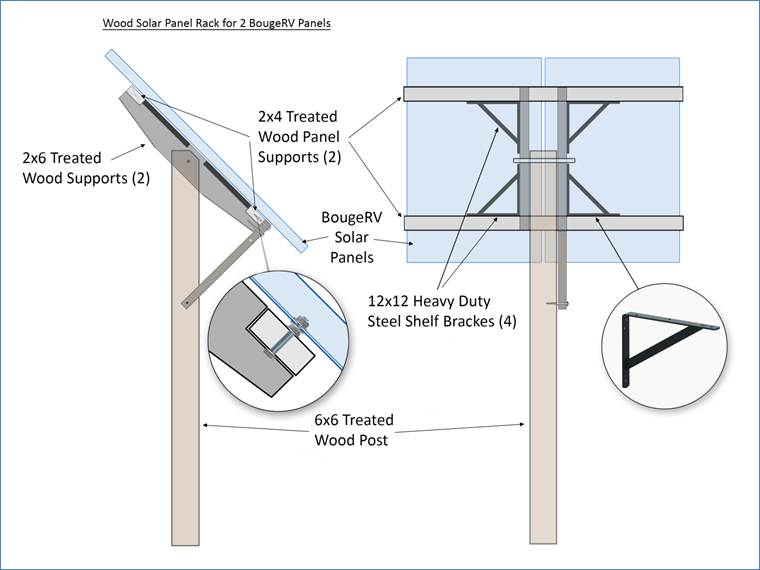
Wooden Solar Panel Rack for 2 BougeRV Panels
This rack was designed to fit two BougeRV 200 Watt, 24 Volt solar panels but
could easily be constructed to hold one larger panel or a couple of panels
roughly the size of the BougeRV’s. I have included a materials list that will
build one, two-panel rack that can be seasonally adjusted from 45° to vertical.
I’d recommend buying materials for and constructing one rack initially to be
sure it looks and works as you’d like.
There are several options regarding tools needed but here is a list to get
you started: Circular Saw, Power Drill, 5/8” Spade drill bit, Hacksaw,
Measuring tape, Sharpie marker, Carpenter’s level, Reciprocating (jig) saw or
sharp hand saw.
A cordless drill/driver with a T25 Star drive bit would be handy to drive the
deck screws that hold the rack together; a corded drill would also work. In most
soils a post hole digger will make the cleanest hole but use what you have and
need to.
The circular saw will be used to cut all of the 2x6 and 2x4 lumber to length,
to make some rip cuts in the framing 2x6’s, and to bevel the top (south) edge of
the post.
Tools you may not have:
☐ T-25 Star Drive Bits
6”
Materials Per 2-Panel Rack:
Wood:
☐ 6 x 6 x
8’ CedarTone Treated Post
☐ 2 x 6 x
8’ CedarTone Treated Board
☐ 2 x 4 x
12’ CedarTone Treated Board
Hardware:
☐ #9 x
3-1/2” Star Drive Coated Deck Screws - 1 lb. (55)
☐ #8 x
1-5/8” Star Drive Coated Deck Screws -1 lb. (145)
☐ 12”
Heavy Duty Shelf Brackets - 4-Pack
☐ 5” Strap
Hinge
Pivot Hardware
☐
5/8”-11 x 36” Hot Dipped Threaded Rod *
☐ 5/8”-11
Hot Dipped Galvanized Hex Nuts **
☐ 5/8” Hot
Dipped Galvanized Flat Washers ***
☐ 5/8” Grip
Fast 5/8” Zink Split Lock Washers**
Panel Mounting Hardware
☐
5/16” x 2-1/2” Grip Fast Stainless Steel Hex Bolts ***
☐ 5/16”
Stainless Steel Lock Washers ***
☐ 5/16”
Stainless Steel Flat Washers *****
☐ 5/16”
Stainless Steel 18-8 Hex Nut ****
* 12” needed per rack
** 2 needed per rack
*** 4 needed per panel, 8 per rack
**** 8 needed per panel, 16 per rack
***** 16 needed per panel, 32 needed per rack
- Specially treated deck screws and galvanized or stainless steel hardware are
needed when in contact with treated wood to prevent corrosion.
Preparation:
☐ You can use a
compass to establish where true south is but depending on your site you may want
to aim your array toward the center of the widest solar exposure. Begin by
laying out and marking the locations of all of your racks on the array site.
They will be spaced 5’-6” apart. (The panels are 30-¼” wide, x 2 panels = 60-½”
+ 1” extension on each end + 3-½” rack separation = center-to-center hole
spacing of 66” (5’-6”)).
Post Preparation:
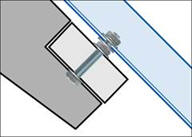
☐ Drilling Pivot H
Step by
Step Instructions:
ole: Measure down 2-¾” from the top of the 6x6 post
and draw lines around the post. Mark the center of what will be the east and
west sides. Use a 5/8” spade bit to drill, as perpendicular as possible, a
little over half way from each side. The holes should meet in the middle. If not
quite, use the drill to make it so. Test to be sure that the pivot rod will fit
through - a tight fit is OK.
☐
Set your saw for a 45° bevel and cut off what will be the south edge of the top
of the post. This ensures clearance for the panels and wiring when adjusting the
seasonal tilt.
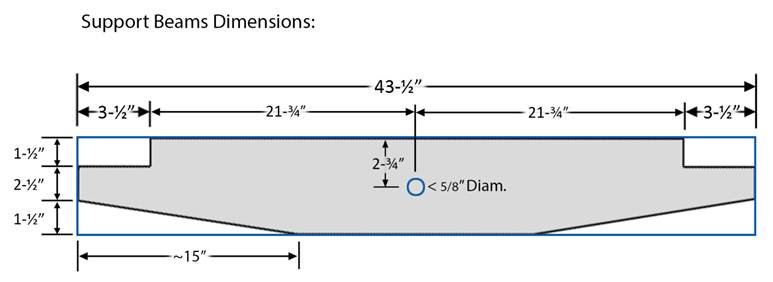
Support Beams:
☐ Support Beams:
Cut two support beams from 2x6 as shown below. You will probably want to use a
reciprocating (jig) saw for those upper cutouts but a hand saw would work too.
Those lower cutouts are mostly for looks but will also lighten the frame. The
15” dimension is totally up to what you’d prefer visually.
☐
Once they are cut to shape clamp the two pieces together to drill the pivot
hole, drawing a line all the way around as you did on the post. Perpendicular is
pretty important. Of course, if you have access to a drill press that would make
this a lot easier.
☐
Horizontal Panel Supports: Cut two 2x4 panel supports 62½” long.
These steps are best done on a flat smooth surface such as a cement garage floor
or even a sheet of plywood laid on flat ground. Here’s what we’re after:
☐ Insert the pivot
rod in the beam with equal amounts sticking out on each side.
☐ Place the beam
with the pivot rod inserted on the flat surface.
☐
Slide a flat washer on each end of the pivot rod.
☐ Slide a support
beam onto each side of the beam with the end notches up.
☐ Add a flat washer,
lock washer and nut to each side and tighten moderately. Confirm that the top
and bottom ends of the support beams are spaced equally.
☐ Center the panel
support 2x4’s across the ends of the support beams.
☐ Confirm that the
diagonals are equal: 
☐ Drill two 1/8”
pilot holes through the panel supports at each joint and drill a shallow
countersink - not too deep as the treated wood is pretty soft. Then secure the
support beams with 2 of the longer deck screws at each joint.
☐ Mount the shelf
brackets in each inside corner using the shorter deck screws.
Panel Mounting Bolts:
☐ The easiest and most
accurate way to locate the position of the panels is to set the completed rack
up on a sawhorse, lightly clamp the solar panels in place, and reach up under
the panels and trace the hole locations onto the panel supports. This requires a
short, sawn-off pencil or other similar marker.
☐ Drill a 5/16” hole at each panel mount bolt
location.
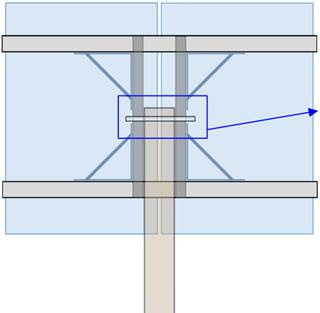
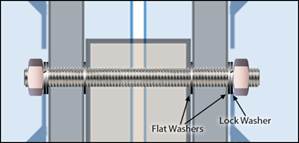
☐ Refer to this drawing for the panel mounting
bolt installation.
☐ Insert a 5/16” x
2½” bolt with a flat washer from the back then add a flat washer and nut. Once
all eight bolts are in place confirm that the panels fit OK. If so, set the
panels aside for now and you are ready to get the rack in the ground!
Setting the Post:
A hole 30” deep will place the bottom edges of the solar panels about 3’
from ground level. It will probably be easiest if you secure the pivoting rack
unit to the post so it doesn’t move around or get in the way of the next steps.
☐ It is admittedly a
little tricky to get multiple panels set so they are lined up and their tops are
even. For a 10-panel, 5-rack array I’d start at the middle rack location. Use a
post hole digger (or whatever you have) to dig a slightly oversized hole, maybe
10” in diameter, centered on your previously marked spot. If the site is sloped
east/west I would dig this first hole slightly shallower than 30”. (If there is
a 6” total slope between the end racks, you would make that center hole 3”
shallower). If you’d rather have the array follow the contour of the site
(easier!) just ignore all this and dig all holes 30” deep.
☐ Tamp the bottom of
the hole with something like a 2” hardwood pole, place a thin, flat rock in the
bottom of the hole and tamp again.
☐ Position and plumb
the post, then firmly tamp in multiple layers of crushed stone. It is especially
important to get the bottom of the post set in solid. A small batch of Redi-Mix
wouldn’t be a bad idea. This is a good job for two people; one keeping the post
in position, and using a level, plumb in both directions while the other puts in
a shovel full of stone and tamps - over and over until you reach the top of the
hole.
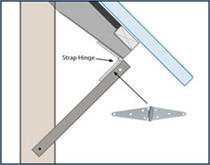
☐ In the main
drawing I show a 2x2 tilt support bolted to the bottom of one of the support
frames and this would work but it will stick out behind the rack when it is
tilted to its vertical position. A nice alternative might be to use a strap
hinge to mount that support instead of lag bolts. The hinge I have spec’d is
zinc plated so you will want to isolate the metal from the treated lumber with a
couple of layers of outdoor rated duct tape and use stainless steel screws to
mount it. A stainless hinge would be OK but quite expensive.
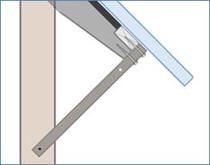
☐ Use a level to
establish a 45° tilt and install the tilt support. There will be one hole at the
bottom of the support for ‘summer’ angle and another near the hinge to secure
the rack in its vertical ‘winter’ position. A 5/16” lag bolt goes through one of
those holes into the post.
☐ Finally, you can
now carefully mount the solar panels. Place a flat washer on teach of the
protruding bolts, set the panel in place and then secure it with yet another
flat washer, a lock washer and nut. Tighten the nuts securely.
Congratulations! Your first new solar rack is ready to be wired and put in
service!
June, 2026
Support Email: steve@manytracks.com