|
The Plan:
-
March 25, 2018
The plan is to make the sailing modifications first and then build the cabin.
The cabin's location in the aft end of the boat will especially effect
how the rudder is controlled. Looking at the conversion for sailing,
item by item, here are some of the details. By the way, this is all my
way of 'thinking out loud', so to speak. My way of putting my thoughts
in order so I can be fairly efficient when actually working out in the
shop.
I'll be updating this page as the design process unfolds.
RUDDER/SKEG:
Rudder hardware was ordered from Duckworks early so I will have the
gudgeons and pintles in hand when doing the final design work for the
rudder. Here is my preliminary design for a kick-up rudder based upon
work done by Paul Riccelli at Riccelli Yacht Design.
I have chosen to build a laminated plywood skeg for the kick-up rudder
to fasten to. Primary support will be two pairs of 1-3/4" x 1/4" rigid
fiberglass straps that fasten the skeg to the stem.
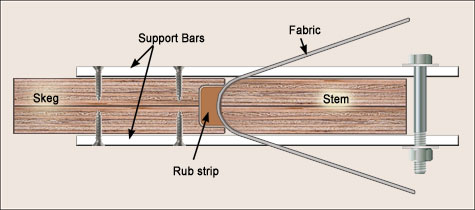
The forward edge of the skeg is routed to fit snugly around the stern
rub strip. The support bars will pass through slits in the skin (cut &
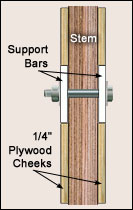
shaped with a hot knife) and will be bolted together as shown. I plan on
gluing 1/4" plywood 'cheeks' to the stem above and below the support
bars to help keep them in place. The reason for this system is that this
is a very tight area with no opportunity to screw or bolt the supports
directly to the stem without making many holes in the skin.
The
rudder will be made up from two pieces; the upper, rudderhead, will
be
attached to the skeg with stainless steel gudgeons & pintles, and the
lower part attached to the upper by a 3/8" pivot bolt. The cheeks of the
upper piece are to be lined with HDPE to reduce friction.
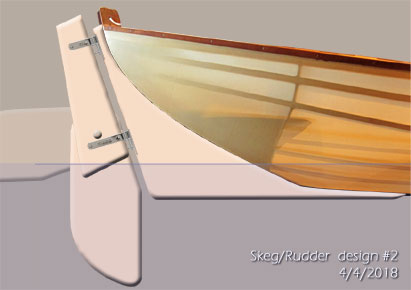
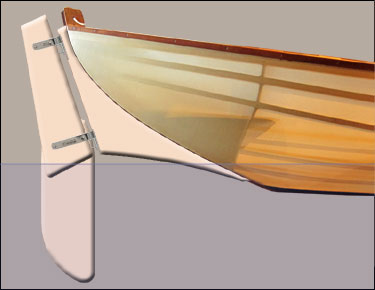
Design #2 - April 4, 2018
Design #1
I liked the looks and smaller size of design #1 but remembered that it
might be nice to have a functional skeg even when not sailing. Design #2
does that and also would be stronger since I can put a couple of SS
screws up into the keel at the forward end of the skeg. With the rudder
removed while rowing the skeg will give some directional control,
hopefully helping when rowing on windy days. It is also possible that I
may want the rudder installed on those days if the skeg doesn't function
as I hope. In that case it might be nice to add foot controls for the
rudder.
Speaking of controlling the rudder, the plan is to install a small,
maybe 5" radius quadrant atop the rudder head and have stainless steel
cables lead forward along the outside edges of the cabin leading to the
mid-ship tiller. The tiller will be mounted below the thwart and hinged
and/or removable for times when it's not needed.
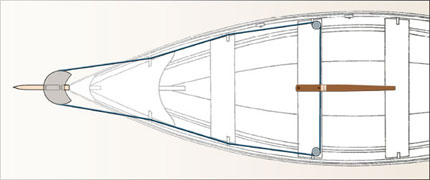
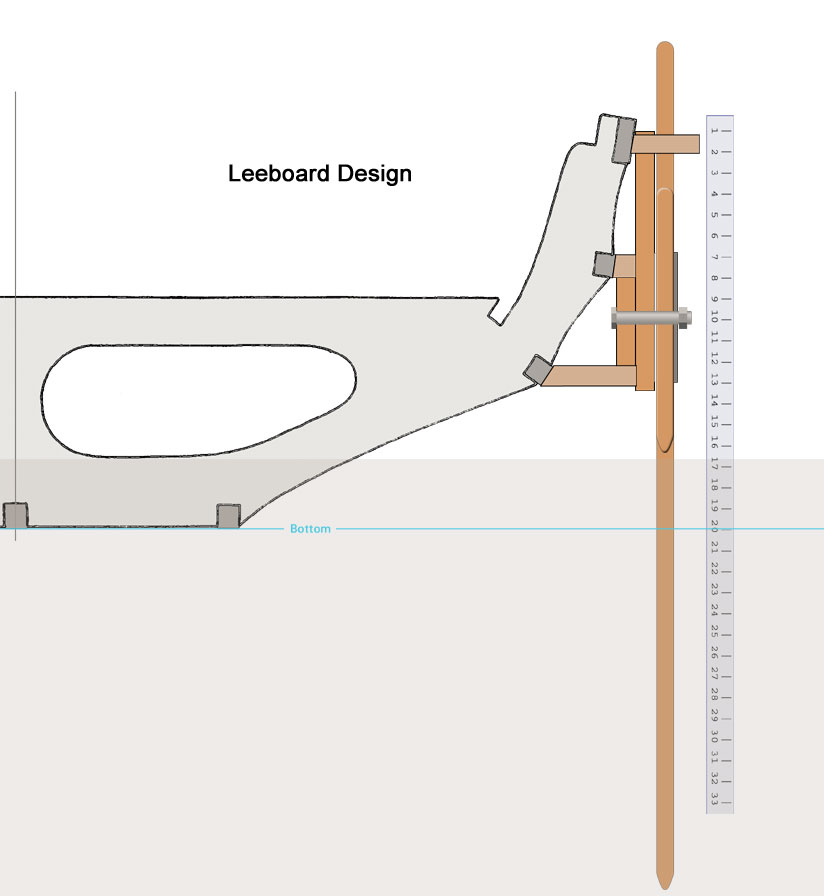
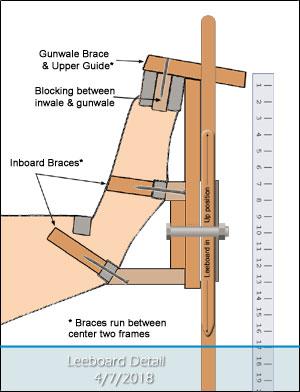
LEEBOARD:
I've been in contact with Dave Gentry who designed our skin-on-frame
dory regarding this series of modifications and generally he's OK with
them but suggested that a daggerboard might be better than a leeboard
for this boat, and he may be right. I believe his concern is based upon
the lack of framing to support the stresses imposed by a leeboard, which
can be pretty strong.
My concern with a daggerboard is having a hole in the bottom of the boat
and that daggerboards can't kick up when they
strike something like a submerged log or rock ledge. The force of that
sort of impact would have to be absorbed by the daggerboard trunk and
ultimately by the framing of the boat.
So my solution to this dilemma is to mock up a leeboard support
structure and see how it feels when applying lateral forces to it. If it
feels OK, that is, if the framing of the boat appears to be able to
handle the loads, I'll go ahead and build the real thing. If not, I will
switch gears and design a daggerboard trunk with some sort if passive
shock absorber.
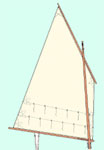
SAIL:
I ordered a sail kit from Dave Gray at
PolySail International. After reading
many reviews and recommendations I decided to make the sail from
polytarp material; but not the cheap, flimsy, ugly blue tarps from the
hardware store. Dave Gray has done his homework and sourced some nice
low-cost, high performance poly laminate white tarp material and
assembled several sized kits for making your own sail.
I purchased the 'Medium PolySail Essentials Only Kit' that includes a
12' x 16' white tarp, double-faced tape and rope for around the edges of
the sail and a brass grommet setting kit with 24 grommets. Sue and I
will be sewing all seams with heavy white polyester thread.
The sail design is a 76 sq. ft. balanced lug with two reef points. We
added a walking foot attachment to our venerable Husqvarna/Viking
Emerald 116 sewing machine since the material is so thin and smooth.
MAST & RIGGING: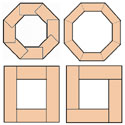
With a basically tippy boat like this it is important to keep the weight
aloft as low as possible so I'd like to make a hollow wood mast with the
yard and boom being solid wood. There are several ways to make a hollow
mast; birdsmouth, coopered or box-section. The mast will be tapered so
that complicates it a bit. I'm waffeling - but like the idea of a
coopered mast ( top right) because it uses so much less clear wood and
has the potential to be very light. I'll have to do some research to see
if there is an easy way to make a tapered coopered mast. On the other
hand, a solid mast that is properly shaped can be stronger. What to do?
Latest News!
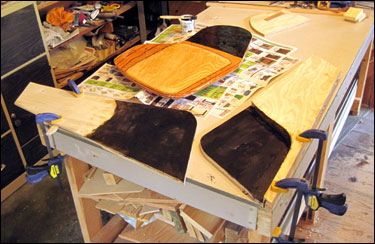
May 19, 2018 - Skeg & Rudder
The weather is cooperating and we now only need to heat the shop when
expecting epoxy to cure. I am now working on the finishing up coating
the bearing surfaces of the swing-up rudder with epoxy filled with
graphite powder. The idea is to reduce friction between the rudder blade
and the cheeks of the rudder head. Prior to this step I bored a 3/4"
pivot hole hole through the pieces and in the photo below have filled
those holes with graphite and silica thickened epoxy. When it has cured
I will re-drill 1/2" holes through the centers for the 1/2" x 2-1/2"
stainless steel pivot bolt.
|


 I re-framed the east wall, adding a new header and using some large gate
hinges, turned that wall into a big bi-fold door. The opening width is
about 60”. It takes less than a minute to release the sliding bolt that
keeps the wall in place and gently push the door open.
I re-framed the east wall, adding a new header and using some large gate
hinges, turned that wall into a big bi-fold door. The opening width is
about 60”. It takes less than a minute to release the sliding bolt that
keeps the wall in place and gently push the door open.
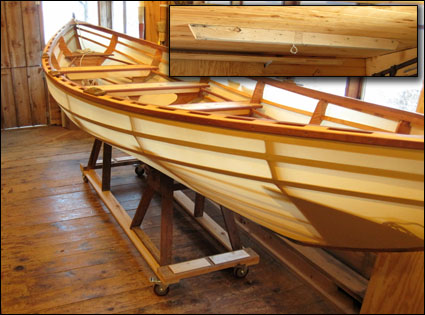 dolly for use in the shop. Even with the expansion I made to the shop it
is still pretty small (clear space is about 22' x 7') for working on a
boat this size (18'- 3" x 54"). The kayaks at 14 -15 feet long and quite
narrow worked fine but there is an immovable post in the middle of the
shop that gets in the way at times.
dolly for use in the shop. Even with the expansion I made to the shop it
is still pretty small (clear space is about 22' x 7') for working on a
boat this size (18'- 3" x 54"). The kayaks at 14 -15 feet long and quite
narrow worked fine but there is an immovable post in the middle of the
shop that gets in the way at times.