
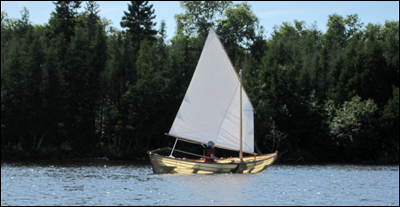
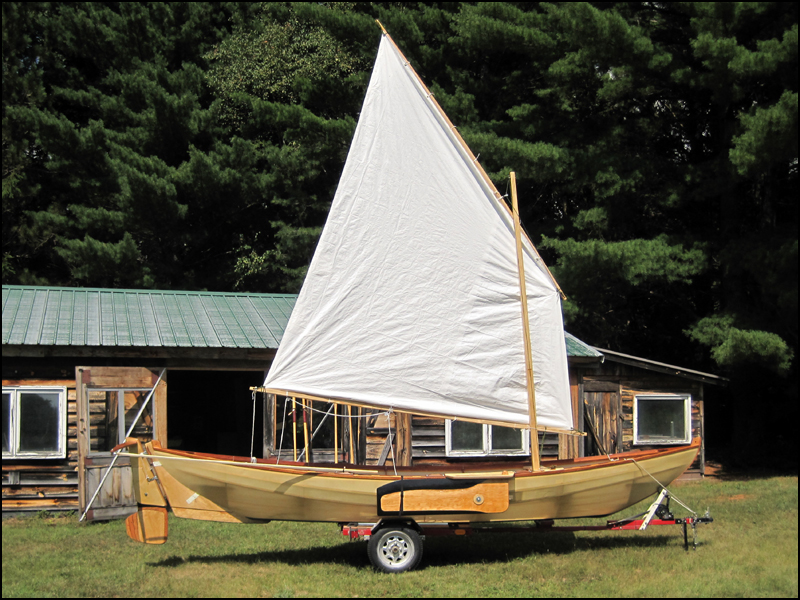
The purpose of this page is to document the addition of a sailing rig to our
skin-on-frame dory. We have rowed this boat for a few years and it rows nicely
with 7-1/2' and 8' oars. My original plan related to the sailing
conversion was to also add a small aft cabin. I have chosen to get the boat
sailing well first, before deciding whether a cabin is appropriate for the boat
and our use of the boat. My wife Sue likes to paddle her SOF kayak but so far
has shown little interest in sailing so I expect that most sailing will be done
solo. We launch together, each going our own way but keeping in contact via
walkie-talkie.
So here we go with the individual components in about the order they
were built.
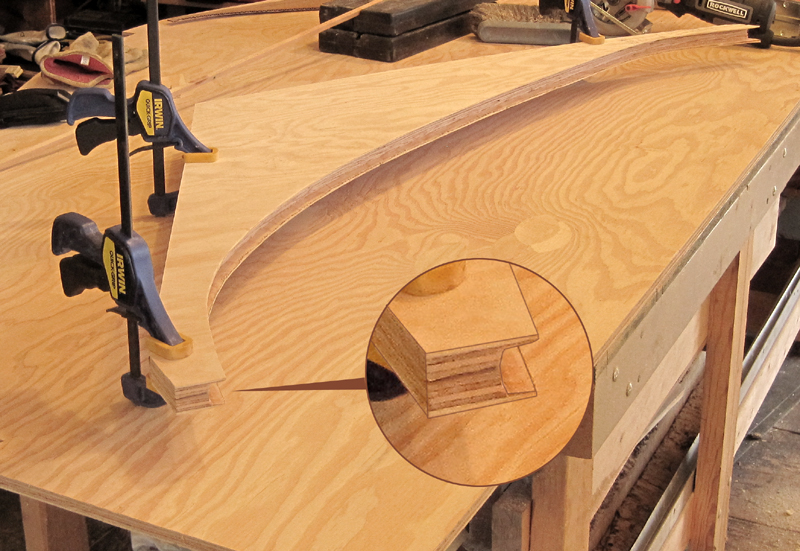
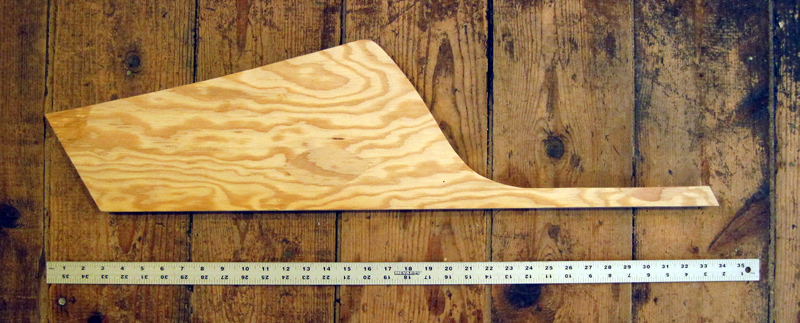
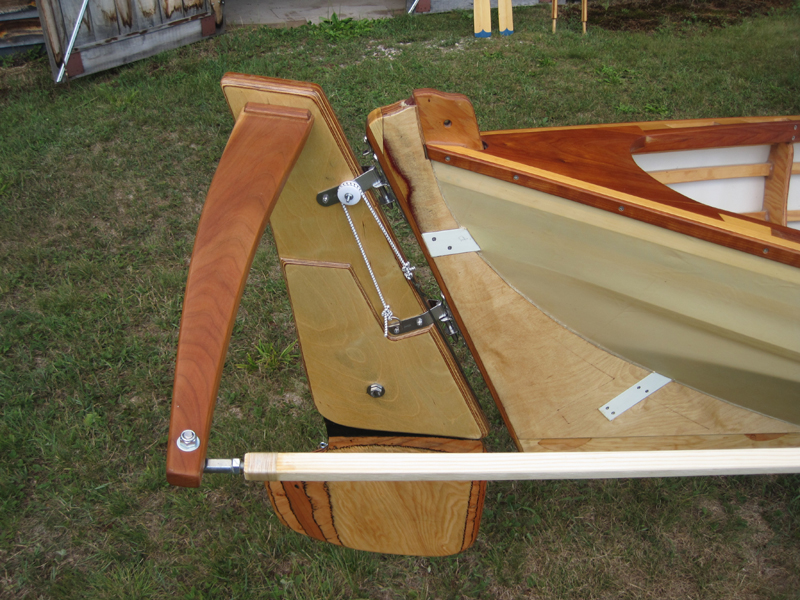
SKEG:
The first step was to design a skeg on which to mount the rudder. A little
research turned up that the the maximum angle for the aft edge of the skeg
should be about 15 degrees from vertical. Less of an angle would be better but
15 degrees looks good to me so that's what I went with. The forward edge of the
skeg is attached to the aft stem by snuggly fitting over the existing cherry rub
strip. In the photo below you can see the edge profile of the skeg.
 Click any image to enlarge
 Cutting holes in the skin w/hot knife
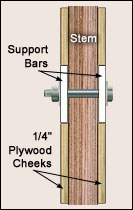
The body of the skeg is made up from 2 layers of 1/2" fir marine
plywood. All but the underwater surface has 1/4" Baltic birch
plywood glued to it on each side. This layer has three jobs to do; (1)
backs up the
'flange' that goes on either side of the rub strip, (2) provides a lot
of reinforcement for the support bars and (3) gives the skeg enough
thickness to accept the rudder hardware. I used Racelite's Weekender
Vertical Gudgeons with Racelite Medium Duty Pintles, both from
Duckworks.
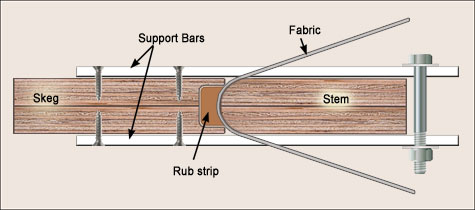
The support bars are 1-1/2" x 1/4" fiberglass boat cover support bows.
Very strong and easy to work with. Below you can see how they are
fastened with two 3/16" SS machine screws with nylon insert lock nuts.
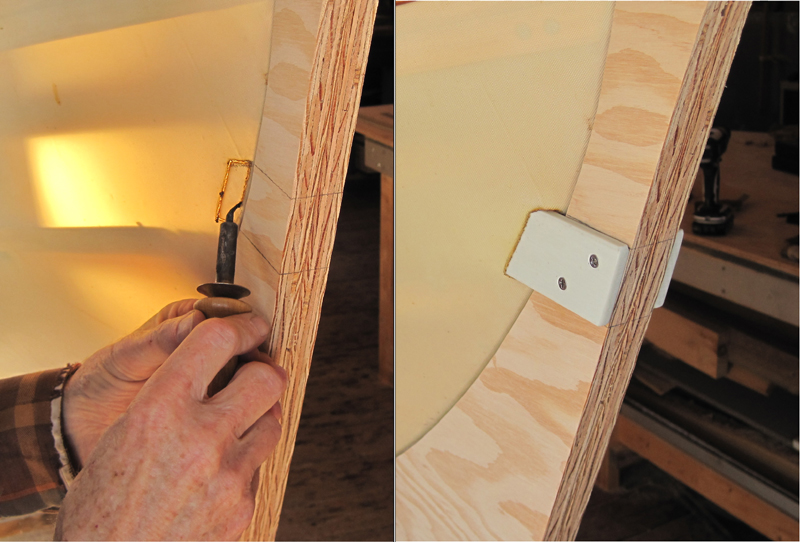
Once the skeg was coated in epoxy and varnished I attached it with PL
Premium construction adhesive along the entire joint and with two 2" SS
screws up through forward end of the skeg into the keel. The small
openings in the skin around the support bars were sealed with thickened WEST G-Flex
epoxy.
![]()
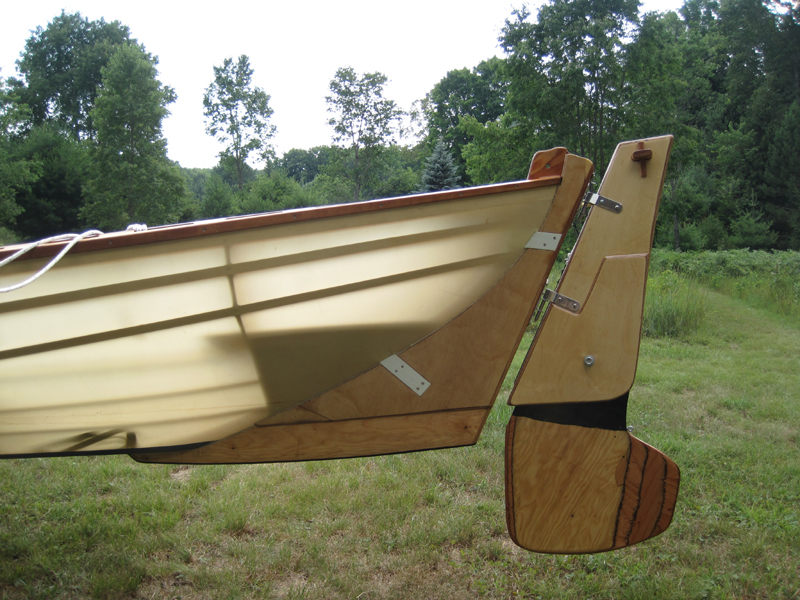
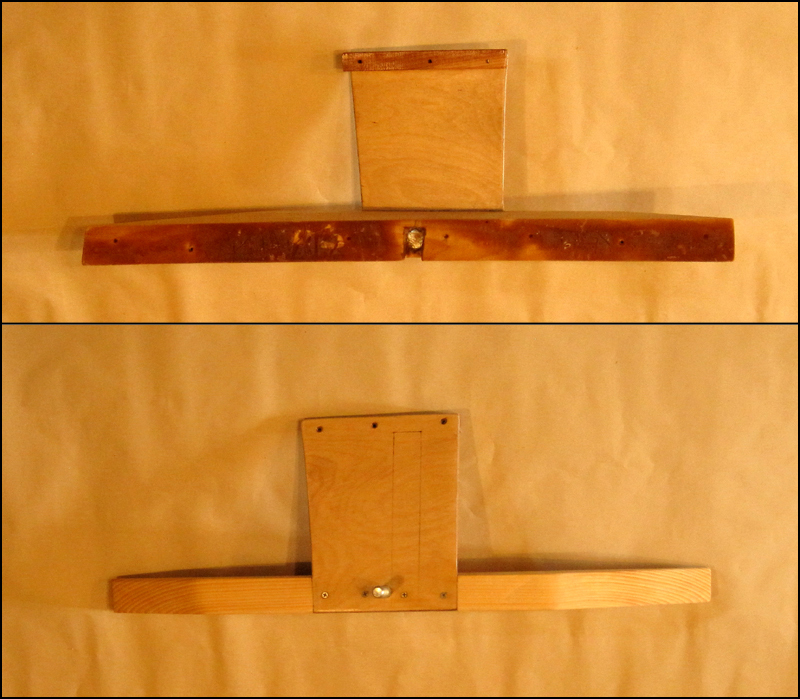
RUDDER:
The rudder assembly is pretty heavy duty. The blade is made from two
1/2" layers of marine fir plywood bonded with thickened epoxy and shaped to a foil shape
provided by Michael Storer in his OZ Racer plans. The odd shape is my
own design. It seems to be very effective. For example when rowing with
the rudder down you can maintain a pretty straight track using just one
oar. You definitely need to swing the rudder to make a turn when rowing
with it down.
The rudder head body is also made from 1/2" plywood with ...
cheeks from 1/4" Baltic birch plywood. By the way, I love this stuff. It
is the only thin plywood I can get locally that is actually flat, has no
voids and is made with waterproof glue. I have soak and boil tested this
material with no ill effects at all. A little heavy maybe but it works
and finishes well.

The blade pivots on a 1/2" SS bolt and is equipped with fastening
locations for both pull up and hold down lines. I'm not crazy about my
current rudder management system so may go with Jim Michalak's
suggestion and add some lead to the lower aft edge of the blade to
help keep it down. Jim's formulas say I'd need about 6 lb. of lead
added to the lower aft area of the blade. I'm still thinking on this
because I'd rather not make the rudder any heavier.
![]()
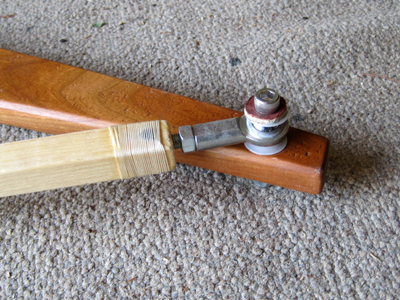
TILLER:
The tiller is still a work in progress. For the time being I am
using a push-pull tiller with a 22" cross beam attached to an 8' 1"x1"
pine shaft. The two are joined by a 5/16" SS Heim joint and that part of
the unit is working fine. At this point I have only been out
sailing a few times but I have to say that this tiller does not seem as
intuitive as a conventional tiller - yet. Time will tell if I continue with it or
possibly switch to a yoke with ropes.
 < You can see my hold-down system

![]()
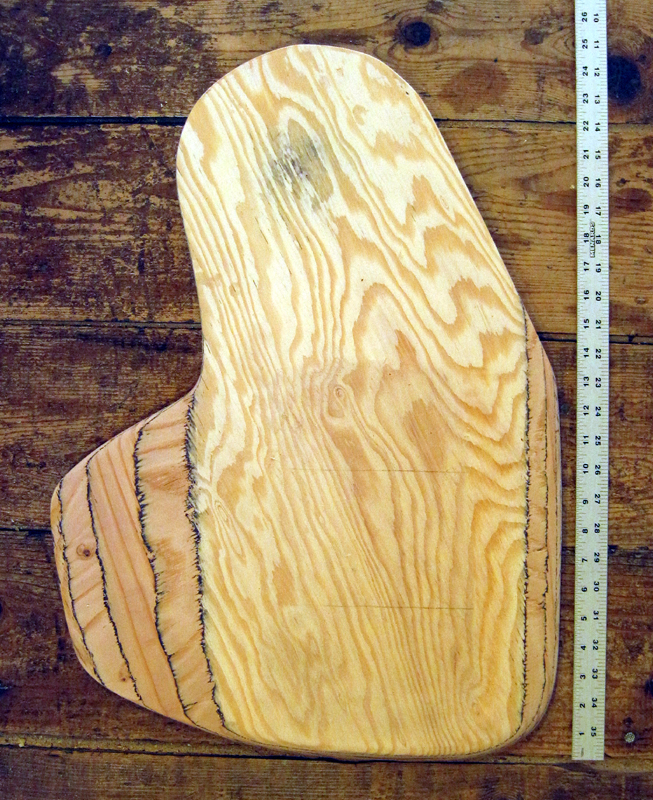
LEEBOARD:
The leeboard is 48" x 13" x 1" thick (two layers of 1/2"
plywood). The bottom 30" or so are immersed. Like the rudder it was shaped with a power plane, belt sander
and long-board using a version of Michael Storer's foil template. The
design is completely from Jim Michalak's book. The only deviation from
Jim's plan is that he would have the board mounted at the widest part of
the boat but the position on my boat was driven by the mast (and
therefore, sail) location.
I decided that I wanted the mast just aft of
the front thwart with a rake aligned to be perpendicular to the gunwale
at that point. The center of effort of my sail is about 28" aft of the
center of the mast. I positioned the leeboard so that the Center of
effort is lined up with a point 1/3 of the way back from the front edge
of the leeboard. The leeboard pivot is 15" (~7%) forward of the center of the
sheer. From a practical point, positioning the leeboard where it is
leaves all three row-locks in their original, correct position and
completely functional. Also, the board is centered on a bulkhead, a
pretty strong location. One reason I thought I might get away with this is that because
of the rounded hull shape the board enters the water quite a way from
the hull. Yes, a bunch of research and messing around to come up with that
position but so far it seems to have worked OK.

I coated both the leading and trailing edges as well as the tip with two
additional coats of epoxy heavily laced with graphite powder. So far it
has held up very well.
The upper leeboard bracket is fastened through the openings in the
starboard gunwale by seven 1/4" carriage bolts. I fashioned backer
plates for through and under the gunwale to spread the leeboard load out
as much as possible on either side of one of the central frames.
The lower bracket is fastened through the skin into two filler blocks
epoxied between the two stringers. They are also epoxied, with large
gussets, to that central frame. Six long deck screws go through the
blocks, through the skin and into the lower leeboard bracket.
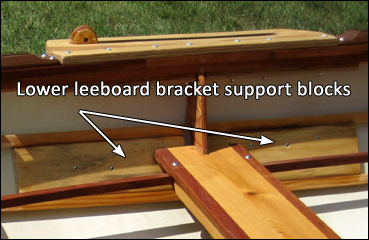
There is a 1/2" SS bolt epoxied in place through the lower bracket. I
mounted an 8" x 1/8" HDPE disk between the lower bracket and the
leeboard and wood disk and a couple of large SS washers on the outside.
The pivot tension can be adjusted with a nylon-filled locknut. I
currently have the board tensioned so it will pretty much stay where you
put it. When it swings up from hitting bottom I either leave it alone or
if the water is getting deeper will pull it back down with a line that
runs from the top of the board to a point along the starboard
gunwale. The flat piece in the photo connects the outer edge of the
bracket to a spot just under the rub rail on the gunwale and adds a lot
of stability to the unit.

![]()
MAST:
The 11' tall square 'hollow' mast is made from 5/8" clear New
Zeeland pine. The lower 32" is 2-3/4" square and from there
upward it tapers to about
1-3/4". I filled the lower end (northern white cedar) and inserted
several filler blocks and filled the top 12" or so. The filler pieces
are shaped to avoid any hard points along the length of the mast. That
funny shape is easily made by cutting two 'V' shapes on the band saw.
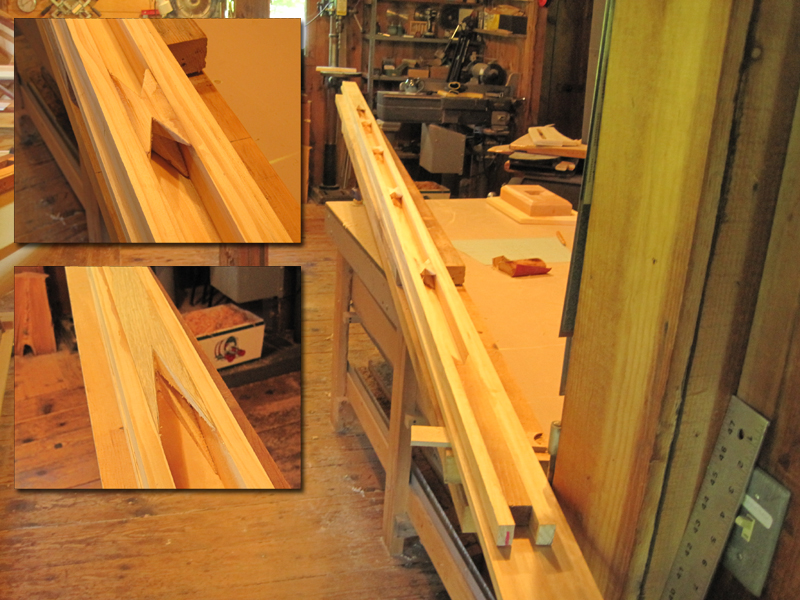
I rounded the corners with 3/8" and 1/2" radius round-over router bits
then coated the end grain with a couple of coats of epoxy before
varnishing. There is a 7/16" ID Ronstan fairlead bolted through at the
top of the mast. I'm finding there is a lot of friction there making
raising the sail, especially on the water, quite a chore so will add a
single block up there in the near future. The mast weighs 11 lbs with
its center of gravity about 55" (40%) from its base.
![]()
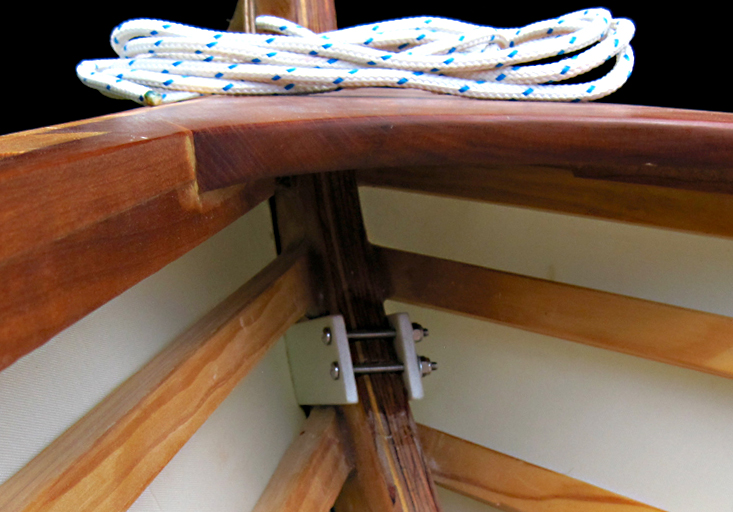
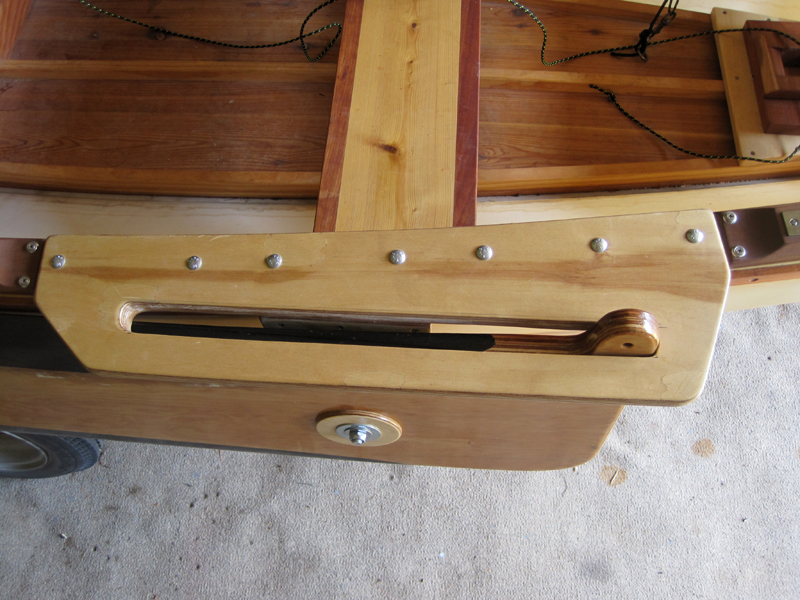
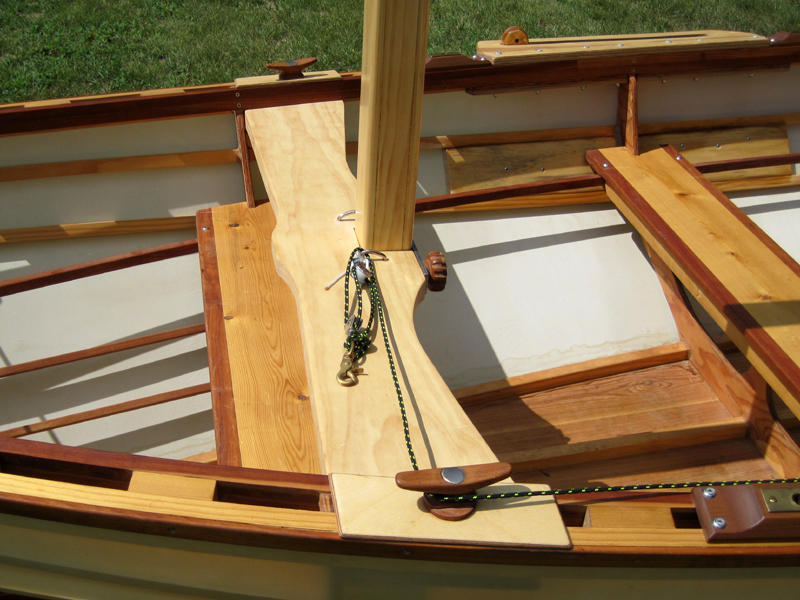
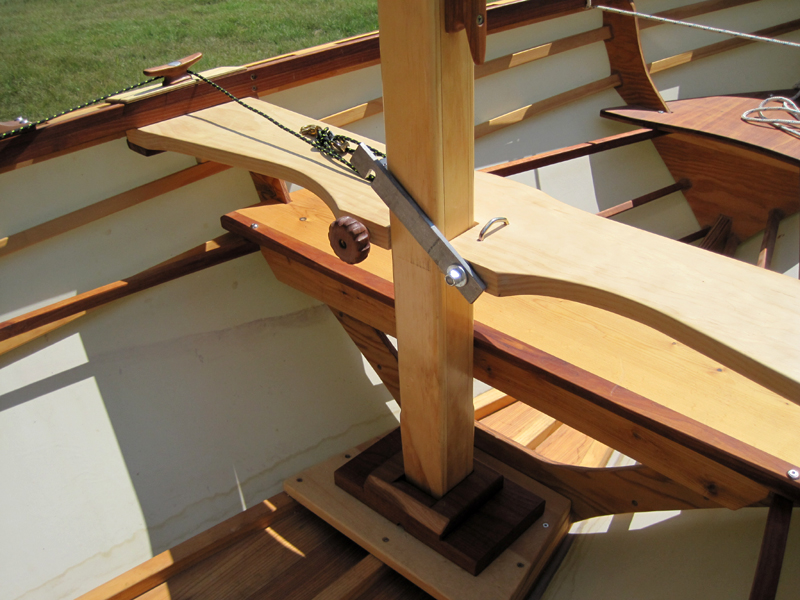
MAST PARTNER:
The mast partner was made from a 5/4" x 8" piece of clear NZ
pine. I shaped it a bit for esthetics and to lighten it a little. A
piece of 3/4" cherry runs across the under side at each end and there is a 3/8" brass
threaded insert in each reinforcement piece.
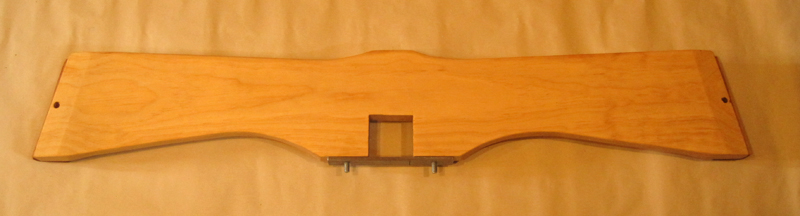
I made up a couple of 4" cherry cleats bored for 3/8" x 3" carriage
bolts which were slightly counter-bored then epoxied in place. The bolt
heads were pretty ugly so I ground them off flush with the tops of the
cleats - they look better and don't interfere with the lines on the
cleats.
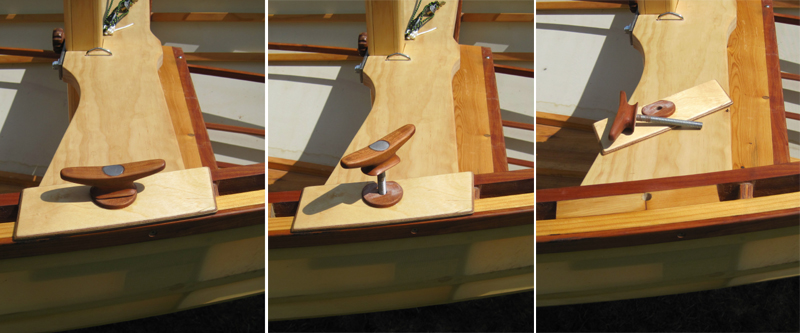 Partner securing system
The whole point of these things is to easily, with no tools, fasten the
partner securely to the gunwales. I made up a couple of bearing plates
to spread out the load and topped them off with a couple of tapered
cherry disks so the bottoms of the cleats don't bind when tightening
them down. I use the port cleat to guide the downhaul line back to
another cherry cleat bolted to the inside of the gunwale.
I used a 1-1/4" x 1/4" thick steel bar to hold the mast to the partner.
Starboard end is bored and pivots on a 3/8" embedded bolt; the other end
is notched so it can swing down and be held in place by a turned cherry
knob fitted with a brass threaded insert. Very snug and secure.
![]()
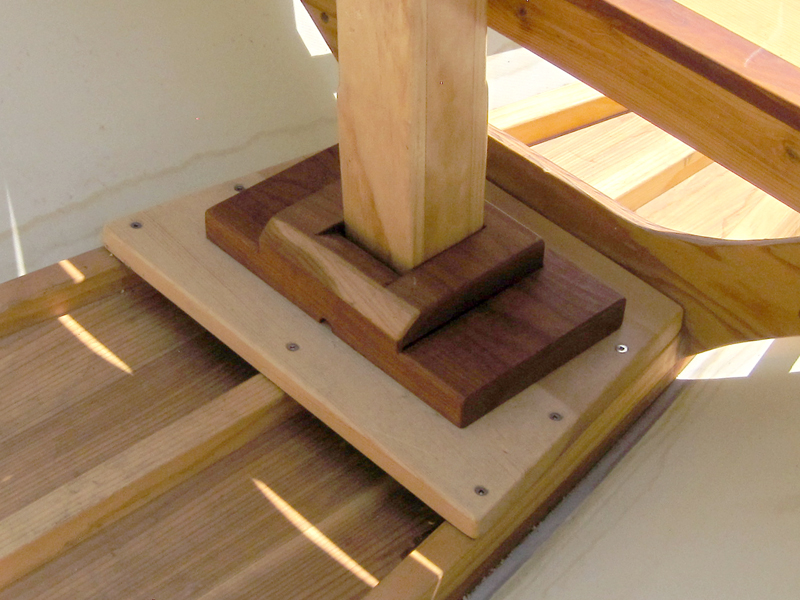
MAST STEP:
The base of the mast step is a pine 1 x 12 shaped to fit up
against the forward frame. There are cleats underneath that hold it
securely in position and it is screwed to the keel and floor stringers.
The upper part of the step was made from a 2-1/2" thick cherry block cut
down and shaped to lighten it up a little and make it somewhat less of a
stumbling hazard.
![]()
SAIL & SPARS:
The sail was made from one of Dave Gray's PolySail kits;
'Medium PolySail Essentials Only Kit' that includes a 12' x 16' white
tarp, double-faced tape and rope for around the edges of the sail and a
brass grommet setting kit with 24 grommets ($100 delivered). The 76 sq.
ft. balanced lug sail design is by Jim Michalak as modified slightly by
the
Toledo Community Boathouse.
 Sail shape & tarp seam
I liked their step-by-step presentation on how and why the sail is
shaped the way it is. We followed those instructions very closely. We
moved a little furniture in the living room and laid out the shape of
the sail, cut to the lines and taped it up then Sue went to work sewing
it together. The process took longer than expected but the sail looks OK
and seems to work well. I'm not crazy about that seam in the tarp but
the sail seems to smooth out once filled in a good wind.
The boom and yard are both 11' long and laminated from 3/4" clear NZ
pine. They started out at 1-1/2" square. In his OZ Racer plans Michael
Storer has very detailed diagrams on how the spars should be tapered for
proper bending while under sail. I spent a couple of hours converting
his measurements from metric and then scaling them to my spar lengths
then when out in the shop decided that in real life I'd be just as well
off getting somewhat close to his spar shapes. The boom is pretty stiff
with just a little taper (in the vertical plane) at the forward end and
a bit more at the aft end. The yard has significant tapering with the
thickest area about 1/3 of the way back from the forward end. Both spars
were rounded with a 3/8" router bit and there is a 1/2" hole in each
end. I wrapped nylon cord around the ends to ensure that the ends don't
split and then epoxied over the cord and up about a foot. A few coats of
varnish and they were ready to go. The whole package of spars and sail
weighs about 14 lbs.
Notes:
As this is written, August 10, 2018, I have only had the boat
out sailing a few times so I'm still refining a few things but unless there is
some major structural failure I don't expect the components shown
above to be changed much though I am certainly open to suggestions for
improvements! It has been quite a while since my admittedly
limited sailing experience (owning a Hobie 16 forty-five years ago does
not make one a sailor) so I'm really learning to sail as well as testing
out the sailing rig.
The most recent outing was in a brisk breeze, 5 - 10 mph with higher
gusts according to NOAA. Finally got to get a feel of the boat
moving through the water. My overall impressions from this recent trip
was that the boat is more stable as a sailing boat than while rowing and
that it is quite forgiving of my learning mode experiments. I found out
that: Tacks slowly with rudder still pulled up (pilot error), better with rudder lowered
but I still need to refine my technique. When sailing towards the beach
in increasingly shallower water the leeboard pivots up smoothly and the
boat still sails pretty well - better than I thought it would.
More sailing reports later. Here in the Upper Peninsula of Michigan sane
sailing weather usually extends into the first few weeks of October.
Sometimes. I'm looking forward to many more trips out on the water!
Update - Fall of 2018:
We did manage a few more sailing adventures before the cold weather and
fall chores forced an end to the season. Overall I am happy with the
boat just as it is, that is, I'll probably not pursue adding a cabin to
the boat right now. The one modification still on my to do list is to
add a smaller rudder for use when rowing. My experience with the sailing
rudder was that it was very effective at keeping the boat on a track but
I'm pretty sure I can make a smaller, thinner rudder that will create
less drag and still work. I'll probably use rope steering to keep it
simple.
Update - 3/1/2019:
I have made a sliding seat unit that can easily fit in the dory and I'm
looking forward to seeing how well it works with my existing 8' oars
with Gaco locks. The unit is designed to fit right over the thwarts and
clip in place with a couple of simple swivel latches. It was actually
designed to be used in my
new rowboat but can be easily be moved from one boat to the other -
I still seem to be limited to rowing one boat at a time, but I'm working
on it.
Contact:
Steve Schmeck
steve@manytracks.com
www.ManyTracks.com
![]() © Copyright - Steve
Schmeck - 2018
© Copyright - Steve
Schmeck - 2018