![]() ..... TreeBike
..... TreeBike
Steve's Wooden Recumbent Bike #2
May 1, 2000... This bike initially did not turned too cool. Looked great! Rode crummy. Sue did not enjoy riding it because of poor stability, especially in crosswinds. I tracked down the problem: due to my not being picky enough in choosing the wood for the central core of the frame, it has twisted or perhaps was not straight to start with. This created a situation where the front end (headset and pedals) were in one plane and the rear end was tilted in a slightly different plane.
What little riding Sue did last year she rode the old Maxim. I was so disappointed I just stuck it in a corner and didn't think about it again until this Spring. It turned out to take a couple of hours of low-tech repairs and the bike is ridable, just like that! I filed one of the front fork dropouts a little deeper and shimmed the rear triangle until the whole thing lined up. Sue loves it and will hopefully get to put lots of miles on it this Summer.
This page documents the construction process, in detail, of bike #2 of Steve's Recumbent Project. The bike is finally rideable and Sue has put a few miles on it. It has taken a while to complete this bike and it turned out quite a bit different than originally planned (as usual). It has no suspension due to the weight of the original design. Current weight is about 27 lbs. Sue has been riding a 44 lb. Maxam Reveille recumbent so you can imagine how much faster she is now. In fact I can barely keep up with her new-found sprints. We're talking total weight with rider of 127 lbs. compared with 'Woody' and I at a total of 188 lbs. Below I've presented some close-ups, construction details and dimensions.
Specifications...
Wheelbase . . . . . . . . . .64"
Length overall . . . . . . . .80"
Seat height . . . . . . . . . . 20"
Height at seat back . . . .37"
Weight . . . . . . . . . . . . .27 lbs.
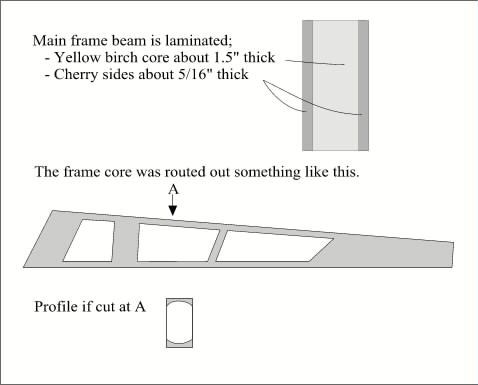
Frame material: Yellow Birch/Black Cherry Box frame with chromemoly
steel rear triangle
Components: Shimano Alivio Rapid Fire shifters & rear hub w/11-32
cassette, 32-45-56T chainwheels
Construction Notes...
One of the most asked questions on Woody was "How did you decide on frame dimensions?" Here are the steps I used on this bike:
........1. I set up
our old Maxim to fit Sue. That is, the seat was adjusted until she found
a comfortable extension with her knee just slightly bent at the point
which the pedal was farthest away. This step could also be done, as it
was with Woody, by setting up a couple of planks, clamping on an old
crank . . .![]() and
taking the measurements.
and
taking the measurements.
........2. I then measured the distance from the seat back frame to the pedal axel. In this case it was 42".
........3. On the roughed out plank which was to become the frame core I laid out the headset angle (30 degrees) and set the fork and wheel in position.
![]() .
. . (3/98 Basic Frame Layout)
.
. . (3/98 Basic Frame Layout)
Frame Construction Details...

 Click
to see Seat Detail
