|
| ||
|
Bathing Suit |
ManyTracks Sewing and Knitting
|
|
|
Sewing Tools
How-to ~ Ideas
~ Inspiration A good collection of quality and handy tools can make your sewing projects sing and the sewer hum with joy. |
||
|
Some tools are pricey, some are free, but what counts is if they make you happy to use them. When I finally got serious about replacing old and no longer adequate tools I spent a fair amount of time researching, reading reviews, coming up with my wants, making lists of my choices. It was fun and I learned a lot just reading others experiences with various items. Over time, and thanks to many thoughtful family gifts, and some good timing with sales, my sewing tools were upgraded and I've never looked back. Some are common, some not so. But whether purchased new, refurbished, or gathered from other areas on the homestead, they have made my sewing life easier and more enjoyable. There's a special joy in using a really good tool.
For quite awhile I used a miscellaneous collection of french curves and drawing templates from Steve's college days. They're handy for small work but when I discovered the large Dritz Styling Design Ruler (large french curve) that became my most common pattern drafting tool. I know, it's common and been around but here is an old school sewer who has never watched a TV sewing show, wasn't even aware of any online sewing blogs or sites, had never considered buying a sewing book, and a regular inexpensive school ruler and household yardstick was the only 'drafting tools' you had used. One sewed by sitting down and sewing like you always had. What a leap I took into the future! Which is pretty funny considering how high tech some other parts of our lives are. I would someday like to get a higher quality large french curve with finer and more accurate markings. Meantime the common Dritz does the job.
Possibly less common in the sewing room is a compass and it is really a handy tool. I used various light-weight models from the two drafting kits Steve has and while they did the job you didn't have much of a choice for marking - usually just a pencil lead which was hard to see, and they tended to drift. They weren't made for large projects on heavy paper. Then I realized we had a real nice older compass in the shop that allowed the use of a regular pencil or pen, though Steve had to adjust the holder to use a fine marker which is a bit larger diameter. We share this tool. I've since found a variety of adaptable compasses are available so you should be able to find one to suit you. A quality compass with an easy to work adjustment screw is important. But even more important is a compass that will stay put once adjusted. You don't want to come to the end of having carefully drawn a seam allowance all around your pattern or fabric to find out the compass width had drifted from start to finish.
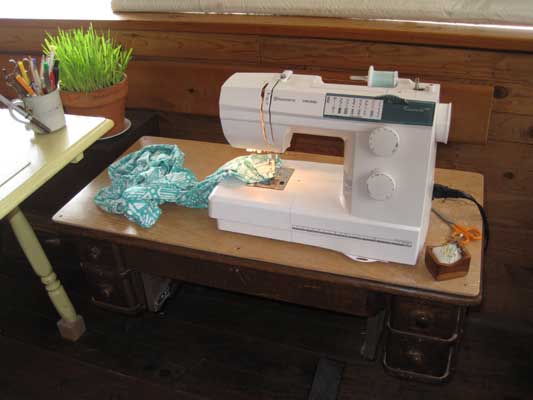
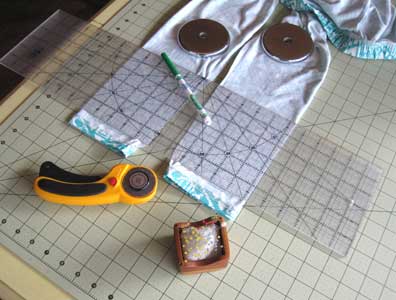
For cutting I use a simple Olfa rotary cutter. I find this easier than scissors since I don't have to move the pattern to cut. This is our 'shop' cutter - not my good sewing rotary cutter, and never the two shall be substituted for the other! Same for scissors. When I'm all done fitting/fussing/finagling my pattern to my satisfaction (after I've made, worn, washed the new article) I recut the pattern out of a new piece of brown paper, also a nice 'tool', making sure to transfer important notes I've made on the original. I often save the old original for a while till I'm sure the new pattern works, in case I need to go back to see what I did where. Then again, if I've fussed overly long I might not as I don't want to be reminded of how long it took me to come up with the final pattern! A final typed page of notes made when making the article completes the pattern, folded, clipped together and stored in a desk tray stack. Cutting - My first, oldest (more than 50 years likely) sewing shears are still in use - in the shop, where they belong. My second oldest, probably 30 years old, are there also and much appreciated as a better quality scissor than one usually finds in a shop setting. And they did great duty to the best of their ability for many, many projects over those many years. That second pair migration came when I received a new pair of Gingher Dressmaking shears for Christmas. Oh my, I didn't know scissors could cut so smoothly! They don't get used often but when they're in my hand I marvel at this well made high quality tool and thoroughly enjoy the experience. It takes fabric cutting to a new level.
For everyday sewing use though the most used scissors is a pair of small Fiskars that this same sister-in-law gave me as a Christmas present almost 40 years ago. I well remember getting them! And the day. Happy memories. These little companions have been by the sewing machine since, snipping miles and miles of thread and little cutting jobs. I expect they'll be around when we're not (as will the above scissors), snipping thread for some new young or old sewer. That's a happy thought. Then there is the rotary cutter. When I embarked on my newest journey of upgrading my sewing skills and tools there was this new-to-me tool that it appeared was everyday common to a very high percentage of sewers. When did that happen? It had simply passed me by. Actually, the tool wasn't unknown to me. Years ago Steve had bought a straight 28mm Olfa Rotary Cutter. I'm not sure where he discovered the tool but he needed something to cut a precise pattern out of leather for a woodworking piece he was working on. It worked good for his use and we both had used it off and on, mostly for leather (much better results than with scissors), using a scrap board underneath, same as we did for cutting something with a knife. But it was a shop tool; I'd never considered it as a sewing tool. I read up on them (there was plenty) and got an Olfa 45mm Deluxe Handle Rotary Cutter and a Fiskars mat for the table. On sale at Joann's it wasn't a big investment but I also wasn't too sure I'd use it. After all, sixty years of using scissors for cutting fabric had served me well. And an accomplished seamstress friend who does a lot more sewing than I do didn't have or use a rotary cutter. But that smaller shop cutter worked great for leather, maybe this one would be OK for fabric. Well, I'm sure anyone who has been using a rotary cutter will find all that pretty funny. I do, too, now. The kitchen table is my sewing area and the large cutting mat is on it almost all the time (we have a separate dining table where we eat mostly - the kitchen table is more often a work table). We bought a small mat for the shop which is handy (and can be added to the larger mat for a longer project). The rotary cutter is used for almost all sewing projects. It's not the 'last forever' type of tool like the above scissors but it's held up well and gets used a lot. I like it, plain and simple. I particularly appreciate it when cutting slippery or light material. It's a tool that has upped the quality and preciseness of my cutting. The large 45 cutter is the fabric tool - it's in the sewing chest; the medium 28 in the shop is used for paper, leather, and various other jobs. We also have one of those little 18mm cutters that hasn't been used for anything. It's a very sharp tool so demands the respect and care one gives any sharp tool, of course. But we're well used to sharp tools. Other Miscellaneous Tools - When I started this page I didn't think it would take long or have much content. Hah! Sewing is very much about tools. And good ones can make sewing life easier and more fun. And there's no reason to sew if it's isn't fun and satisfying (which hasn't anything to do with challenging/frustrating/mind-boggling/hair-raising/how-do-I-get-myself-out-of-this-sewing-mess-I've-made? moments) (if it was slip in-out easy we probably wouldn't do it!).
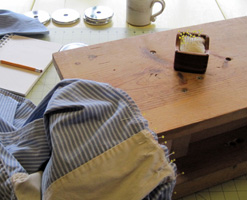
Then there is that little tool in front. Technically I suppose it should be in the Cutting area. Or in the 'most used' section. Or maybe the most overlooked, underrated, maybe least cared for, but most important of tools. The seam riper. Now some sewers may not use this tool much (but I seriously doubt it!). Like so many of my tools I had several old ones, been around for ages, inexpensive, knocking around in the drawer, not thought of much though used a lot. When early on discussing my "new tools" quest with my sewing friend she said, without hesitation - a new seam ripper. That's the most important tool you need, get a good one. Well, that wasn't at the top of my list, not very exciting really. But I did go buy a new one (Clover) - she was right. I kept the best of the old ones for rough projects, but I always go for the new one. As with so many tools, quality is worth it. A few days ago Steve was at one end of the table removing bits and pieces from his backpacking pack (striving for even lighter weight), and I was at the other working on getting my newly made leggings to fit. We passed the seam ripper back and forth, back and forth. We really should get another.
My favorite weights are some Steve found in a thrift store many years ago. Smooth metal, they're from a small bar-bell set. They're heavy and feel good in the hand. They get used a lot. Recently I made use of some other weights we had on hand (when working on a 'muslin' for lycra leggings and really didn't want the pattern paper to move). These are also thrift store purchases - arm or ankle weights - and they seem to be fairly common in the used world. They worked well for this purpose because they aren't slippery but are a nice weight. [I had to borrow these from my music stand bag. In the summer we play music at the Farmers Market in Manistique which is on Lake Michigan. It's a rare day that it's not windy, so I wrap these around the bottom of my sturdy music stand to help keep it from blowing over. Steve also has some he keeps in the shop for various uses. They're a handy tool.]
Pins - In my occasional reading
on sewing matters I'd come across reference to silk pins, and
the recommendation to buy new pins, and needles, often which I
skipped over as a marketing comment. After all, I had ever only
replaced a sewing machine needle when I broke one and hadn't
noticed any problems. I had pins, they worked, they were of no
special brand or label, had pretty colored ball ends and I'd had
them for...well, many, many years. But when I came to sewing
light weight synthetics I did notice they were not as smooth as
one would hope, and maybe a bit clunky. I decided to look into
possibly getting new pins. Gone were the times when you just
went down to the local Dime Store and bought whatever they
offered. I started searching online -- what a mess of choices!
So I searched for recommendations from some reliable "real"
sewing websites and put together my order. If I was going to do
it I was going to go the whole way. Out went my sturdy old pins.
In came:
#1 - Clover Fine Patchwork, yellow & turquoise glass headed
pins. Wow! What a revelation. Sharp, sharp, ouch-sharp, smooth,
silky -- wonderfully nice for fine and medium, and even some
heavier fabrics. They are now my main pin. Yes, they do bend
easily. If I come up with a bent pin or one that even hints at
snagging I throw it out. There is no reason to suffer with a
poor pin (I tell myself now), one has enough to contend with in
most sewing projects. They just aren't that expensive. I also
like having the two colors heads.
#2 - Clover Silk Pins, oddly named, opaque white and red glass headed pins, sturdier than the above. Also very nice and they come into use when the job is too tough for the Fine pins. I find I don't use them as often as I thought I would. #3 - Clover Fine Quilting pins, long, fine, smooth, sharp, great when you need a longer pin, a little sturdier than the regular length Fine Patchwork pins. I used them for my most recent window quilt projects and appreciated the quality. They come in handy occasionally in regular sewing projects, too. #4 - Clover Appliqué, opaque white glass heads, short sturdy little pins. I'm not sure why I bought these, I think I just got carried away with the pin brigade. Turns out they really are too short for me, and I don't do any appliqué work anyway. I need to give these to sewing friends who do. #5 - Common Dritz multi-colored work-horse pins from the local "dime" store. Since I'd thrown out my old clunkers I figured I better get something similar so no one would be tempted to use the good pins for projects they shouldn't be used for. Someday I'll get tired of storing them and put them in the thrift store box. Might be good for crafts or something.
They're simple to make and a great shop project. Here's a link to some instructions so you can make your own: Mini-bench. If you do, let me know how it turns out! Now one downside to using a riser from the shop is that they may both be in use. We have two, but LilliBulero, our resident feline, decided early on in her life with us that the one with the largest top was her choice for favorite lounging. It was on the center workbench by the window when she chose, and it's been there since. She can easily keep an eye on things both inside and outside, and be right there at hand should a human want to pet the cat (or rather The Cat) as they go by. Over time the riser ended up with several layers of towels and comfy fleece, a few toys (wood curls are her favorite), and a respectable amount of cat hair. Steve does use it, moving what needs to be moved, but any such use is apt to have a cat jump up into the middle of the project. She does like to be involved.
Copyright by Susan Robishaw |

 Gifts
from family came through with the cat's pajamas of tools. An
unexpected joy is the non-slip Olfa 6" x 24" frosted rule.
It's wonderful to use and one very well designed tool. It gets
used a lot, for layout, design, and cutting. They weren't
available locally so when I went to buy a similar 12" rule I
ended up with a yellow-green highlighted quilters Omnigrip.
Though I use it, since I have it, it isn't nearly as easy to
read and use as the Olfa and will be replaced. The biggest
problem I have with my large Olfa and the above Dritz is finding
them when Steve is working on a boat design/pattern. He likes
them, too!
Gifts
from family came through with the cat's pajamas of tools. An
unexpected joy is the non-slip Olfa 6" x 24" frosted rule.
It's wonderful to use and one very well designed tool. It gets
used a lot, for layout, design, and cutting. They weren't
available locally so when I went to buy a similar 12" rule I
ended up with a yellow-green highlighted quilters Omnigrip.
Though I use it, since I have it, it isn't nearly as easy to
read and use as the Olfa and will be replaced. The biggest
problem I have with my large Olfa and the above Dritz is finding
them when Steve is working on a boat design/pattern. He likes
them, too! 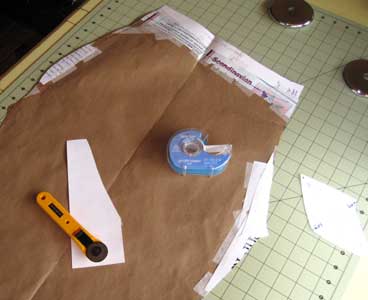 When
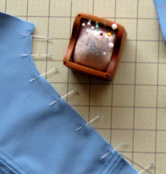
fitting a newly made pattern I've found paper tape and
whatever scrap paper happens to be around to be the essentials.
Sometimes pattern making goes smoothly and sometimes not, as
this photo of my draft leggings pattern shows. I think I had
more trouble with this "simple" article than anything else I've
done. Paper tape is nice because you can write on it, see
through it, and it removes easily though sticks well enough.
Locally the only place I've found the tape is in the drug store
as a bandage tape (though I would think there might be less
expensive options elsewhere).
When
fitting a newly made pattern I've found paper tape and
whatever scrap paper happens to be around to be the essentials.
Sometimes pattern making goes smoothly and sometimes not, as
this photo of my draft leggings pattern shows. I think I had
more trouble with this "simple" article than anything else I've
done. Paper tape is nice because you can write on it, see
through it, and it removes easily though sticks well enough.
Locally the only place I've found the tape is in the drug store
as a bandage tape (though I would think there might be less
expensive options elsewhere). 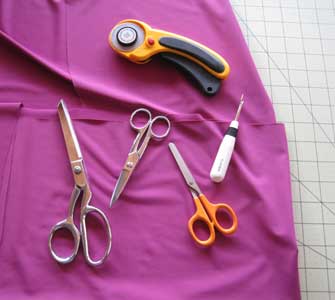 That
same Christmas I received a pair of Gingher 5" Tailor's Point
scissors. This was one I'd read about, highly regarded and
recommended, but did I need a special clipping scissors for the
moderate amount of sewing I do? I'd gotten by without them for
all these decades of sewing. These weren't very common (then)
and I'd never seen them for sale. But my sister-in-law
persevered, found, wrapped and shipped off this special
asked-for Christmas present. Well, another cat's pajamas of
tools! I'd never had a scissors to cut so close, neat and clean
for those small hard to reach little hard to cut jobs. They are
a special tool that is indeed special to me.
That
same Christmas I received a pair of Gingher 5" Tailor's Point
scissors. This was one I'd read about, highly regarded and
recommended, but did I need a special clipping scissors for the
moderate amount of sewing I do? I'd gotten by without them for
all these decades of sewing. These weren't very common (then)
and I'd never seen them for sale. But my sister-in-law
persevered, found, wrapped and shipped off this special
asked-for Christmas present. Well, another cat's pajamas of
tools! I'd never had a scissors to cut so close, neat and clean
for those small hard to reach little hard to cut jobs. They are
a special tool that is indeed special to me. 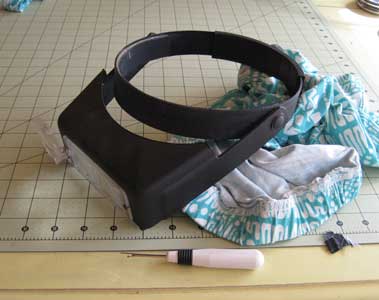 I go for this tool quite often when doing any kind of fine work,
especially if it is hard to distinguish dark colors, tight
stitches, or small stitches or pieces. Another shop tool that
gets shared - a headband magnifier - can make whatever
little job you need it for go smoother and less stressful. There
are many brands available and we've had this one so long I don't
remember the name, but I appreciate it a lot.
I go for this tool quite often when doing any kind of fine work,
especially if it is hard to distinguish dark colors, tight
stitches, or small stitches or pieces. Another shop tool that
gets shared - a headband magnifier - can make whatever
little job you need it for go smoother and less stressful. There
are many brands available and we've had this one so long I don't
remember the name, but I appreciate it a lot. 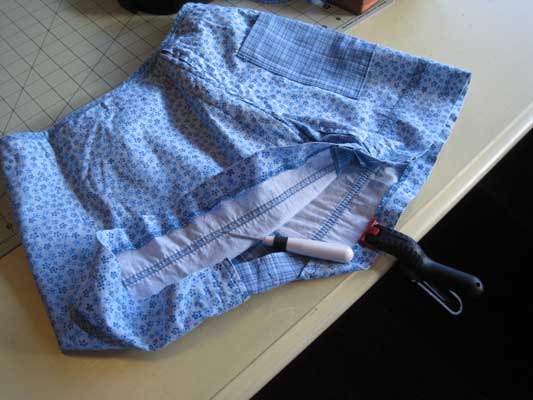
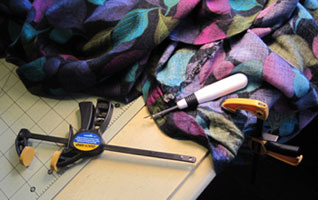 aka kitchen) it's
not too hard to get one when needed. (Except during boat
building when ALL of the clamps on the homestead seem to end up
out in the boat shop). My main use of a clamp is when taking out
a long line of stitches, when two hands are wanted to hold the
fabric taut while the third hand handles the seam ripper. A
simple to use clamp to the rescue!
aka kitchen) it's
not too hard to get one when needed. (Except during boat
building when ALL of the clamps on the homestead seem to end up
out in the boat shop). My main use of a clamp is when taking out
a long line of stitches, when two hands are wanted to hold the
fabric taut while the third hand handles the seam ripper. A
simple to use clamp to the rescue!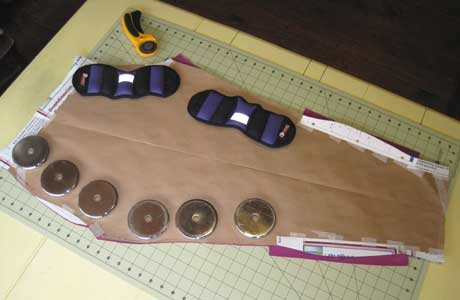
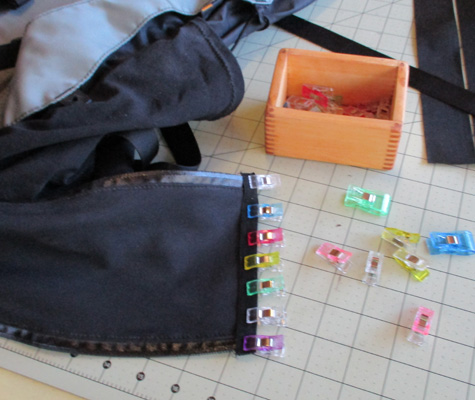 Craft
Clips - I'd read about these awhile ago but at that time
they were only available from sewing sources - Red Wonder Clips
- and at a quite high price. I easily passed them by. But
time passes, and for some particular project I thought of them
again. When looking anew I was surprised to find them easily
available and quite inexpensive - as craft clips. I soon added
both small and large ones to my sewing tools. Mostly the small
ones are used but occasionally the large ones. They are handy
when sewing difficult fabrics and projects which come upon my
sewing table quite often from the hiking and boating areas. But
sometimes I might use them for simple hemming jobs when for some
reason I don't feel like pinning. They're a bit clunky at the
sewing machine compared to pins but they also don't stab you.
Mine find uses in other areas of life as well so I keep some in
my sewing box and some in the shop so I always have clean ones
for sewing.
Craft
Clips - I'd read about these awhile ago but at that time
they were only available from sewing sources - Red Wonder Clips
- and at a quite high price. I easily passed them by. But
time passes, and for some particular project I thought of them
again. When looking anew I was surprised to find them easily
available and quite inexpensive - as craft clips. I soon added
both small and large ones to my sewing tools. Mostly the small
ones are used but occasionally the large ones. They are handy
when sewing difficult fabrics and projects which come upon my
sewing table quite often from the hiking and boating areas. But
sometimes I might use them for simple hemming jobs when for some
reason I don't feel like pinning. They're a bit clunky at the
sewing machine compared to pins but they also don't stab you.
Mine find uses in other areas of life as well so I keep some in
my sewing box and some in the shop so I always have clean ones
for sewing. 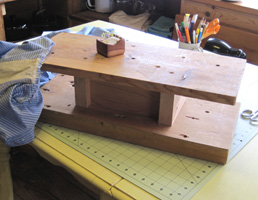
 likely
commercial fold-up options which would be nice for storage. But
this simply and easily made riser is sturdy and great to have
around for any number of uses. Ideally you'd have one
specifically for sewing, kept clean, with appropriate holes or
holders for particular tools, maybe a drawer? And maybe a narrower rounded end. It
would be fun to design and build one just for the sewing room. But meantime I simply
dust off one of the shop risers (we have several) and use that.
likely
commercial fold-up options which would be nice for storage. But
this simply and easily made riser is sturdy and great to have
around for any number of uses. Ideally you'd have one
specifically for sewing, kept clean, with appropriate holes or
holders for particular tools, maybe a drawer? And maybe a narrower rounded end. It
would be fun to design and build one just for the sewing room. But meantime I simply
dust off one of the shop risers (we have several) and use that. 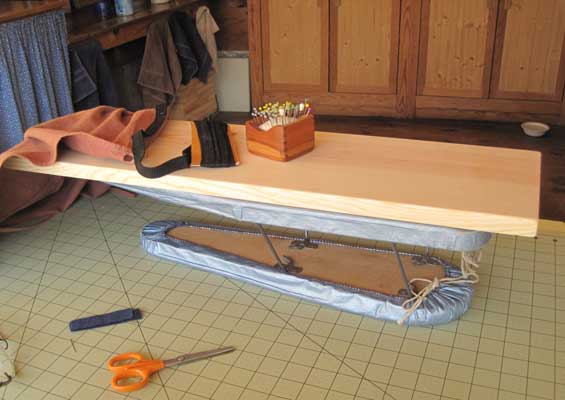 So
with the cat secure on one riser and Steve using the other I
grabbed my second choice make-do -- a board on top of the little
table-top sleeve ironing board. Usually I just snitch the wooden
cutting board from the kitchen (since my 'sewing room' is in the
kitchen this seems fair). But I wanted something longer so asked
Steve if there might be an appropriate sized scrap out in the
shop. There was, and he very nicely sanded it for me. So this
one will stay in the sewing room. It's not as sturdy as the all
wood one but it's simple, works just fine, and no cat hair or
sawdust to clean off.
So
with the cat secure on one riser and Steve using the other I
grabbed my second choice make-do -- a board on top of the little
table-top sleeve ironing board. Usually I just snitch the wooden
cutting board from the kitchen (since my 'sewing room' is in the
kitchen this seems fair). But I wanted something longer so asked
Steve if there might be an appropriate sized scrap out in the
shop. There was, and he very nicely sanded it for me. So this
one will stay in the sewing room. It's not as sturdy as the all
wood one but it's simple, works just fine, and no cat hair or
sawdust to clean off. |
Back to top |
|
|
|
|
* Should you want to use all or part of one of our articles in a non-profit publication, website or blog we simply ask that you give proper credit and link (such as "article by Sue Robishaw/Steve Schmeck from www.ManyTracks.com"), and we'd enjoy knowing where it is used. Thanks! We always appreciate links to our site www.ManyTracks.com from appropriate sites, and we thank you for recommending us! |
|
|
Have you read "Frost Dancing - Tips from a Northern Gardener"? A fun short read. or "Homesteading Adventures" Creating our backwoods homestead--the first 20 years.
and
"Growing
Berries for Food and Fun"
A journey you can use in your own garden. |