|
Excerpts from the book:
TABLE OF CONTENTS
Foreword by Jd Belanger
Preface - Original, 1997
Introduction
1. Homestead Dreams
2.
Homestead Beginnings
3. A Cabin is Born
4. Where Building Begins
5.
The Earth House
6. Wind and Water
7. The New Garden
8. The Solar
Oven
9. Outhouse, Inhouse
10. Eat What You Grow
11. An Adventure in
Food Self-sufficiency
12. The Sun and Solar of Electricity
13. The Solar
Food Dryer
14. The Days of Wine...
15. ... and Vinegar
16. To Save
the Garden Seed
17. Potatoes and Stocking Up
18. Cooking the ManyTracks
Way
19. Life and Livelihood
20. Maple Syrup ? Sweet Success
21.
Small Greenhouse ? Many Plants
22. Dream Your Life, Live Your Dreams
Bibliography
Index
Back to top
PREFACE
I discovered JJ and CindyLou one autumn afternoon meandering through my mind. At the
start they were two rather nondescript creatures with whom I began having regular rambling
many-tracked conversations. They helped me pick and thresh the dry bean pods with much
oohing and aahhing over the varied colors while wondering why I spent so much time keeping
all the varieties separate, and wouldn't it be easier to just throw them all in together,
it's getting late after all you know, and when are we going to make the bean soup? They
supervised the pulling of weeds while speculating on what would happen to the garden if I
didn't, and why didn't I just get that big old red tiller going and dig it all in, and
wouldn't it have been easier if I had put more mulch on in the first place?
They popped up amongst the apple peels and cores of applesauce making wondering if I
really needed to peel the apples, and why didn't I dry the crop instead of canning it, but
would it taste as good and would it take less time and what kind of apples were those
anyway? And did I really mean to drop that core into the cooking kettle instead of the
compost bucket?
A load of firewood wasn't complete without them sitting on top pointing out the merits
or lack thereof of cutting your own wood, or the route I had chosen, and did I really have
to walk through those brambles? A walk up to get the mail was seldom a solitary trip, and
the walk back down full of comments and discussions concerning the contents of the mail
and wasn't the computer supposed to do away with the postal service anyway, and hey isn't
that a letter from, oh sorry, wouldn't think of looking into your private mail you know,
but how are they doing anyway?
Over time JJ and CindyLou came into focus as the neophyte homesteaders you will meet
through these pages. Fictional neighbors and friends, they have come through my life
bringing fun, amazement, organization and chaos. By sharing our own homesteading
experiences with them they've shared with me a new outlook and a different perspective.
Though certainly of a fictional nature and not based on any real person or persons they
have a tendency to reflect back at oneself ones own self. The good, the bad and the ugly.
But more important, the funny.
Even if you can't imagine getting excited about digging around in the wet cold mud for
potatoes maybe you can come along anyway and laugh with us. Share in our adventures as we
find treasures in the mundane and high scholarship in the everyday. Maybe catch a bit of
what we've learned. As we catch a bit of the homesteading experience through the eyes and
perceptions of the ever lounging simple speaking long lanked JJ and his enthusiastic song
filled petite partner CindyLou.
We've had fun with it all. And I hope you will too.
Copyright © 1997 by Susan J. Robishaw
Back to top
INTRODUCTION
Steve and I started our homesteading adventures some twenty years ago, even before our
move north to the backwoods of Michigan's Upper Peninsula. The satisfactions and
challenges have followed us unabated since. We find ourselves living both in and out of
the mainstream and it is a good way to live.
A homesteading lifestyle is as varied and individualistic as the people who embrace it,
and we are no different. I offer our experiences not as rules or dogma to live by but as a
picture from which to borrow pieces, to add to a corner of your own creation, to select as
a focus for inspiration and ideas.
In the following pages I have shared practical details and wider overviews, actual
experiences and philosophical thoughts; often through the humorous conversations with and
between the fictional JJ and CindyLou. Though it would be the ideal it is, unfortunately,
not practical or possible to talk and visit with everyone personally. But it is my hope
that through this book we can continue the tradition that is so much a part of the
homesteading world; the tradition of passing along experiences, skills, and knowledge
gleaned from our years of living the 'simple' life.
The information presented here, and prices where mentioned, are current to when the
book was written. But we are participating in an ever changing world. While many of the
ideas and suggestions are timeless, others change with the passing moments and years.
Consider this a beginning, not a final statement, and get more information when necessary,
or needed. Check the bibliography for source information.
Since I am the speaker of the following story it may appear at times as if I am
homesteading by myself. But that is not the case. Steve and I are partners in this
adventure. Though there are projects and work we do by ourselves, generally we share the
load and the fun, both in work and in play.
Copyright © 1997 by Susan J. Robishaw
Back to top
~~~
nineteen ~~~ Maple Syrup - Sweet Success
~~~
“Hi there, CindyLou. Hello, JJ. Happy Spring!”
“Spring? You call this spring!? There’s not a spot of ground showing let alone
anything green. And it’s not easy snowshoeing either let me tell you. If you go
out in the morning it’s frozen and icy and these old legs just don’t skate as
good as they used to you know. And then you go out when it’s warmed up so you
can get some traction and before you know it you’re carrying around a ton and a
half of mushy snow on top of your snowshoes. And these old legs weren’t made to
carry weight like that. Why . . .”
“Hello, Sue, it is a beautiful day! And every day I hear more bird songs so they
must think also that it is Spring. But even I have to admit it is hard to see
it.”
“Of course it is Spring. Look around you. Can’t you feel it?”
“OK, I’m looking around. What I see are a bunch of trees with their feet well
buried in the snow. And what I feel is wet, cold feet. I don’t know why you
would want to stand around looking at a bunch of trees in this condition
anyway.”
“It is a very nice woods you have here, Sue. And I see why you might want to
stand here and look at it. But I do not know what it is I am supposed to feel.
And if you had oiled your boots last night, JJ, you would not have wet feet.”
“This isn’t just a woods, JJ, it is a sugar bush. And what you should be
feeling, since you now live in the north country, CindyLou, is that true
harbinger of Spring - sap season. The trees, the bones, the birds, and the
weather, say it is time. The cabin fever cure has arrived. The sap is flowing!”
“I don’t see anything special and I don’t hear anything special and what are you
talking about anyway?”
“You mean it is time to collect maple syrup?”
“Sure is, CindyLou. The nights are cold and the days are warm and there is that
feel in the air. We’re going to tap trees today.”
“Well, why didn’t you just say so. Now I can get almost excited about that. That
bottle of maple syrup you gave us was good and delicious but it didn’t last
long. Flooded pancakes here I come! Oh, I can just taste that sweet stuff
sliding into my mouth.”
“We can collect syrup from the tress around us, JJ. I remember reading about
that. You just drill a hole and hang your bottle underneath and wait for it to
fill up. Oh, this will be very exciting. To collect our own syrup. Yes, let us
go, JJ. If it is time I do not want to miss any of it. We have that large tree
right beside the cabin. It should be a very good one to get syrup from. Though I
am not sure I want to drill a hole in it. Do you have to drill holes, Sue?”
“Well, yes, but just a minute. There is a bit more involved than that in getting
maple syrup.”
“Oh, there is always more involved. But I do not want to make a very large
amount. And if it is time we can not wait for reading and research. We must go
now.”
“For once I’m with you, CindyLou. We sure don’t want to miss out on collecting
any of that sweet syrup.”
“You don’t have to do a lot of research, but you need to know more about the
process. For starters, that big tree by your cabin in a black cherry tree.
You’re not going to get much maple sap out of that one.”
“Of course, of course, I forgot. I know that. But we have maple trees nearby
too.”
“Yes you do, but many of them are too small to tap. You have to search out your
larger maple trees, with trunks at least 10" across. Either red maple or sugar
maple will do, we have both here, but sugar maple will give you the higher
percentage of sugar. The important thing to know is that syrup doesn’t come out
of the tree, sap does. You have to boil the sap down to get the syrup.”
“Oh yeah, I remember seeing pictures of billowing clouds around what they called
a sugar shack. Guess I didn’t think about what they were doing. Thought maybe it
was some kind of sauna. Hey now, that wouldn’t be all bad, taking a nice hot
sauna while your sap is turning to syrup. I could get into that.”
“I did not want to hear that I have to build another building to get maple
syrup. It is not my favorite time to build with the snow still on the ground.
And I have a feeling you are going to tell me it will take time to do the sauna
syrup part of it and we will not be able to have maple syrup for breakfast. I
can tell you are going to say that. You always add more to something that sounds
simple.”
“Sorry, CindyLou, there is more to it than just drilling a hole in a tree. But
believe me, it is worth it. And it’s a fun process. It’s a great time of year to
be outside when there is not that much else going on. But I think we had better
start at the beginning. It is simple, really. There aren’t that many steps to
get to the final syrup. You just don’t get to skip any of them. How about if we
tap a few trees and I’ll explain where we go from there. Steve will be home in a
little while and we’ll be tapping all the trees then, but it won’t hurt to get
started.”
“I’m with you, the sooner we get to the syrup part the better.”
“That would be nice. I would like to know just what we will have to build. It
sounds like we should get started very soon if we are to have our syrup for
breakfast.”
“Actually, CindyLou . . . Well, let’s just get to it. You’ll see.”
“First off we decide what trees we’re going to tap. Our sugar bush is small but
we only tap about twenty-four trees each year so we divide the woods roughly
into two sections. This year we’re doing the east half, last year we tapped the
west half. Each of us takes half of that, finding our routes from tree to tree,
clearing away fallen branches and packing down a path.
Let’s go on up to the house and collect our equipment. It’s nice that our sugar
bush is close to the house, makes it easy to zip out to collect sap even if
you’re in the middle of something else.
Everything’s been washed with hot water and is ready to go. We use gallon
plastic vinegar jugs for our buckets. Just cut a hole below the handle for the
spile and loop and twist a piece of wire around the handle to hang it by.
They’re rather unwieldy to store and carry but they are inexpensive and last a
long time if you take care of them.
The spiles can be purchased or made; we have about half of each. The handmade
ones are 3" pieces of wood dowel or broom handle with a hole drilled through.
One end is tapered using a spokeshave so it can be tapped into the half inch
hole in the tree.
We need the 1/2 inch auger drill bit and the hand brace. A hammer, a few jugs,
spiles, and nails and off we go, back to the sugar bush. Once the path is packed
down and after a cold night we’ll be able to traverse the area without
snowshoes.
It’s good to take along a measuring stick or tool to make sure you don’t tap a
tree which is too small, it’s hard on the tree. Once they’re large enough they
can handle being tapped just fine, if it’s a healthy tree. We don’t tap anything
less than 10" across. Once they get quite large you can put two taps in but
almost all of our trees are in the 10-14" range, one tappers.
Select your tree and decide where to tap. The area immediately around an old
hole will be dead wood so you don’t want to tap there. We make our way around
the tree leaving 4-5" between holes and at a convenient height. This varies
depending on how much snow is on the ground when we tap. Some years there is
little and we’re two to three feet up. But winters like this one, with lots of
snow, the taps can end up being four to five feet high when the snow melts. Be
sure to look up before you decide where to drill. If there is a large dead
branch right above where you want to put your hole move over some. Being below a
large healthy branch is supposed to be good, more sap running there.
The hole is drilled about one and a half inches deep up at a slight angle.
There, that should do. Hand me a spile and we’ll tap it in. You don’t have to
imbed the thing, just get it in firm enough not to fall out. You have to be able
to get them out when you’re done. Now take your jug and set it so the spile goes
into the hole in the side. Take a nail, put it through the loop in the top of
your wire hanger and hammer it in, just far enough to hold. Adjust the nail up
or down a bit if you need to. You want to be able to easily slip the jug off the
spile but don’t want it so loose it will blow off in a wind.
OK, over to the next tree and do the same thing.
 Now,
this is one of the magical moments of the sap season. Listen . . .” Now,
this is one of the magical moments of the sap season. Listen . . .”
. . . plink . . .
. . . plink . . . plink . . .
. . . plink . . . plink . . . plink
“Hey, the trees are dripping! Will you look at that. Do you hear that, CindyLou?”
“I could if you would be quiet, JJ. Yes, I hear it! And, listen, the birds are
singing along. Do you suppose they are waiting for the maple syrup too?”
“I think the birds are just happy about Spring. But you will see squirrels
licking sap that’s running down from a wound in a maple tree. As you can see
this isn’t syrup, this is watery and it’s not very sweet and not at all thick at
this point. It takes from 40 to 50 gallons of sap to make one gallon of syrup.”
“That is a very large amount of sap! How ever will you get that much? I would
think it would drain the trees dry taking that much sap out. Oh, and I was
thinking of making a whole gallon of syrup.”
“It does take a lot of sap, some years more than others, to make syrup. But the
trees can handle it. From our twenty-four trees we make 5 to 6 gallons of syrup,
enough for a year’s sweetening needs plus gifts. How much you get out of each
tree depends on how large the tree is, how healthy it is, and where it is
located. Some trees give more than others. Those trees on the south edge of the
woods with many branches reaching out into the open usually are the best ones.
Generally the larger the crown on the tree the more sap you’ll get. That’s why
trees in sugar bushes are thinned to stand farther apart, so their tops can
spread. The weather also has a lot to do with how much sap you will get.
Meantime, we have more work to do. Let’s go back up to the house. We use 4 and 5
gallon buckets to collect the sap so we have to round up and wash four buckets,
two for each of us. By now we usually have empty buckets that held wheat or
oatmeal or popcorn earlier in the season. You can tell we’ve used these before
because they have gallon gradations marked on the side: 1, 2, 3, and 4 gallon
marks. It’s nice to have an idea how much sap you’ve gotten when you collect.
The other thing we have to get is our storage container. We use a polyethylene
garbage can for that. It’s been holding sunflower seeds for the birds since fall
but those are all fed out by now. So it just has to be washed and it becomes the
sap storage container. Now on to the woodshed.
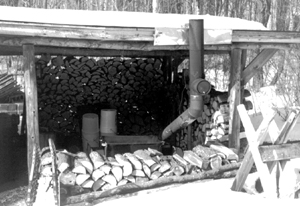
The woodshed doubles as our sugar shack this time of year. By sap season the
shed is usually empty inside with walls of firewood stacked around the sides. It
makes a handy and convenient sugar shack because it is already here, and it is
close to the house. We restack wood as necessary and set up our cooker in the
corner.
Before we had our wood shed we made an adequate shack by putting up six
temporary cedar posts in a rectangle. We stacked firewood on three sides for
walls and stretched a tarp over the whole thing for a roof. It worked fine,
though the tarp did get blackened on the end over the cooker.
Now to the heart of syrup making - the cooker. Our first one was made by
stacking old bricks on a foundation of cement blocks. A couple of pieces of
angle iron across the front and back held up the borrowed sap pan. Some old
scrap sheet metal and chimney finished it off. It worked fine except that as the
ground thawed the whole thing developed a somewhat scary tilt, and some of the
bricks started to crumble. We made about eight gallons of syrup that year
though.
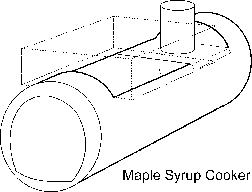
But we progressed, as homesteaders do. Steve took an old water heater, cut an
almost circle out of one end, leaving a flat bottom, and a rectangle out of one
side. Opposite that and at the other end he welded on a large piece of angle
iron to stabilize the thing when it’s set down. When not in use it is leaned up
in the corner of the shed and wood is stacked around it. When sap season comes
around we set it back down and make it level using boards, angle iron pieces,
pipes, or bricks.
The chimney is made of standard sheet metal pipe and is stored in the storage
building when not in use. The cooker/chimney thimble is a piece of scrap metal
cut to fit. It is set up to pass just outside the woodshed roof and is wired to
it for stability. Where it passes the roof a piece of metal provides a heat
barrier.
The door of the cooker is a piece of sheet metal propped against the front
opening. The draft is controlled by how far out you set the bottom, and a piece
of green firewood leaning against one corner is the “latch”. A bucket of wood
ashes is spread in the bottom of the water heater cooker and it is ready for the
first fire.
Now for the pan. For our first try at making maple syrup we used our enamel
canner and cooked the sap down outside on a small sheet metal stove. It took
quite a while but it worked. The next time we borrowed a nice stainless steel
pan from friends who weren’t cooking that year. Then we made our own.
We have to go inside and get the pan down off the wall where it hangs as a
typical homestead decoration most of the year. Watch out there I don’t bump you
with it. Not that it is fragile or anything but it’s covered with oil. Steve
made the pan from a piece of 36" x 48" 24 gauge sheet steel; a thickness he
could bend and braze without special tools. The top edge is folded out and down
2" for strength, and four heavy steel handles are bolted on. The final size is
18" x 28" x 8" deep. It is just wider than the rectangular hole cut in the side
of the water heater. And is a size that is manageable for pouring out the syrup
once the sap has boiled down.
At the end of each season the pan is cleaned then oiled inside and out. After
almost ten years the pan is well used and far from shiny but it is still doing
its job well. I never completely scrub the outside, just get most of the black
off so it doesn’t get all over (crumpled newspapers work well for this).
Now that the season has begun, the twice a day (usually) collecting routine
becomes a part of our lives. Off-the-homestead trips are planned around how the
sap is flowing. And it feels great to be working outside again.
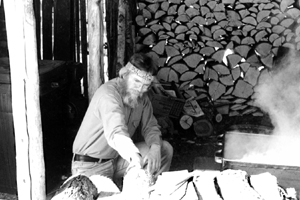
We collect sap until the storage container is full then we start our fire. A
reminder I want to give you, from experience I might add, is to be sure your pan
has sap in it before you start your fire. We fill it up then boil the sap down
to about 1/2" to 3/4" three times for each batch of syrup. When we’re boiling we
try to time it so there is an inch or so left in the pan at night and the fire
is going down. The embers will gently reduce the sap over night without fear of
burning.
We’ve found that the best wood for the sap cooker, and the most convenient for
us, is dead poles (tree tops and branches). When we’re collecting firewood in
the fall we also collect poles to pile up beside our woodshed. Some of the poles
are cut to size for the cook stove but the rest are saved for sap season. We cut
them to length by hand as we need them. Since the sawbuck is right there it’s an
easy and enjoyable chore. It seems to fit the whole process.
When you’re boiling you’ll find a lot of foam and stuff coming to the surface
that you’ll want to keep skimmed off. Not only for the quality of your syrup but
to keep it from insulating the sap and preventing a good evaporative boil. We’ve
found the easiest skimmer to be a length of thin light wood, such as 1/8" x 3/4"
pine, the width of your pan, with another piece nailed on perpendicular for a
handle. You just float it across your sap and scrape the scum off into a pail.
It’s easier than using a spoon.
When the third fill-up has boiled down, the sap (almost syrup at this point) is
poured off through a clean flannel blanket into a stainless steel or enamel
kettle. I finish it off inside on the cook stove or wood stove. If the wood
stove is going I set it on that and let it gradually cook down to be syrup. Or
I’ll get the cook stove going and do it faster there. You can either go by feel
as to when the syrup is cooked down enough (how it drips off of or sheets across
a large metal spoon) or boil it until it reaches seven degrees above the
temperature it takes for water to boil.
When the sap is a good syrup I bring it to a boil and strain it again through a
piece of wool blanket and a cotton cloth (such as T-shirt or flannel blanket).
Then it gets bottled in clean jars, bottles, or jugs. If while in storage a mold
occurs on the syrup (as I’ve found an occasional jar or batch to do) just pour
it into a pan, skim, boil, skim some more, and rebottle in clean bottles.
So there you have it - sap to syrup. And it’s the finest sweetening you can get
(in my humble opinion). We use it for everything. From cereal to jam, pancakes
to pickles. I’ve even tried it in wine making but I wasn’t thrilled with the
results. If I didn’t have sugar it would do though. And I don’t think I’ve found
a more appreciated gift than a bottle of fresh from the woods maple syrup.”
“Well, we have work to do, JJ, let us get going. The afternoon is waning and we
have to build a cooker and get jugs and make spiles and make a pan and find a
drill and build a woodshed and . . .”
“Now hold on there, CindyLou. I’m as fond of maple syrup as the next guy and I
sure was looking forward to having maple syrup smothered pancakes tomorrow
morning, but no one warned me it was going to be so much work. This old body
won’t be around to appreciate the sweet stuff if you work it to death first.
It’s not getting any younger you know and a body’s only got so many projects in
it. Now that I think of it, that store bought syrup stuff isn’t all that bad,
and . . . Oh all right, unruffle, unruffle. I suppose we could come up with some
way to make a little syrup this year . . . we do have that large canner we can
boil it in . . . and maybe we could make a cooker out of that old steel drum
sitting out back . . . and we have a broom we can cut up for spiles, who has
time to sweep anyway and . . .”
Copyright © 1997 by Susan J. Robishaw
|