Chicks Who Don't Read Books
We had barely begun our homestead when we seriously
began studying the Murry McMurry Hatchery catalog. We weren't really ready for
chickens, but that was barely a passing thought. We had read the books, lots of
books; and articles, many articles (this was before the Internet). We knew what
to do.
That first batch of chicks were raised by the book. They survived,
and so did we, in spite of that. They arrived via mail and were the cutest
things we'd ever seen. We wanted to do our best by them.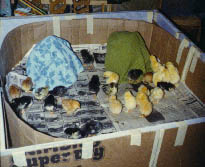
The books said that the chicks needed temperatures of 90 degrees or so, for six weeks,
before they could go out on their own into a coop. We didn't have regular electric power so
the typical heat lamp was out. It was May and we were living in our 14 x 22 ft
one room cabin. We
set up a large cardboard box (see picture above) on a card table beside our bed, because
that was the only extra space in the room. We kept the woodstove going even though it was
getting warm outside. We roasted, and the chicks probably did, too.
By the time the chicks were the required six weeks old, according to the books, they had
advanced to a 4 x 8 ft box which was a significant portion of our floor space. We had to
add a chicken wire addition to the top of the box to keep the fast growing chicks in. And
the cabin developed a coat of "chicken dust" that we never did get rid of.
They were fun, but they sure were happy when moving day came -- and so were we. We would
miss their antics -- the three dozen alert eyes below the variably fuzzed heads suddenly
popping up, straight and to the point, to look at any strange noise (such as a sneeze or
laugh or crash); the developing personalities; the peeps, the cheeps, the squabbles. But
we all knew there had to be a better way of living for them, and for us.
Their new coop wasn't quite ready yet so we turned our utility trailer into a temporary
coop, with several additions and modifications, using scrap and salvaged materials.
An attached short chicken wire enclosure allowed them access to
the ground. We moved them out with a little bit of concern - was
it too early - too cold? But the concern was all ours. They knew
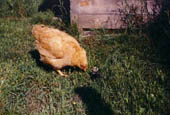
just what to do and wasted no time doing it. Scratching,
pecking, running, jumping over each other. They loved it, we loved it. Nothing like real grass and dirt under your
feet and real insects to chase and eat to make life fine.
Eight years later we decided we wanted some color variety in our flock once again. We had
originally purchased five each of seven different varieties of heavy breed chickens. The
rooster we had chosen to keep (or he chose to stay with us) was a Barred Rock. So over the
years of attrition, brooding and hatching, our flock ended up all being variations of the
Barred Rock coloring, nature being the way she is.
Once again an order was sent off for a colorful variety of chicks. We were living in our
newly finished house by then and had a sunny spot by the chimney for a large cardboard chick box. We
still had the woodstove going occasionally, but only when we needed it, not especially for
the chicks. In fact, our house is naturally rather cool.
What we did have for the chicks, in opposite corners of their box, was two one-gallon
plastic jugs, filled with hot water morning and night, and wrapped with old towels. The
towel was draped such that it wrapped around the jug then folded out to make a tent for
chicks to get into.
Some of the chicks started right off roosting on top of the jugs while some spent almost
all of their time inside the tents next to the warmth. Others nestled near the jugs now
and then when they felt need of the heat or comfort I suppose.
A piece of chicken wire for a lid kept the ambitious ones in (a few discovered they could
fly out of the box by launching from the tops of the jugs and it is not easy to catch a
lively chick loose in a large room). They all thrived happily and healthily.
A week and a half after they arrived an addition was built to their cardboard palace,
with high chicken wire sides to keep them in yet let them see out. The small stick roosts
were replaced with larger and higher roosts. One water jug was removed and the other
filled with hot water only at night. A few chicks still used the jug for warmth but most
just used it as a roost. A lot of bedding was used, both sawdust and hay. And this time
we all enjoyed the experience.
 Two more weeks went by and at three and a half weeks old the fast growing chicks were
happily moved outside to their own, small coop and fenced-in area within the large chicken
yard. They reveled in playing and pecking in the grass, chasing insects, and watching the
adult chickens from the safety of their enclosure. Two more weeks went by and at three and a half weeks old the fast growing chicks were
happily moved outside to their own, small coop and fenced-in area within the large chicken
yard. They reveled in playing and pecking in the grass, chasing insects, and watching the
adult chickens from the safety of their enclosure.
We had
previously learned that having a separate area for the mother hens and their chicks was a lot
easier and safer for mom and her brood. They had their own small coop and fenced yard,
separate but right beside and in company with the main flock. When mother hen was ready,
when the chicks were about 6 weeks old, she was let back in with the rest of the flock and
the chicks stayed in their separate enclosure until fall when they were old enough to hold their own and
become part of the main flock.
This separate area worked great for the new mail-order orphan chicks as well. They thrived
-- bringing diversity, color, fun (and later, eggs) to our world.
 Chicken
Memories Chicken
Memories
It has been many years
since we gave the last of our chickens away, but their spirits and the
adventures we had with them still make us smile.
Like the
time Mr. C (a large tom cat who wandered into our lives one fall day) was
chasing/playing
with a small mouse out in the yard. As he turned around for another pounce, a savvy Barred
Rock hen wandered by, turned, grabbed, and ate the small rodent without the cat's notice.
Mr. C simply could not believe the mouse was gone. He searched and searched the area for
his missing treat, while the hen wandered nonchalantly away. Mr. C didn't seem to
appreciate our hoots of laughter either.
Or the time Steve was working on our current "vintage" car, a 1970 Opal Cadette,
when he dropped a necessary small bolt into the long grass. We searched, and searched --
hands and knees, noses and fingers, over and over that area for what seemed like hours,
with no success. A wandering hen came by, pecked in the grass, came up with the bolt,
rattled it around in her beak a moment, then spit it out in disgust and haughtily walked
away. The bolt was retrieved by the humbled humans, with no comment.
In the late summer when the herbs were tall and lush, I would often toss handfuls of
mint
into the chicken coop (the floor of which was dirt with a generous supply of hay and
sawdust for bedding). It was great for the general atmosphere. Wormwood was used often,
fresh or dried, in the hay-filled nest boxes, to discourage any unwanted critters (such as
mites or lice).
The wormwood didn't work against snakes though. Not that I had ever thought it should, or
needed to. But one day I was calmly collecting eggs from the nest boxes (hung about eye
level on the walls) when I looked over my shoulder to see a Pine Snake looking calmly back
from within a nearby nest box. Well, I like snakes, but (though I do hate to admit it) I
much prefer the larger ones to be at a two foot or so distance, especially from my nose.
I'm also not much for picking up Pine Snakes. So I went to ask Steve if he'd mind taking a
small Pine Snake out of the coop.
Turned out this small snake was four feet long -- a quite healthy adult, with egg lumps
along its body. We figured we should take it away from the homestead to discourage a
repeat visit, so put him temporarily in a cardboard box, with a board on top to keep the
top down. When we came back about 10 minutes later, the box was empty. But there were no
more snake visits to the chicken coop.
A great winter treat, for both chickens and us, was a bale of good, green alfalfa hay. In
the fall, we'd get six bales of the best looking hay we could find. Then about once a
month, during the winter, we'd put a bale of hay in the coop (twine removed). The chickens
had a great time scratching and eating and spreading the hay around. And we enjoyed the
fresh aroma and dark yellow yolks.
When it came time to butcher, we took the advice of a friend who had rabbits and banty
chickens: we skinned them. No plucking (which, we discovered the first time we tried it,
is a skill very hard to learn from a book). Skinning is relatively easy with two people --
one holds, the other pulls.
Usually I would can the meat, approximately one bird per quart jar. Even old hens turned
out tender and delicious. All the bones, wings, and giblets were simmered in water for a
long time (to concentrate the broth), strained, and canned for soup stock. A lot of work,
but great eating.
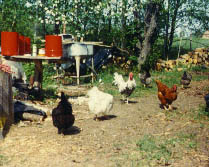
 If you're planning on letting your chickens run free range, you might want to give
consideration to the best camouflage coloring for their environment, and choose
accordingly. Our Barred Rock rooster was great at spotting a hawk, usually giving his
warning cry before we humans could see the coming threat. The flock would all freeze where
they were, hugging the ground, hiding, but being mostly quite visible in their bright
white and red and black coverings. We chased off many a hawk and owl, and lost many a
chicken, over the years. I have often wondered if more camouflaged colored chickens would
have had a bettered chance at survival. If you're planning on letting your chickens run free range, you might want to give
consideration to the best camouflage coloring for their environment, and choose
accordingly. Our Barred Rock rooster was great at spotting a hawk, usually giving his
warning cry before we humans could see the coming threat. The flock would all freeze where
they were, hugging the ground, hiding, but being mostly quite visible in their bright
white and red and black coverings. We chased off many a hawk and owl, and lost many a
chicken, over the years. I have often wondered if more camouflaged colored chickens would
have had a bettered chance at survival.
When we gave up our flock, we pretty much gave up eggs. It wasn't that hard. We just left
them out of the pancakes, and breads, and cookies. It still made fine food. But we do miss
those great, strong, deep yellow yolked, eggs -- cooked just to that not-too-runny,
not-too-hard stage, gently slid upon a small stack of hearty, whole wheat pancakes, with
homemade maple syrup dripping off the edges.
But mostly, we miss the personalities. Rocky, the wonder rooster, a sturdy Barred Rock
with the long, sharp spurs, who was much admired by the hens, and who really didn't like
me; Reddy, his favorite companion, a small, trim, Rhode Island Red hen with a friendly and
alert manner, who would come into the cabin with her pal Rocky to pick at odds and ends
hidden in the cracks of our wooden floor; Spesh, a small, paranoid, handsome, long tailed,
Silver Spangled Hamburg rooster who was cruelly tossed into a box of full sized birds as a
freebie, and who spent his days on the windowsill of the coop, out of the way of the rest
of the block, all of whom were fully twice his size; and the lively, little white bantam
mix hen who loved to jump up on people's shoulders when they walked into the yard, to the
delight of some, the extreme non-delight of others (especially if her feet weren't exactly
clean); and so many more. All sizes, shapes, colors, and personalities.
If you are willing to give them plenty of space; to study and learn as much as you can;
work and care for them, chickens can be a great companion and worthy part of the
homestead.
A Different
Opinion
In our first flock of chickens there were some
White Rocks who grew into very large (very fat) hens. One developed a baseball
sized lump on her chest. It didn't seem to bother her at all except that between
her weight and the lump she had trouble getting up onto the roost at night. So
we built her a ladder.
On all accounts she seemed to be a healthy, happy hen. She wasn't the anxious
athletic type; walking around eating was more her style, and she was a very good
layer of eggs. Of our mixed match of old heavy breeds the White Rocks were the
heaviest, and she outweighed them all. The ladder we built to help her up to
the roost solved that problem. But we were concerned about the lump. It was
maybe the size of a baseball, which was pretty big for even a large hen.
I called a vet and talked to the receptionist, explaining the problem. She said I'd have
to bring the hen in to the office. I explained that I'd be happy to pay for a phone
consult if I could just talk to the vet about it. It was winter and I couldn't see
exposing the hen to the half mile hike up to the car and half hour drive to the
veterinarian's office. The trauma of the trip would probably be worse than the lump. But
the receptionist insisted I would have to bring the hen in, and no I couldn't talk with
the vet on the phone. I said thank you, and hung up.
Next I called a county Extension Agent, explaining the situation. He said to kill the hen.
He said it could be anything, it could spread to the whole flock. The only answer was to
kill her right away, then keep an eye on the others and kill more if necessary.
Mmmm, not exactly what I had in mind. I said
thank you, and hung up.
Then I remembered a fellow we had heard speak at an Extension meeting on backyard poultry
flocks. The kind where they start out by saying that a flock of less than 100 chickens is
not worth bothering with, and of course you will have all modern hybrids. We sat through all of that, not
getting much of practical use from any of the speakers. Then the last speaker got up, a
calm, elderly man. He stood with half-closed eyes, sort of staring into space, and
proceeded to give some of the best poultry raising advice I've ever heard or read. He
ignored everything that had been said before, just shared his plain, common sense ideas
and experiences. Turned out he was the regional animal pathologist. I called him with my chicken
problem, and this no doubt very busy man, very kindly listened.
When I told him what the vet's office had said, he replied, "No, no, no." When I
relayed the County Extension Agent's words, he emphatically said, "Oh, no, no,
no." I could almost hear him shaking his head.
He then went on to say that if the hen didn't appear to be in pain and was laying well,
there was no reason to do anything. He said that chickens have a high threshold of pain.
She could have a growth, it could be a crop problem, it could be several different things.
If many chickens in a flock fell ill or developed problems, then yes, you should get
concerned, maybe get a carcass to him to send out for testing. But an occasional problem
is no need to panic.
I gratefully and sincerely thanked him, hung up, and went out to talk with the hen.
She lived, and laid well, for many, many years. When she developed respiratory problems
(as did all of our White Rocks) and was obviously uncomfortable, we killed her. We buried
her in the garden, in the perennial row, where we buried the other special chickens whom
we just couldn't eat when it came time for them to go.
We don't keep chickens now, but their spirits are certainly still here on their homestead,
roosting among the tools in their coop turned garden shed.
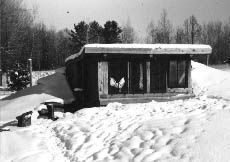 Earth
Bermed Solar Chicken Coop Earth
Bermed Solar Chicken Coop
- by Steve Schmeck
The basic concepts behind the construction of a solar chicken
coop have been known and used for a long time. Most traditional poultry houses have lots
of windows (mostly for light rather than heat), and early homesteaders' coops were often
built low to the ground and of logs. I incorporated these ideas in my own way
considering our cold winters.
The primary solar features used in our coop are south-facing windows, thermal mass to
store heat, and outside insulation and insulated window panels to keep that heat in.
SITING: Since the coop could be dry inside only if the building site was high and dry, we
dug several test holes a foot or so deeper than the planned excavation, and checked them
later to be sure no water had seeped in. Then, to ensure maximum solar efficiency, we
checked the site for both morning and afternoon shading problems. In our case, we settled
on a sort of compromise -- direct sunshine from dawn until about 4 pm when, in the summer
only, the leaves of an adjacent woodlot (maples, birch, and basswood) provide partial
shade for the coop.
EXCAVATION: The dimensions of our coop were determined by estimating the size flock we
wanted (20) and multiplying that number by four square feet per bird. As it turned out,
eight-foot-long interior walls, using a five-sided shape, yielded a floor area of 85
square feet. Since our foundation logs averaged eight to twelve inches in diameter, we
staked out the site a couple of feet larger than the interior dimensions. The edges of the
pit were cut as vertically as possible, and most of the dirt was
piled on the north side.
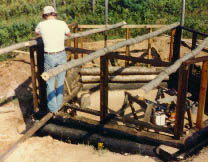
FOUNDATION LOG WALLS: When the excavation was about three feet deep and the bottom
leveled, it was time to begin laying the walls. The logs had been previously cut, peeled
and sorted by size. The largest diameter poles, for the bottom tier, were notched on the
top side with a chainsaw and axe (Fig. "a"), and subsequent logs were notched on
both top and bottom (Fig. "b").
Each piece was laid temporarily in place until all adjacent logs were matched to it and
irregularities between them removed with an axe or adz. Then the log was removed from the
wall and coated on all surfaces with black waterproof roof sealer. If cedar, cypress, or
treated poles has been used, this laborious step could be eliminated. But we used what we
had -- Balm of Gilead, or Balsam Poplar.
When re-placed in the wall, the logs were secured at each end by a single
"spike", actually a short (10 to 18 inch) length of 3/8 inch steel reinforcing
rod. Care was taken to be sure that no spikes were placed where the door opening would
later be cut. Logs were laid until a wall height slightly above the
original ground level was reached.
 FRAME UPPER STRUCTURE: To facilitate insulation of the above-ground portion of the
structure, standard 2-by-4 frame construction was used. Only slight modifications were
needed to accommodate the transition from logs to dimension lumber (Fig. "c").
Double vertical studs were placed in the middle of the two north walls and at their
junction to provide support for the three stout maple rafter poles. Likewise, the midpoint
and each end of the south wall were framed to support the other ends of the poles. FRAME UPPER STRUCTURE: To facilitate insulation of the above-ground portion of the
structure, standard 2-by-4 frame construction was used. Only slight modifications were
needed to accommodate the transition from logs to dimension lumber (Fig. "c").
Double vertical studs were placed in the middle of the two north walls and at their
junction to provide support for the three stout maple rafter poles. Likewise, the midpoint
and each end of the south wall were framed to support the other ends of the poles.
All openings were made to match the dimensions of the old windows and door we had
scrounged up. Exterior wall boards were nailed on at this point to give
rigidity to the structure while the roof was being put on.
ROOF AND WATERPROOF COVERING: The roofing job consisted of notching the three rafter
poles, setting them in place, hacking off the most obnoxious upfacing knots, and nailing
on roof boards. We tried to save the strongest, smoothest, and widest boards for the roof.
Any sharp or ragged edges or knots which could have punctured the roof covering were
planed or filed smooth. Roof and wall covering material was applied in one operation to
avoid any possibility of leakage at a roof/wall seam.
We literally wrapped the entire building in roofing felt (tar paper scraps and roll ends
left over from building our cabin). The purpose of this layer is not so much to provide a
moisture barrier, but to protect the next layer - polyethylene film - from the roughness
of the wood.
Next we carefully draped a single sheet of six-mil polyethylene over the whole building.
The film extended from the bottom row of logs up over the edges of the walls, with all
excess left temporarily on the roof. This extra material allowed the film to creep down
along the walls during backfilling, without stretching or tearing.
Just before backfilling, several layers of foam boxes (salvaged from a cable tv company)
were stacked up between the sheeting and logs. Our boxes tested out to have an
"R" value of four, not including the insulating value of the air spaces inside
and around them. An "R" factor of eight to ten should be adequate for this type
of below-ground application.
Soft, clean sand was gently shoveled against the wall, the trench around the coop finally
filled in. Straw bales were stacked against the north walls and around the east and west
corners up the eaves' height and tapered away from the building to provide a smooth
contour into the surrounding area. [See note at end concerning using straw for backfill.]
Foam boxes were arranged on the roof and then the whole thing, including surrounding
bales, was covered with a few inches of light soil and a thick straw mulch. From the
north, the coop looks like a rather casual pile of straw.
FINISHING TOUCHES: We put a little trim around the windows, doors, and the edge of the
roof, nailed some cedar boards on the exposed exterior wall surfaces, and then the outside
of the coop was finished.
Inside, fiberglass insulation (some of which was salvaged from old hot water heaters) was
put into the walls, and interior wall boards were nailed up. A coat of paint (white on the
upper board walls, dark brown on the lower log walls), roosts made from ironwood saplings,
nest boxes hung on the wall, and a pickup load of dry, coarse sawdust completed the
project.
During the winter, we added an insulated panel to cover the front window and to help
retain both heat absorbed by the dark-colored log walls during the day, and the
significant amount of heat given off by the birds.
Well, that's all there is to it -- a couple of weeks of good, healthy exercise, a few
dollars for materials we were unable to scrounge, a lot of fun . . . and the chickens love
it.
Steve Schmeck
1979
NOTE -- 1999:
From Sue. The chickens made this coop their home for some eight years,
and thrived. It worked well for them and for us. The chickens are now gone, but the coop
still stands, twenty years later, and is well utilized as a garden shed. There is a leak
in the roof now, and next summer we are going to unbury and strip the insulating boxes and
plastic off to repair and recover the roof covering.
The early straw bales worked as backfill only until they started to break down, which of
course they did, settling and exposing the upper part of the coop to the weather. We
wrapped the exposed area in sheets of dark colored, closed-cell foam we had left from our
house building, and told ourselves we'd get to properly burying the coop soon. Meantime,
we piled brush and apple tree branches from pruning and trimming around the back of the
coop to hide the ugly foam.
Well, soon does come sooner or later! And on the homestead, it is usually later. We did
add some extra dirt around the coop some years ago, but not enough to reach the roof. The
roof itself has a wonderful, living covering of moss and weeds living in its six or eight
inches of dirt. We will be sorry to have to disturb that covering, but if we plan on the
building lasting at least another twenty years, the later will have to come soon, and the
old chicken coop will finally get its new covering and dirt surround.
NOTE -- 2009:
From Sue. And things change ... The old coop served us well for so many
years but those leaks are the bane of any builder who wants things to last. We
decided it was time to let the coop, and that part of the garden, rest in peace.
So we rearranged our storage building to accommodate the tools from the old
garden-shed-coop and in 2002 dismantled the building, filling in and
more-or-less leveling the ground. We salvaged as much as we could and many
boards (which were themselves salvaged from elsewhere) have found new uses on the
homestead. In its place we planted a pear tree (which a few years later I moved
because it was in the way of my expanding grape row). Sigh -- if we could only
get it right the first time, how much time we'd save. But that wouldn't be much
fun.
In 2006 it
was obvious that the cedar posts we'd built our storage shed on way back in 1978
were well rotted and the sinking building wasn't getting any better. We took
stock of what was in, what room was elsewhere, and started cleaning house. We
squared off our added-on-to-again-and-again cabin-turned-shop building and
gained a small room for a "new" garden tool shed. Some stuff went to St Vincent de
Paul and the Habitat Restore. The local metal recycler got a good load when he
came to pick up a finally retired old car. Other stuff found room in the hangar
(which has no plane). Then we added a lean-to on the hangar for the rest. Such
is the life on the homestead.
* * * * * *
Copyright
© 1979 - 1999 - 2009 by Stephen Schmeck and Susan Robishaw
|