ManyTracks
Home

Homesteading
Articles

Gardening
Articles

Underground
House

Contact Us


Click on Book for More Info

Bookmark and Share


Homesteading Life with Steve & Sue
 

tools-bench-Steve


Miscellaneous Projects


On This Page


Trailer Mover


Fan Controller


Diversion Controller


Temporary
Straw Shed


Links to Other
Projects

Wood Flute Book

Mini-Bench

Recumbent Bikes

Sleds

Solar Food Dryer

Solar Oven

Treadle Lathe Book

How-to  ~  Ideas  ~  Inspiration
 From more than forty years having a good time living a sustainable life
in the northwoods of Michigan's Upper Peninsula

Our entire lives, and the homestead life for sure, is made up of projects. Planning, dreaming, imagining, designing, building, re-building, repairing, enjoying the doing and the results. Here you'll find odds and ends of projects and blog posts that don't seem to fit anywhere else. May they inspire you to a creation of your own.

Post by Steve New Carport! - 7/6/2025

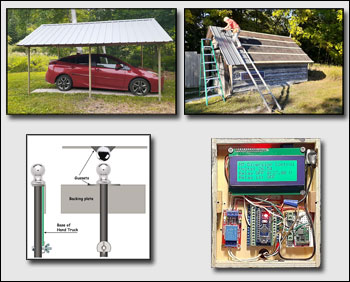
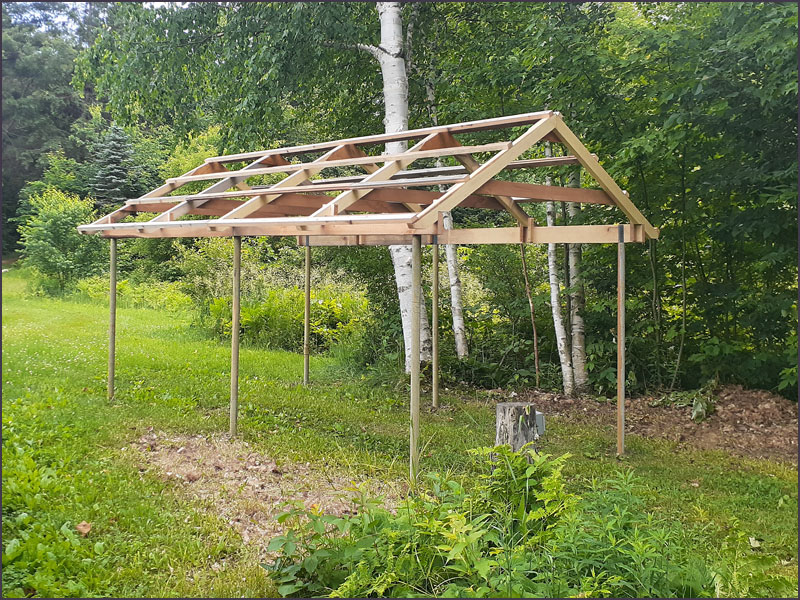
Over the years we have made several 'carports' out by the shop to protect the cars from the sun, falling limbs and birds but none were designed to last and the most recent was recycled a few years ago. I 
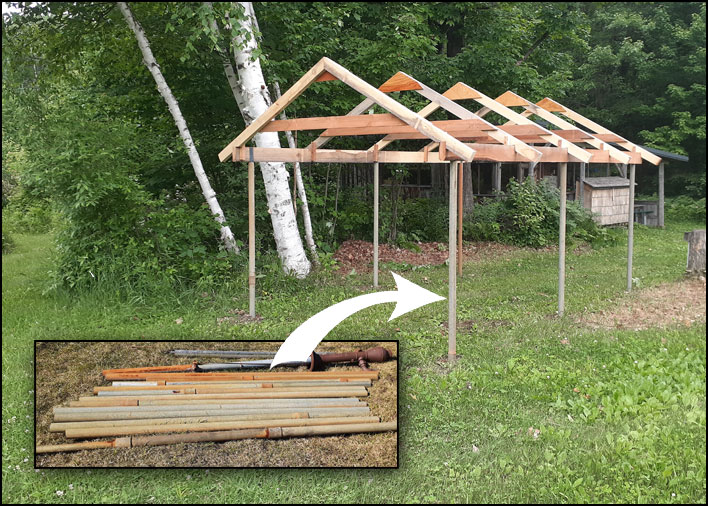
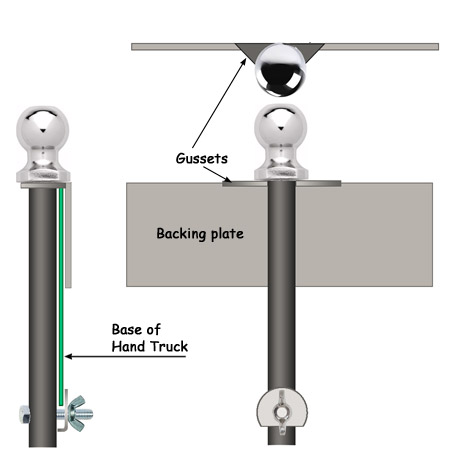
saw an opportunity to re-purpose a few of the pieces of well 
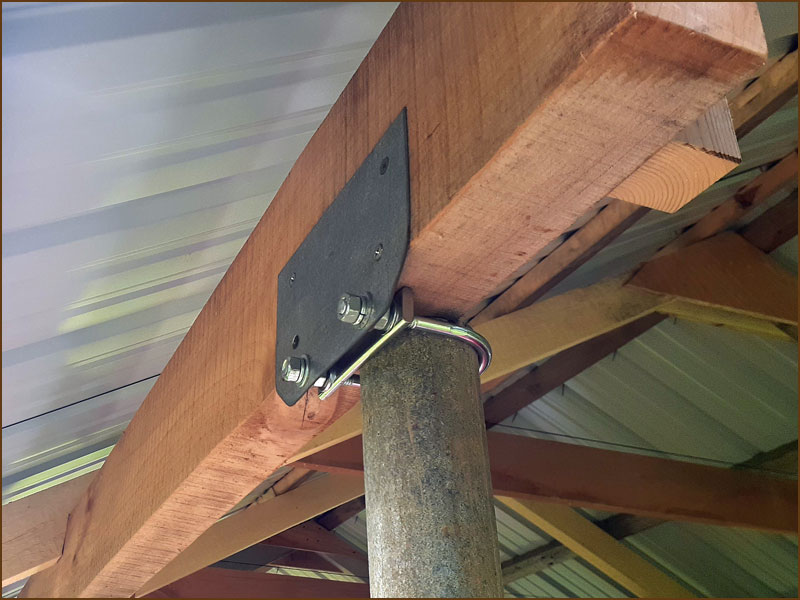
drop-pipe from our recent well upgrade so surplus well pipe became 
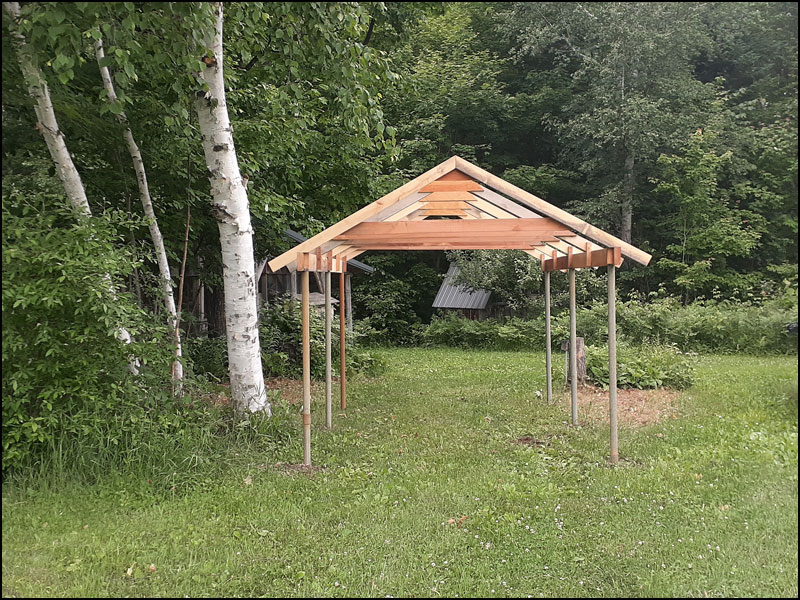
carport roof support posts. All of the wood was from homestead 
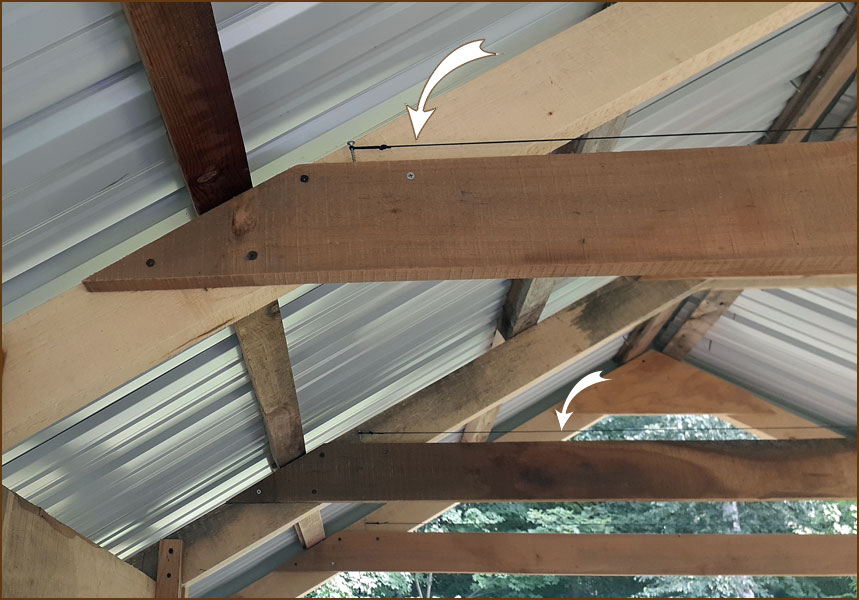
stock; maple and cherry for the main support beams and rough-sawn basswood 2x4's and more cherry for the five trusses. The roofing metal and a few U-bolts to hold the roof down were the only purchased materials. Here is a brief review of how this fun project went.

In the beginning ...beginning  pipe to posts
When we finished our recent well pump upgrade we had quite a pile of heavy 2" steel pipe 'in stock'. I was looking for a way to put some of that pipe to use. In the mean time, our car had been baking in the hot summer sun and the two issues came together as "A carport would be a nice"; use the pipe and save the car.

I began by setting the longest pieces of pipe in two rows nine feet apart and leveling their tops at a height we could comfortable walk beneath. Many years ago we cut down a bunch of black cherry, maple and basswood trees and hired a guy with a bandsaw mill to come out and convert those logs into lumber. We air-dried the beams and boards a while and then stored them in our hanger building ... for like 20 or so years. I used some of that lumber to build the trusses for this project.
phase two
For the main post-top beams I used a couple of rough-sawn cherry and maple 2x6's - very strong stuff! The lower cross-beams of the trusses are 1x6 cherry. The purlins were ripped from 2x6's salvaged from a long-gone storage building. Time to order the metal roofing.

done


It all came together pretty quickly and turned out plenty sturdy.


A few details needed attention: roof hold-downbird-strings
1 - those nice truss cross beams could make great bird roosts so I strung thin nylon line an inch or so above the upper edge of the beams.
2 - To ensure that the roof stays on I thought it would be a good idea to come up with some kind of connectors between the steel posts and the main linear beams.
3 - I laid down a couple of crushed stone pads to help keep the car-tracks from getting muddy.

Overall this was a fun project and so far the carport has done its job as intended. A couple of weeks of enjoyable outside work and less than $500 invested. All's well on the homestead! 


Post by Steve Garage Re-roofing Project - 9/22/2021 

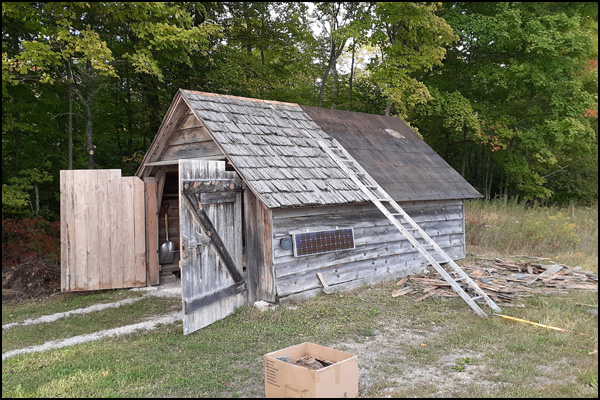
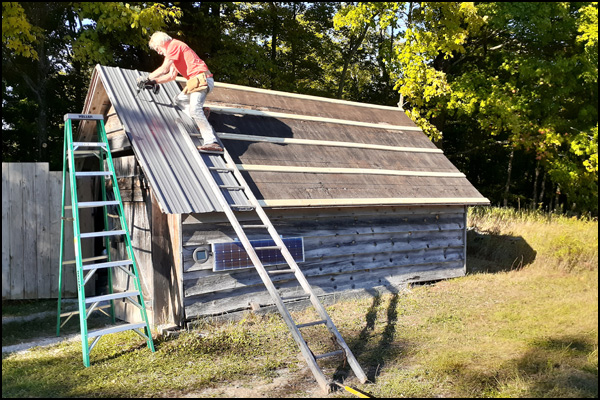
Some folks have their GARAGE attached to their house, some a little bit away. Here in the Upper Peninsula it is common to see old houses back a ways from the road but with the garage built right up by the road, with a very short "driveway". Such were practical the home builders of old. And we did the same. Of course, the distance from our house to our garage is a bit longer -- about 1/2 mile through the woods, up or down the fairly steep hill, depending on if one is coming or going. This has worked wonderfully for us for forty years and we expect it to continue for another many decades. Much of the year we drive down to the homestead, parking near the shop. But when the snow arrives we dig out the snowshoes and start packing our path to the garage. That is so much easier and more pleasant than trying to plow or blow snow that whole way, which isn't practical anyway. This friendly little building has held up well but we knew it was time, and it deserved, a nice new roof...

September 22, 2021 -- Garage Roof Update         

A bit of history on our garage: It is located at the end of the county road about ½ mile south-west of the house, on our neighbor’s property. We built it over 40 years ago on the edge of the snow-plow turnaround. The county road stops there because of a significant escarpment. About 30 years ago the paper company that owned adjacent land filled and graded beyond that cliff to create a viable logging road which gave us a nice, gated driveway. Nice in the summer, that is. The hill is steep enough that it is not passable once covered with snow and ice.

Having the garage up there at the top of the hill has been nice, especially in winter. We sized it for the smaller cars we were driving in our early years here on the homestead; Opel Kadetts, Toyota Corolla and Dodge Rampages. Our 2007 Prius fits in lengthwise but it is a bit tight getting in and out.
Originally the roof was covered with 30# tar paper, and then upgraded to roll roofing and eventually, 30 years ago, re-roofed with cedar shingles. The shingles did their job admirably for about 28 years. A couple of years ago we began to notice points of sunlight shining through those picturesque shingles. After two years of procrastinating we have finally replaced the shingles with boring, gray metal roofing – that does not leak.

Well, in truth, so far we have only done the south-facing side. This afternoon I’ll go up and begin on the back side (that nobody sees, but still needs replacing). Here are some ‘Before & After’ photos of the project.

Garage roof - 'Before'   Garage roof update - in process


Post by Steve Trailer Mover - 11/30/2017

This is the first of what I hope will become a series of projects that produced a tool or process that has worked for us. For some time I had wanted an easier way to move our two trailers around without endangering my back or having to hook them up to one vehicle or another.

I had seen a couple of possibilities on the Internet and got some ideas then headed out to the shop. Using an old, 1-7/8” hitch ball, some scrap steel (a piece of an old, large saw blade and a short piece of ¾” ID steel tube), our 40-year old hand truck and here’s what I came up with.

Trailer mover 1 Trailer mover 2 Trailer mover 3

The whole rig is based upon using that old hand truck without making any alterations to it. The unit’s backing plate (the saw blade part) slides down over the bottom of the hand truck’s base plate with the tube running on the top side. There is a large fender washer on a ¼” bolt that secures the bottom of the tube with a wing nut.

Building sequence:
  1) I brazed the shaft of the ball into the end of the steel tube.
  2) The backing plate was brazed onto the bottom flange of the ball, spaced out a bit more than the thickness of the hand trucks base plate.
  3) Two triangular gussets were brazed between the ball flange and backing plate to strengthen the unit.
  4) I drilled a ¼” hole through the lower end of the tube, just below the lower edge of the hand truck’s base plate.
  5) The fender washer was bent and shaped to fit the side of the tube.

Here is a drawing of the unit. Hopefully it will make some sense of the above.
     Trailer mover drawing

In use I slip the ball under and into the trailer coupler and lowering the handle of the hand truck to raise the tongue. I can then wheel the trailer around easily, parking it in a back corner of the garage or whatever. I have not tried to move any really heavy loads but this unit easily handles our 150 lb. boat on its trailer. This tool is especially handy when parking the trailers inside for the winter, stuffing one in a corner of the storage building and kind of nesting the other tightly beside it.


Post by Steve Homestead Electronics:
         Greenhouse Fan Controller - Arduino #1 -  12-5-2016

And you thought that I hibernated all winter! I have been amusing myself this fall/winter by designing and building small electronic gizmos based upon Arduino microcontrollers. This all started, as many homestead projects do, with being frustrated by the fact that neither our solar charge controller nor inverter can handle diversion loads.

There are many times, in all seasons, when the sun is out bright and the batteries are fully charged. Sometime this happens early in the day and the potential energy from the solar panels for the rest of the day is just wasted. The charge controller sees that the batteries are full and says, "I'll do my job of protecting the batteries from overcharge by reducing the power I'm sending to them".

If we are around and notice that the controller has been in float mode a while, we can manually turn on a one or two circuits that power electric heating panels. This has the potential to reduce the amount of firewood we burn - a good thing.

So, back to the electronic things. I am designing a pair of circuits that sense battery voltage and charge current and some software that runs on an Arduino that will turn on/off relays that control those two heating panel circuits. I think I forgot to mention that I have not always had a lot of luck with electronic stuff. I have smoked many a home-made device. I figured that with that background I’d start with something a little simpler; an Arduino-operated greenhouse fan controller. This sort of thing is commonly known as a ‘thermostat’. Wheel reinvented!

Here’s what the fan controller looks like inside…

Greenhouse fan controller
All kinds of fun components and wires seemingly running everywhere! By the way, it works just fine. The display shows the current temperature as well as upper and lower set-points, which are adjustable. The unit has been working well for a few weeks now. No smoke at all!
.


Post by Steve Homestead Electronics:
        Solar Diversion Controller - Arduino #2 -  12-20-2016
Since the greenhouse fan controller worked so well I was encouraged to continue on with the solar diversion controller. To make a long story short, I wired up another Arduino microcontroller circuit that senses the voltage of our main battery bank. When two criteria are met the unit turns on two remote relays that in turn activate some smallish radiant heating panels. First, the battery voltage must be 27 volts DC or higher and secondly, the FlexMax 80 charge controller must be in one of its two float modes.

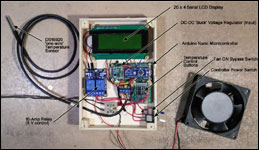
The resting voltage of our battery bank is (as of 2024) 26.6 volts so in the morning, before the sun hits the panels, the diversion relay is OFF. The voltage increases as the sun hits the panels and usually by mid-morning it climbs to or above 27 volts. Some time later, usually 15 minutes to an hour, depending on how bright the sun is and how much battery power we used the the previous evening, the controller will go through a short 'Absorb' mode and then switches to 'Float' mode.

At that point both criteria have been met and the heaters are turned on. There is enough hysteresis in the controller's programming to keep the heaters on throughout the day even though the solar input may vary quite a bit due to clouds. In the evening the process reverses and when the battery voltage drops below 27 volts the relay switches OFF. Usually there is a short period during which with the heaters off the voltage will go back up to more than 27 volts and the heaters may turn on for a few minutes. Sometimes we notice this happening but usually, since the relays are pretty quiet and the heaters are virtually silent, we are unaware of this little shut-down process.

Diversion contoller - installed

 On a typical partly sunny day the diversion controller shut-down is early enough that the panels have a chance to top off the batteries before sundown. It is an understatement to say that we are very happy with this unit's performance! At this point (April, 2025) the controller has performed flawlessly for over eighth years. I changed a couple of settings when we upgraded our battery bank to lithium ion (LiFePO4) batteries but otherwise it has just worked without even being touched for all those years. I estimate the cost for the controller was less than $20, a pretty good return on investment!
<{ Click for larger image }


.


Temporary Storage using Straw Bales and some boards and plastic sheet

The articles, discussions, and books on straw bale building have been fun and intriguing. If we build again, it is a technique we will certainly look into. But it is an idea that can be used on a less formal scale as well, for temporary storage and shelter.

When we first moved to our current homestead, we discovered, to our surprise and dismay, that one summer was not long enough to build a complete homestead -- not even a complete house -- not even close. We also discovered that those unanticipated odds and ends drained a limited savings even faster than the grasshoppers devoured the new garden, planted on worn-out soil. Fall arrived with the house built up only as high as the footings. We looked around and made the responsible decision to move back down to the city to work for money for a few more years (which lasted two months before instinct overruled supposed responsible action, and we moved back to the homestead).

But all our worldly goods were residing under a large sheet of heavy black plastic, where we had unloaded them from the U-Haul that spring, and had laid them out in more or less organized rows for their temporary stay until we got the house done that summer. So we thought. But now, it didn't seem the best storage facility for a longer duration. And besides, the thrill of crawling under that black plastic to find the particular box that had that one item in it that we wanted had long faded away. A neighbor down the road was baling straw about then. Ah hah!

We bought enough bales of straw to stack, one over two, into a building eight feet wide on center by about twice that long, with an opening in one wall for a door. For the roof we had the eight foot rough wood forms we had made for the footings and walls of our planned house (ala Nearing slip-form type stone and cement wall, which later turned into an Oehler PSP wood type). We set the heavy forms, made of rough pine 2-by-4s and 1-by-6s, on the straw bale walls and covered the whole thing with the piece of 10 mil black plastic that had been covering our belongings. Scrap boards laid on the plastic kept it from blowing away.

What a great improvement! What luxury! It was something we should have done at the very first. This hay bale temporary storage building lasted for many years, and the chickens that came the next year loved to scratch around the base of the straw walls. When we built a more permanent wooden storage building, the straw went to good use on the garden, and the plastic and forms went on to other lives.

As is the way on the homestead, many of those wooden forms were used a few years later as a roof on a "temporary" lean-to off the wooden storage building -- for rototiller, corn grinder, tires, and the like. Last year the "temporary" lean-to (probably twelve years old) was replaced with a "real" addition (2-by-10 rafters, metal roofing, walls made of salvaged used metal garage doors). The best of the forms became a new porch off the woodshop (former cabin). The rotten ends of the worst were sawn off, the remaining halves used as scaffolding for building a new hangar. And life on the homestead goes on -- for people and materials.

* * * * * *

Copyright © 1999 by Susan Robishaw / Updated 5/2025 by Steve Schmeck


Back to top

To comment
, ask questions, or just say Hi - click here  Contact Us. We enjoy hearing from our visitors!

Enjoy our articles? We appreciate DONATIONs of any amount! It helps to keep the website going. Click HERE to donate to ManyTracks using: Credit Cards logos.     Thank You!!


* Should you want to use all or part of one of our articles in a non-profit publication, website or blog we simply ask that you give proper credit and link (such as "article by Sue Robishaw/Steve Schmeck from www.ManyTracks.com"), and we'd enjoy knowing where it is used. Thanks!

       We always appreciate links to our site www.ManyTracks.com from appropriate sites, and we thank you for recommending us!

Have you read  "Frost Dancing - Tips from a Northern Gardener"? A fun short read.

or "Homesteading Adventures"    Creating our backwoods homestead--the first 20 years.

and "Growing Berries for Food and Fun"   A journey you can use in your own garden.