As a homesteader with more interests than
time, simple root cellaring tops my list for out-of-season eating and food
preservation. Spuds,
roots and many fruit do well this way -- easy in and out.
But
other foods need more work to allow us to make use of their favors
off-season. Since we have chosen to live in an area that is under frost and snow
more than half of the year, this is an important aspect of gardening for me. I
do a bit of canning -- tomatoes and pickles -- and used to do more. Then I
discovered solar food drying. Energy efficient enough for both my time and my
sense of sustainability -- environmentally and eatabilitly.
Now
this is hardly a new idea -- people have no doubt been drying foodstuff since
there have been people and food to dry. Many of the books we poured over in the
70’s had solar food dryers. But, I never saw one that inspired me to want to
build one. The many different designs no doubt worked fine -- in hot, sunny, dry
climates where you could dry for weeks on end and not worry about moving the
bulky units in out of the rain. Those of us in the muggy, sun-spare states were
left with the "incandescent light bulb in a box" affairs.
Then
I ran across Larisa Walk’s flat Midwestern design (see link at top right
of page). Her’s wasn’t just a
theory or an "interesting prototype" -- this was a "designed by
necessity and hands-on experience" homestead working tool. She and Bob
Dahse changed and modified their design over time, and Steve and I borrowed
their design and continued on down our own path with it. Hand-made tools like
this are full of life and soul. They don’t like getting stale any more than we
do.
The
dryer works by convection, drawing air in at the bottom which flows across the
trays of food and exits out the top taking moisture with it. And it works in the
humid Midwest because there isn’t much space in the dryer for that moist air
to hang around in -- it quickly moves on out. This design would probably not
work well in a hotter, dryer climate as it would overheat. Although I do have to
occasionally prop a window open on unusually hot, clear, sunny days, this isn’t
much of a problem for us.
THE
MATERIALS needed to build this dryer are not expensive, and many can be
salvaged. It is a design that is easily modified to suit you, your materials and
your budget. The accompanying photos and drawings should give you a good idea of
where you are headed.
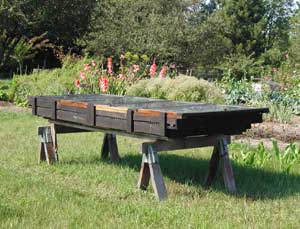
Our
dryer is sized around the four windows that sit on top. They are from our cold
frames and are used as such when not on the dryer. The seasonal timing works out
great for this. The windows are 28"x40" (home-made frames around
24"x36" double strength glass). Everything else was sized to suit
these dimensions. This gives me plenty of drying space for serious food
preservation. Half that size would work fine, too, but if you get much smaller
it won’t heat (and dry) as efficiently. We originally built ours as one long
unit and it took us way too many years of struggling the thing in and out of
storage to finally cut it in half and simply bolt the two pieces together in
place. It is MUCH easier to carry and to store this way and is highly
recommended.
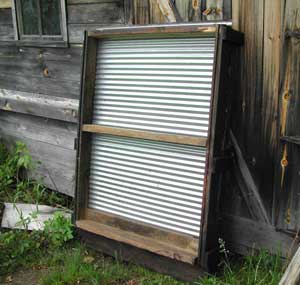 << underside of dryer
The
WOOD FRAME is a simple 2x4 grid with 1x3’s across the top and bottom. The top
1x3 is set down so there is a 3/4" air space across the top; the bottom 1x3
is set up so there is a 3/4" air space at the bottom. The bottom of the
windows sit on the bottom cross piece and the top of the windows sit on 1x4
pieces spaced appropriately. We also screwed scrap pieces on the bottom to keep
the windows from slipping down. The windows need to spaced high enough to leave
room for your food trays and shade frames. The air pattern is in at the bottom,
flowing under and up through the food trays, exiting at the top of the dryer
under the shade panels or glazing. Your dryer design needs to allow and
encourage this air flow.
The
wood is finished with a non-toxic oil finish (raw linseed oil and turpentine,
mixed 2 to 1 is an inexpensive and easy finish). The wood frame provides a base
for the metal as well as the dryer "sandwich" of screen, shade, and
windows. The whole thing sits on two sawhorses. They are easy to move and store,
plus we had them. When the frame was in one piece it spanned the space between
the horses fine. But after we cut it in two we had to put several boards across
top and bottom to help support the middle. Or we could add another sawhorse. You
could also simply attach legs to your dryer, as many as needed to hold the thing
up and flat without bowing.
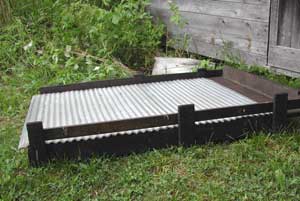 <<
looking from the bottom edge
<<
looking from the bottom edge
CORRUGATED
METAL ROOFING is the bottom layer, laying across the 2x4 frame. Fairly deep
corrugations are best to allow good air circulation under the food trays, which
rest on the tops of the corrugations. We could only get shallow corrugated
roofing when we built our unit so we put rounded 1x1 sticks vertically under the
food trays to get a bit more air space.
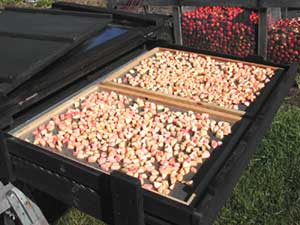 <<
trays of apple pieces ready to dry
<<
trays of apple pieces ready to dry
The
FOOD TRAYS are the next layer in the dryer sandwich. They have to be sturdy
enough to hold the wet food, non-toxic and able to withstand the heat of the
dryer. It’s hard to find a good, inexpensive solution here. Regular window
screening, whether metal or fiberglass, is not food safe. One option is to use
galvanized hardware cloth covered with lightweight cotton to keep the food off
the galvanized wire. Some foods are sticky and so won’t be easy to manage on
cloth, plus air won’t flow as easily through it. But it will work. Cloth
tightly stretched across a wooden frame is an option, too, though it tends to
sag under the weight of the food. A under-frame of small dimension wood would
help alleviate that problem.
Many
commercial electric dryers use plastic, but plastic isn’t something I want in
my dryer or food. The best long-term solution seems to be stainless steel screen
in a wooden frame, which is what we ended up with. Unfortunately, this is not an
inexpensive solution but the screen should last many lifetimes, which isn’t
something you can say about most common kitchen appliances. We got ours from an
industrial supplier who is willing to sell small quantities to individuals. If
you buy from them, remember they are doing you a favor in dealing with these
small lots. The company is Cambridge Wire Cloth Company, Cambridge, Maryland,
877-226-9473. They have a $150 minimum order but if you haven’t use for that
much screen, combine an order with others. With the eight solar dryer screens
plus another five for a smaller passive dryer that sits over our woodstove, we
had no trouble using up an order of screen (which they call cloth). What size
mesh is available depends on what they have in stock, and the price depends on
the size. The standard width of the material is 60". A mesh size of .025
10x10 (ten wires per inch) is common and works well for dryer screens.
This
metal screen was stapled to a simple wood frame, with thin strips of wood nailed
over the edges. This makes an easy to use, easy to clean, non-reactive, sturdy
screen that doesn’t droop. It has been well worth the initial cost. Because a
large tray full of wet food would be quite heavy and hard to manage, my trays
are moderately sized (19"x 26") to fit four across and two high in the
dryer (eight total).
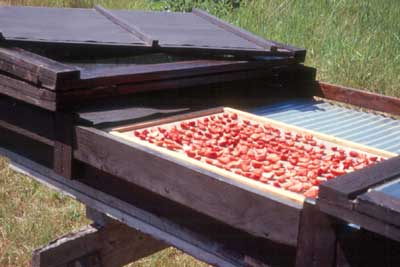 <<
shade sitting on open window ready to be place on tray of
strawberries
<<
shade sitting on open window ready to be place on tray of
strawberries
A
SHADE over the screen is important to keep the sun off the food, plus it can
help absorb/transfer heat down to the drying food. A simple thin, black cloth
can be draped over the screens but it tends to stick to some foods and is a
hassle. Initially we stapled black material to wooden frames which sat on the
food trays. This kept the material off the food but the material faded fast and
had to be replaced too often. Meantime, Larisa had mentioned they had tried and
were happy with black painted metal attached to the underside of their windows
(they were using corrugated fiberglass glazing). It was easy to manage and
worked well. And they discovered that it worked best to paint the underside as
well as the top side of the metal black.
We
didn’t want to attach anything to our windows since they were also used on the
cold frames, so we made a simple shade out of 1x1 wood strips and aluminum
printers plates (inexpensively available from the town’s newspaper office),
sized to fit over two trays. The wood strips run vertically on the underside (to
allow air to flow from top to bottom over the food trays), and horizontally on
the top, the thin, floppy printers plate sandwiched between. The lightweight
panels were then painted flat black with high temperature barbecue/stove paint.
These have worked well and are easy to move and store.
 WINDOWS are the final piece of the unit, sitting on top of all, enticing the sun
and heat into the dryer and discouraging rain and debris from entering. I prefer
wood framed, glass glazed windows. But you can use whatever glazing suits you.
For ease of use and dismantling, each set of two windows is hinged with loose
pin hinges along their adjacent sides (slightly loose fitting nails work great
for replacement pins). The windows sit slightly above the shade frames on
supports that are part of the wooden frame, with bottom stops to keep from
slipping down off the unit.
WINDOWS are the final piece of the unit, sitting on top of all, enticing the sun
and heat into the dryer and discouraging rain and debris from entering. I prefer
wood framed, glass glazed windows. But you can use whatever glazing suits you.
For ease of use and dismantling, each set of two windows is hinged with loose
pin hinges along their adjacent sides (slightly loose fitting nails work great
for replacement pins). The windows sit slightly above the shade frames on
supports that are part of the wooden frame, with bottom stops to keep from
slipping down off the unit.
USING THE DRYER is simple, but it is not
mindless. The whole unit is propped at an slight angle toward the sun, using
shims to raise the back up. How much of an angle depends on how much your drying
food wants to roll to the bottom of the screens. And you need sunshine. Several
sunny days in a row. A few clouds will be OK, but if it gets very cloudy or
overcast, there won’t be enough sun heat for drying. How this affects your
food depends on what you are drying and what stage of drying it is in. A good
sunny day for the initial drying is important so I don’t bother filling the
dryer unless it looks like the weather will cooperate.
On
those unusually clear, hot, sunny days of summer I sometimes have to prop the
windows open a bit to keep from overdrying / burning the food. It can happen
(there really is not much use for scorched dried broccoli). I’ve read
temperature recommendations from 90 to 140 degrees. But as I haven’t a
thermometer of that range that will fit in the shallow space of the drying rack
I simply go by the food itself. By observation and experience you’ll soon have
a feel for the dryer and the sun and how they interact. If your drier
continually overheats, then set your windows up a bit farther.
Prepared
food is laid out on the trays without overlap or crowding, the trays set in the
dryer, the shade set on the screens, the windows closed over all. Most foods
take several days to dry and I often move or turn screens, and turn/stir the
drying food during the day. Because of the passive nature of the unit, there are
spots that are warmer and dry faster than others. We live in the bottom of a
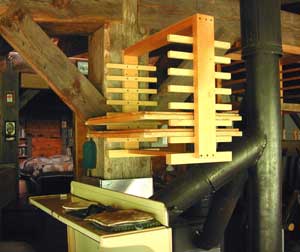
valley and our nights are usually very humid, so I bring the trays of food in at
night and take them back out the next day. We have a rack in the house (over the
wood cookstove -- see photo below) to set them in which works out nice. Even
though there usually isn’t any heat from the stove that time of year, the air
circulation helps, if not to dry then at least to keep from molding. However,
you may choose to leave the food in the dryer at night. There are no "one
and all" rules here. It depends on your weather, your environment, the food
you are drying. Some foods are fast and easy (shredded carrots), some very
difficult and needing long, good sun (tomatoes), others in-between. It’s a
cooperative procedure that requires more awareness than rules.
 Once
the food is more dry than not, I put it in a covered bowl or pot at night to
equalize since the individual pieces dry at different rates. Then back on the
screens and into the dryer the next day. If the weather clouds up so you can’t
return the food to the dryer, spread it out on the trays anyway. Until the food
is quite dry, there is the possibility of mold if left in the covered container.
When it IS dry, however, I leave it in a covered container for several days,
stirring once in awhile, before storing in lidded jars. All those canning jars
that you are no longer using work just fine for dried foods, and you don’t
need nearly as many as when you were canning the harvest.
Once
the food is more dry than not, I put it in a covered bowl or pot at night to
equalize since the individual pieces dry at different rates. Then back on the
screens and into the dryer the next day. If the weather clouds up so you can’t
return the food to the dryer, spread it out on the trays anyway. Until the food
is quite dry, there is the possibility of mold if left in the covered container.
When it IS dry, however, I leave it in a covered container for several days,
stirring once in awhile, before storing in lidded jars. All those canning jars
that you are no longer using work just fine for dried foods, and you don’t
need nearly as many as when you were canning the harvest.
THE
FOOD itself is, of course, the heart and soul of the solar food dryer. There are
many books on how to prepare food for drying, and I recommend reading all you
can find. Most advocate much more aggressive preparation and warnings than I
subscribe to, but you have to go where your beliefs take you. My favorite is
Larisa Walk’s booklet "A Pantry Full of Sunshine - Energy Efficient Food
Preservation Methods" ($11.75 ppd from Larisa Walk, 30319 Wiscoy Ridge Rd,
Winona WI 44987; or online at www.geopathfinder.com) since I share her
practical, cooperative approach to food. My food drying and the foods I dry are
pretty basic but you can be as adventurous as you like with a wide variety of
fruits and vegetables.
APPLES
are one of the main inhabitants of my solar food dryer, though because of their
seasonal timing, later batches often are dried indoors over the wood stove
instead of in the outdoor solar dryer. We eat fruit sauce most mornings for
breakfast (with raw oatmeal and other amendments), and apples are our main
fruit, so I cut up and dry a lot of apples. Simply peeled, cored, cut into
pieces (maybe half inch or so) and spread on the trays, this is much easier than
canning. And you can eat the dried fruit as is, in addition to cooking it into a
sauce. Apples are naturally a drier fruit than most so are easy to dry and will
tolerate less than ideal weather much better.
STRAWBERRIES
are fussier, but if we’re having a bumper crop, I do several batches of these
as well. They are great additions to the dried apple sauce in late winter, or
for camping. When backpacking, we simply add water to dried apples and
strawberries at night, having "instant" breakfast sauce ready in the
morning. Strawberries are incredibly sticky as they dry, so I prefer the small
or medium sized berries that I can simply slice in half, laying them skin side
down on the tray. Large berries get sliced in thirds or quarters so some of the
pieces have to go wet side down on the tray. Later, they are peeled off and
turned over. Once they skin over they are easier to handle. You want to have
good sun for strawberry drying as they are quite a wet fruit.
SNAP
BEANS are easy and one of the two main vegetables that I dry. I cut or snap them
into relatively same size pieces (maybe half to three quarters inch), steam
blanch them 10 minutes (they don’t taste as good if not blanched first), then
spread on trays. They dry fairly easily. Reconstituted dry snap beans don’t
taste like fresh or canned beans, so you may want to do a small amount before
drying your entire harvest, depending on how picky you choose to be. They take a
surprisingly long time to reconstitute/cook but give flavor and texture to
winter soups and vegetable dishes.
CARROTS
are easy to root cellar, but they don’t last until the new crop is ready, so
if I have a good harvest, I dry some for that lean time. I found dried carrot
pieces to take too long to reconstitute/cook for most of what I used them for,
so I switched to shredding them. Either way, they are pretty easy to dry. Simply
wash, shred on a grater, spread on trays and dry. I like to add a handful of
dried carrots when cooking rice.
CORN
is probably my favorite dried food success -- green, or sweet, corn -- not
mature dry corn for grinding. I’ve never dried enough to last through the
winter, though I keep trying. It reconstitutes closer to its fresh taste than
any other food I’ve tried. Of course, to get that great flavor, the initial
harvest has to be of good, ripe, fresh, NOT overipe, green corn. If the corn is
chewy and past peak when you harvest it, don’t bother to dry it -- it won’t
get any better.
Corn
is a wet food, so watch the weather and forecast before starting. You want good
sun for several days. It takes a bit more organization and work than the other
foods, but is well worth it. My favorite way is to harvest the corn in the
evening, steam blanch 10 minutes (just as you would for eating), then lay out on
towels to cool overnight. In the morning, cut the kernels off the cob, spread on
trays and put out in the dryer. This spreads the work out and gets the corn out
in the dryer earlier in the day than if you start in the morning. We usually do
several bushels at a time as that is how corn matures (and you have to harvest
when it’s ready, whether you are or not). Plus it’s a messy operation and
you might as well do a lot as a little. Sometimes I do the entire operation all
at once, however.
Dried
sweet corn reconstitutes fairly fast and is great eating, on its own or with
other vegetables. I particularly like having a handful to add to dry beans. Nice
thing is you can get just the amount you want, without having to open a whole
can or jar full. I really do need to grow more corn though.
THERE
ARE MANY other vegetables and fruits you can dry in your dryer, of course. Once
you start using your dryer, you’ll discover what works or doesn’t work for
you. A handful of extra peppers are easy to cut up and dry, or leftover garlic.
Herbs can be dried in the dryer, but I find they do better simply hung in a back
room of the house. The dryer can be too hot for sensitive herbs. Homemade
camping food is easy to do-your-own, and much cheaper and better than
store-bought if you do even a moderately good job.
Once
the sun starts moving down in the sky in the fall and the days get shorter,
there simply isn’t enough solar radiation and heat to bother using the solar
dryer, and it gets dismantled and stored inside for the winter. It’s done its
job well, and deserves the rest, as does the gardener.
The
solar food dryer is an interactive and satisfying way to put food away for those
times you can’t eat fresh from the garden, and for those foods that don’t
lend themselves to simple root cellaring. It requires only sunshine and human
power to operate, and fits in well on the homestead. One can hardly ask for more
from a cherished friend and tool.
* * * * * *
Copyright
© 2006 by Susan Robishaw