|
| ||
|
Bread |
Homesteading Life with Sue & Steve |
|
|
DIY Window Quilts
How-to ~ Ideas
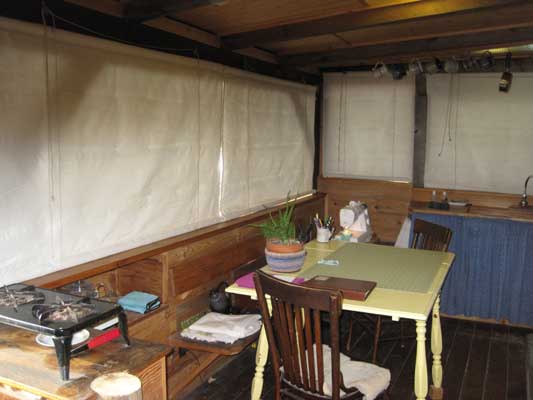
~ Inspiration Windows in a home are essential. They invite in the Sun with her light and heat, and in the winter we crave both. But on those cold winter nights or cold gray days those windows draw out our precious heat. But we can give the windows a friendly warm hand by making and installing window quilts. Not just for winter though, they can be equally as useful in the summer and in hot climates to keep out a hot summer sun. |
||


|
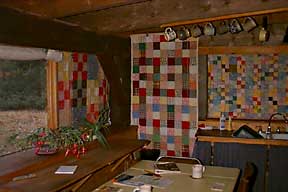
Over the years, and many window quilts later, I've decided that a window quilt needs to be easy to use, both going up and coming down and it needs to be cheery when in place. Being inexpensive and easy to make doesn't hurt. And you can let your creativity run wild if you want. TOPS - My first window quilts were rather heavier on the 'quick and get it done' side than the creative, but they worked. We had moved into our new underground house in the fall (not that it was 'finished' but it was livable) and the changing weather made it obvious I needed to get the window quilts done sooner than later. With fifteen windows to insulate I set to work with a cardboard template and scissors and cut out a million or so 4" squares out of whatever inexpensive material I could find. Maybe it was only a half a million, but it seemed like more. Sewing scraps and worn-out clothing made my original window quilt making a real "homemade" affair. Being in a hurry to get the quilts on the windows I'm afraid I didn't strain my creativity much.
Later when I added a new layer of batting I covered the colorful tops with plain white material which, though not as splashy, suits much better. Yet when the light shines through when they are down during the day the old colorful quilt tops glow through with subtle color, rather like stained glass. If I ever get around to making new window quilts, I'll just use plain white cotton muslin.
Many years later - 2010: We had replaced our original
homemade double pane windows with factory e-glass double pane
glass (and did that ever make a positive difference!). I decided it was time to make new, more efficient window
quilts to go with them. The basics were the same as the old ones
but the materials were different. See notes in the paragraphs
following. 2010 quilts: 15 yards of 118" unbleached muslin; enough for new quilts for all of our windows. This turned out to be a good choice. It was easy to work with, easy to launder, and we really like the look. This was a long term, several year project making new window quilts for all of our windows. But when it was done it was well worth it.
BATTING - But it is the inner batting that, though not
visible, is the most important part of the quilt. I used plain
inexpensive cotton quilt batting for my first window quilts which worked
fine -- until I washed them. Turns out the old style cotton batting is OK if the quilt is tied or
quilted on a fine grid. But with only one tie every four inches (I wasn't into
fancy quilting) the
batting separated after being washed leaving sparse areas alternating with
clumpy spots. Not exactly what I had in mind. Technology, options, and availability change all the time and I'd guess that with some research you can find better, more insulating, material available today.
2010: For the newest quilts I used a sandwich between the muslin
of (starting with the window side):
See below for later "stick pockets". I added these on or created them by taking out stitches and resewing to make pockets. I recommend you include this design feature from the beginning.
For all of that, I have to admit that a plain old blanket works
just fine, too. We've had a "temporary" light blue blanket
window quilt on our entryway window for very many years. It
really is time to come up with a more elegant replacement
though. INSTALLATION - For the first window quilts we stapled and tacked two thin boards to the bottom of the quilt and two at the top, one strip on either side of the material. This was OK, but after many years of taking the curtains down, un-nailing, un-stapling, then re-nailing and re-stapling (the quilts do have to be washed) I decided that there had to be an easier way. There was, of course, and it wasn't even that hard to figure out (with one of those huffy "now why didn't I think of that before" impatient snorts). Simply sew an open hem top and bottom and slide in your stick. Drill holes in the top stick for attaching screws. Easy up, easy down. Simply slide the sticks out, wash your quilts, then slide the sticks back in when ready to reinstall. I have found that it works best if the hem is sized fairly snuggly to the stick so it can't rotate around, but not too tight that it's hard to get in and out. Make your bottom sticks narrower than the window opening so they don't jam between the frame and will easily roll up. The bottom sticks allow the quilt to be rolled up with cord. The top ones allow easier installation in or in front of your window frame. How you put them up depends on your windows. You need cording such as venetian blind or sash cording or something similar. Regular string or unwoven cord will likely ravel and break with use. We originally used sash cord, which worked well. But it did wear out over time and when it came time to replace it (maybe 20 years later), we couldn't find any. There isn't a lot of call for sash cord anymore I guess, or venetian blind cord. We did finally find some woven cord in the local hardware that works, though it is a bit bulkier. Two small pulleys and several large fencing type staples are also required. And you will need something to wrap your cord around to keep the curtain rolled up or open. A nail will work but a small dowel is nicer. A little creative adjustment may have to be done around your window frames to make these curtains work well. The pulleys need to hang above or on the room side of the curtain. Ideally the curtains are attached far enough above the window that they don't block the view when rolled up (either flat in the same plane or above if the window is inset). Follow the drawing to see how to string the cording. It is easier done than said I think. A knot or large bead in the end of the cord will keep it from pulling through the pulley. You can tie the ends together but if you have a lively cat in the house you may want to keep them separate to prevent the feline from hanging his or herself on the cord. One of our cats could care less about such things as dangling cords, the other couldn't ignore it if she tried. Which she doesn't of course.
* * * * *
RIGID
INSULATING PANELS - Another technique I've used for
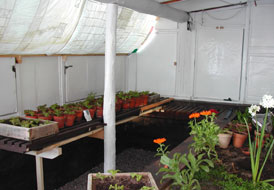
inexpensive window insulation in our
greenhouse is a rigid insulated panel. Make a frame of 3/4" or 1" x
1" wood to fit inside your window opening (or against it).
Cut a piece of rigid foam (styrofoam or beadboard) to fit within the frame. Cut two pieces
of polyethylene plastic for either side. Staple it to the frame. I
used regular wood glue between the frame and plastic as a sort of
caulking or sealant. The plastic keeps the rigid foam from outgassing into the room.
This is important on sunny days when you aren't there to take
the panels down.
Window insulation can be an easy and inexpensive way to cut down your winter energy use and keep your dwelling cozier, as well as brighter. It can be fun and creative too! ~ ~ ~ ~ ~ ~
Copyright ©
1993-2018 by Susan Robishaw |
 I sewed the squares together to a size to fit
generously into, or in front of, our window frames. When you tie
the quilt it will "shrink" some so make it on the large
size. You want them to cozy up tight to your window frames to
keep the drafts out, or in. It's also good to make them long enough that the
bottom can lay on the sill creating a good seal.
I sewed the squares together to a size to fit
generously into, or in front of, our window frames. When you tie
the quilt it will "shrink" some so make it on the large
size. You want them to cozy up tight to your window frames to
keep the drafts out, or in. It's also good to make them long enough that the
bottom can lay on the sill creating a good seal.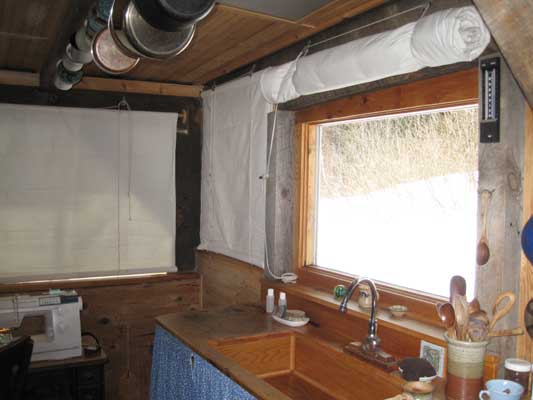
 But before sewing that hem I hand tied the quilts about every four
to ten inches, depending on the batting. Then it all stays together when sewing
that border/hem. Plus it gives you a chance to fit the quilt to
your window and adjust the size with your border.
But before sewing that hem I hand tied the quilts about every four
to ten inches, depending on the batting. Then it all stays together when sewing
that border/hem. Plus it gives you a chance to fit the quilt to
your window and adjust the size with your border. 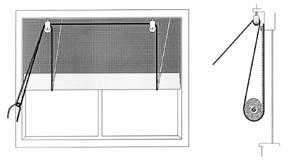
|
Back to top |
|
|
|
|
* Should you want to use all or part of one of our articles in a non-profit publication, website or blog we simply ask that you give proper credit and link (such as "article by Sue Robishaw/Steve Schmeck from www.ManyTracks.com"), and we'd enjoy knowing where it is used. Thanks! We always appreciate links to our site www.ManyTracks.com from appropriate sites, and we thank you for recommending us! |
|
|
Have you read "Frost Dancing - Tips from a Northern Gardener"? A fun short read. or "Homesteading Adventures" Creating our backwoods homestead--the first 20 years.
and
"Growing
Berries for Food and Fun"
A journey you can use in your own garden. |