|
| ||
|
Bathing Suit |
ManyTracks Sewing and Knitting
|
Socks
|
Rayon 8 Gore Dance Skirt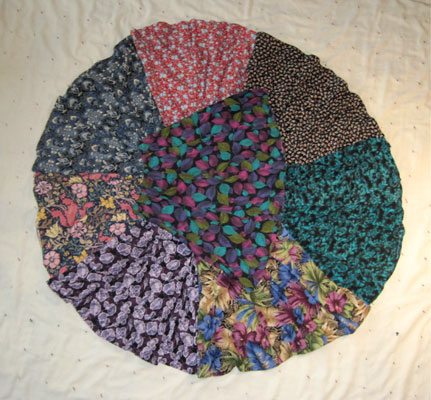
How-to ~ Ideas
~ Inspiration Let the colors flow into a great feeling and flowing light weight skirt. |
||
|
I don’t think I’ve ever found a skirt that fit ‘just right’ the way it came, so I’ve always re-made or made from scratch my own, fine tuning my pattern with every one. For dancing I like rayon. It’s cool, moves beautifully, is confortable, and doesn’t wrinkle. It’s a bit harder to sew with than cotton but not terribly challenging. I like a knee length style. This is what I make most often.
I started out simply shortening and taking in whatever skirts I found, making a simple elastic waist band to fit, letting it be however full it came out at the hem. That worked OK but often looked like it could use some fine tuning. The drape wasn’t always pleasing, the hem would come wonky, and it seemed like too much fabric for my small frame. I fiddled and fussed, trying this or that; taking in, taking out, reshaping. Going back and redoing older skirts when I came up with something I liked better. And always struggling to get a straight hem. By trial and error I finally resolved the issues so now making a skirt is no longer a multi week project. It’s more fun and well worth the time it took to come up with a pattern that fits, suits, and pleases me. Here are some things to consider when creating your own pattern. (1) GORES - the individual lengthwise pieces the skirt is made up of. You can make a skirt with just one or two pieces and seams (that probably wouldn’t technically be a gored skirt), or four, six, eight, or more gores. Gores (when talking skirts) are roughly long triangular pieces which when sewn together make a slim a-line up to a very full skirt. An informal long cotton gathered skirt might do fine with four gores, but my choice for mid-length rayon is eight. And I found it is very important to run the grainline down the center of the gores. (2) GRAINLINE - the direction of the threads in the fabric. If starting with raw fabric it’s fairly easy to lay out your gores with the lengthwise grainline running straight down the center of the gores. But when dealing with factory made skirts you soon find they often aren’t made that carefully. Grainlines can run crooked, or not the same way on each piece. Or maybe the original skirt was fine, but there isn’t enough material for you to lay out your gores correctly so you fudge fitting them in, with no consideration of where the grainline runs on your pieces. And then you wonder why you just can’t get the final skirt to hang right, or the hem straight. It took me awhile to figure this one out. Especially when working with a flexible fabric like rayon it really does pay to keep that lengthwise grainline straight down the center of the gore. It will make your sewing life easier and the finished product nicer. That said, many of my earlier skirts do not fit that ideal and they are fine as they are, but I spent quite a lot of time with finicky redoing hems and seams to get them that way. (3) GORE SHAPE - Angled down the sides straight from the top is easiest. It often comes out fine. But I found a style that suits me better and is not that much harder to make. My gore pattern is straight across the top, then straight down the sides for (in my case) 6" from the finished top, then angle out to the bottom. (See drawing.) This makes for a more fitted style at the hips with less fabric. My rayon skirts hang better with a more pleasing (to me) look. I tried this same style with a full length cotton skirt and it didn’t work. It was OK when standing but not when sitting.
PATTERN - It’s probably easiest to start with a skirt you like, if you have or can procure one, and use those measurements. But you might also get a skirt that is larger than you need and use pins, clips, basting, and a ‘guess and by golly’ strategy to come up with something you like. You’ll also want some large flat paper, ruler and yard stick, and a square helps, too. Don’t worry about getting it "right" the first time or you’ll cause yourself unneeded stress and worry. This is your draft piece. Just do the best you can. Thrift stores or garage sales are your supply sources. It doesn’t matter if you don’t like the pattern or color but it is important to get similar fabric to what you will want to use for your next skirt. Seam ripper, patience, and a sense of fun and adventure is probably even more important. Tip - If you are using your temporarily repurposed kitchen table for your work, blocks under the legs to bring the height up can make you and your back happier. You need several MEASUREMENTS to come up with your pattern gore. To begin with you’ll probably want to add extra at the seams to give you room for adjustments. This style is for those whose waist is smaller than their hips. (1) Top Width of Gore - This is determined by measuring around your hips at the largest spot plus a little for ease. Since this is an elastic waisted design you have to be able to pull your skirt up over your hips. Divide this number by 8 (the number of gores) and add seam allowance for both sides. I use a 3/8" seam so I add 3/4" (2 x 3/8). For your first try you may want to have more seam allowance to give room for adjustments; maybe 5/8" (x 2 would be 1 1/4"). This is the top width of the raw gore before sewing. (2) Waist-Hip Length - Decide the length of the straight down waist-to-hip section. I use roughly the distance from my waist to my hip. That’s a good place to start. (3) Bottom Width of Gore - This will be trial and error if you don’t have a skirt to start with. There’s no right formula, just what you like and how full you want your skirt. To determine the circumference of your finished skirt measure a skirt you like or make a guess to start with. I like 80 inches for my knee length skirts. As above, divide this number by 8 and add seam allowances. Round off to an easy number to keep your life simpler. This is the bottom width of the raw gore at the hem, straight across. The final skirt gores are not straight across but slightly curved, but a little more or less isn’t going to matter. You can fine tune later if need be. (4) Length - Decide the finished length you want, from waist to hem. Add to that at the top for the waist-band elastic pocket, depending on the width of elastic you’ll be using. I use 3/4" elastic so I add 2 1/2" at the top to make a 1" pocket. Tip - Measure your chosen elastic. 3/4" as purchased can be plus or minus 1/8" I’ve found. If on the plus side you’ll want to add some to your pocket allowance so you can easily get the elastic through. At the bottom add what you need for your hem, such as 1" for a 1/2" folded up hem. Then to begin with add several extra inches to give yourself leeway to work with. When you’ve made your skirt and are happy with the length you can cut some of that off your pattern. But I always add some, maybe an inch, to make sure I have enough material since different fabrics stretch and move differently. Tip - If you end up with just barely enough length, for one reason or another, use hem tape or ribbon sewn around the bottom with a 1/4" seam then turned up for the hem. This also makes less bulk at the hem should you prefer that. That helps if your material is particularly light weight or heavy weight. (5) Draw Your Pattern - Lay out your paper and fold it in half lengthwise. This way when cut out and opened flat you’ll be assured that the gore is symetrical. Divide your two gore width measurements (top and bottom) by 2 and use those numbers to draw out your pattern on the folded paper. The bottom width measure is drawn where your final hem will be at the center of the gore. For the angle start at the ‘hip’, drawing an angled line straight to the bottom hem measure and on by for the hem fold and extra fabric length. Cut out your pattern, then make extras. This helps when figuring out how best to lay out and get all your gores out of a repurposed skirt.
(6)
MAKE YOUR SKIRT - You may not have the ideal piece to start with
but just do your best to get your gores with the lengthwise
grainline down the center. The closer you can come to that the
better, but don’t stress it, go with what you have. Then
carefully cut out your eight gores. Rayon tends to be slippery.
Using a rotary cutter and weights helps and makes the job go
smoother. Tissue paper underneath the fabric can help as well.
Pin if you need to. Making your cutting direction the same on
both sides of the gore (from top to bottom, or bottom to top)
and on each gore helps keep the pieces the same, making sew up
cleaner. Depending on what I have to work with I prefer to fold
the fabric and pattern in Sew it up, press it, try it on. Enjoy your endeavor even if it needs tweaking! If adjustment are needed, take in or take out or add or subtract. When you have a piece that fits and suits you sew the final seam stitch, trim to desired seam width and zz the edges. Let it hang a few days before doing the final hem (see Instruction details below). Be sure to make the same adjustments to your pattern as you may have made to your skirt so you’ll be fresh to go when another skirt or piece of suitable fabric comes your way. Then make another skirt, and another, until you have a nice selection to choose from to match your mood of the day. Tip - When you first stitch your seams use a thread color that is close to the fabric color but shows up better than what you will want to use for your final seam stitch, hem, and waist. Make your stitches a bit longer. This way it will be easier to take out if needed. When you are content with the fit then change to your best color thread (one that shows the least against the material in case a seam should open up a little during wear) and use a regular stitch length. Sew down your seam just inside the temporary stitch, leaving the temporary there as well (if you haven’t had need to remove it for fitting). One more thing that is good for future skirts - write up, or make corrections to, your instructions and notes right away. No matter what I’m making, or how many times I’ve made that piece, I seem to come up with some different, hopefully easier, way of doing it, or some adjustment in design or pattern. I keep the old instruction copy, just in case, until I’ve made another from the newest pattern/instructions and am sure the outcome is what I want.
Instruction Notes for Sue's 8 Gore Rayon Dance Skirt 8 Gores hang better than fewer -- 3/8" seams TOP : 34" + seams (straight across), down 6" from finished top BOTTOM: 80" (circumference)* LENGTH - 25" raw / 22 1/2" finished Elastic - 3/4" non-roll = 24 1/2" (overlap 1/2") - measure width - adjust top accordingly (some 3/4" is wider) Needle: Jersey 10/70 GORES (3/8" seams) TOP -- 8 gores = 5" raw = 34" (finished = 4 1/4) BOTTOM -- ~80" -- 11 across square, ~10" arc --------------------- * Mark & Cut gores. Use weights, or pin, or tissue paper underneath if very slippery.Overstitch raw edges or zz after. Sew together exc. last seam, 3/8" seams. Press. Iron seams all the same way at top - makes easier to insert elastic. * Even up//trim top if needed. Mark 1" & 1 1/2". Fold and press. St close to edge start/end 2-3" from edges. * Sew up last seam. Press. * Hang skirt w/ top straight across, 1 day if grainline down center of all gores, 2-3 days if not. * Hemline -- Measure while hung, or carefully flatten on table & measure down 22 1/2" + folds (1" if 1/2" hem) If on table measure straight down center of gore. Then straighten seams edges & measure. Use template to mark curve. If want less bulk at hem use hem tape instead of folds; mark & trim accordingly. Trim to length; Press; Stitch. * Top -- Insert elastic (direction of seams). Stitch opening. * After sure skirt fits and is comfortable around waist, loose zz around top of elastic to keep from twisting. ~~~~~~~~~~~~~~~~~~~~~~~~~~~~~~~~ In the photo at the top the purple/turquoise print skirt in center is the one that started me on this skirt adventure many years ago. I had just started International Folk dancing and was at a week-end dance workshop event in Appleton with a friend. I didn't know anyone else but it was a friendly crowd, and very intense for a new dancer. But it was also interesting and a lot of fun. Toward the end of the event a woman came up to me and handed me a bag saying, "Here - I can't fit into this skirt any longer but I think it will fit you." I was surprised and appreciated the friendly gesture. And, to my delight, inside was a lovely skirt. It was too long so I shortened it and wore it often. I found blouses to go with it and knitted socks to match. Over the years I modified and fine-tuned the skirt many times (per above). It's still one of my favorites, and I smile thinking of that friendly woman handing a gift to someone she didn't know.
Copyright by Susan Robishaw |
 It’s not that I need any more skirts,
but it’s hard to pass by a really nice pattern/color fabric that
catches my eye. This would be at the thrift stores, usually of a
size larger than I need which is perfect as that makes it easier
to re-make it to fit what I like. Ready-made isn’t part of my
repertoire but upcycle/recycle certainly is.
It’s not that I need any more skirts,
but it’s hard to pass by a really nice pattern/color fabric that
catches my eye. This would be at the thrift stores, usually of a
size larger than I need which is perfect as that makes it easier
to re-make it to fit what I like. Ready-made isn’t part of my
repertoire but upcycle/recycle certainly is. 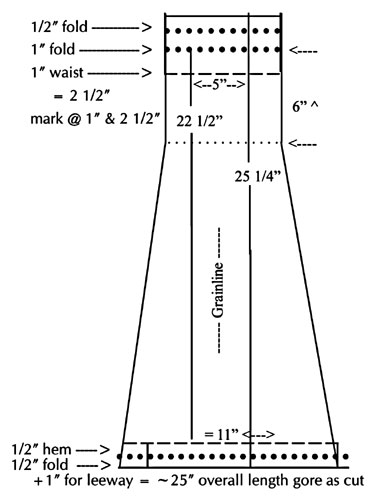
 half to cut out the gore.
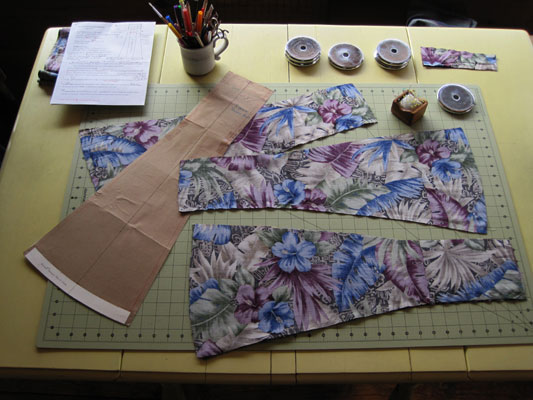
|
Back to top |
|
|
|
|
* Should you want to use all or part of one of our articles in a non-profit publication, website or blog we simply ask that you give proper credit and link (such as "article by Sue Robishaw/Steve Schmeck from www.ManyTracks.com"), and we'd enjoy knowing where it is used. Thanks! We always appreciate links to our site www.ManyTracks.com from appropriate sites, and we thank you for recommending us! |
|
|
Have you read "Frost Dancing - Tips from a Northern Gardener"? A fun short read. or "Homesteading Adventures" Creating our backwoods homestead--the first 20 years.
and
"Growing
Berries for Food and Fun"
A journey you can use in your own garden. |