|
| ||
|
Bathing Suit |
ManyTracks Sewing and Knitting
Mittens
How-to ~ Ideas
~ Inspiration |
Socks
|
|
Wind, rain, snow, cold, mosquitoes, flies - comfort with, protection from. Love your hands, enjoy the weather - make mittens. Make more mittens. Have a shelf full of mittens. Once you have your pattern it takes little time and little fabric to make the perfect pair for that particular weather. Have mittens in your pack, in your pocket, in your purse, in your jacket. Don't leave home without them. Mittens are your friends. |
||
|
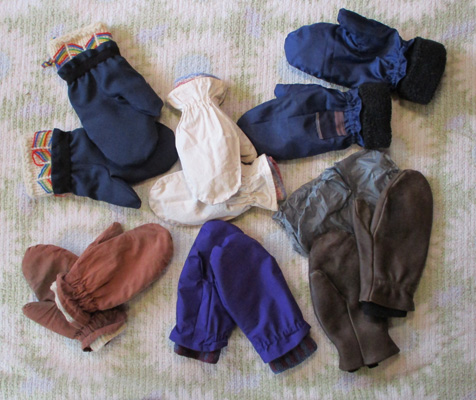
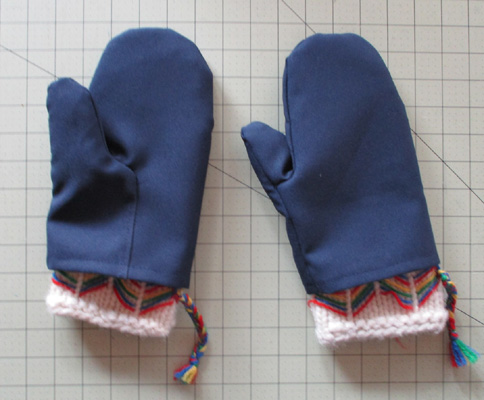
Mittens, Mittens, Mittens - and the Quest for a Smooth Palm The first cloth mittens I made were of fine woven sturdy cotton to go over hand knit wool mittens. They were great, blocking the wind and adding a surprising high degree of warmth whether over knit mittens or by themselves. The humble mitten rose to the top honors in my eyes, and my hands. This was in the early 1980's when the winters were colder and we had a half mile walk to our car, almost every day, morning and night, all winter, no matter the weather. When the temperatures dropped even Steve took to the mittens. Mine came to hand all year. I still have those first patterns, often found in books (and now online). We still have a half mile walk to our car when there's snow. And those mittens (bottom left corner in photo above) are still worn, a lot - soft and comfortably fitted to our hands, as wonderful as their first day. I appreciate the wonders of cotton. It wears well, it adapts well, it's comfortable, it's easy to sew. But - it isn't waterproof and isn't as lightweight as synthetics. Thus came more mittens. That common pattern, the "fancier" one where the thumb ends up right in front of the palm under the index finger, is a position that most thumbs won't go along with. So they pull themselves over to the side as they want to be, leaving a significant stress point at the thumb juncture and a large wrinkle across the palm from that point. The other easy pattern - the thumb stuck on at right angles to the hand as drawn if you put your hand flat on the paper - makes different and likely even less comfortable issues, though it certainly would be easy to sew and might be adequate in some cases. But it is that first pattern that I made our early mittens from. When made of cotton it worked fine, the cotton moved enough to compensate. Leather was likewise adaptable. Nylon came next, light-weight for backpacking, and it wasn't too bad if you made them large enough, OK but not great. I adjusted the pattern each time I made a pair, trying to correct the stress point (which necessitated repeated repairs) and the wrinkle (which didn't bother Steve but I just didn't like it). It got better but not enough. Then came sil-nylon, for rain and mosquitoes - what a challenge to work with, especially in the fussy thumb junctures. They somehow turned out OK, as a gift for Steve so it was worth it. Then I decided to use a piece of coated waterproof-breathable (WPB) "raincoat" fabric to make my own rain mits. I figured it would be easier to work than sil-nylong, which it was, and the extra weight was OK with me. But it came with its own issues - no stretch. What worked fine with cotton, and adequately with nylon, just didn't with this sturdy material. It was time to figure this out.
I ended up undoing the thumb-palm seam, fussing with different ideas, cutting a short slash slightly downward from the thumb crotch across the palm, and sewing in an inch wide patch. I just finangled across and around the top edge, fitting it in as best I could. They turned out OK and, most important, wearable.
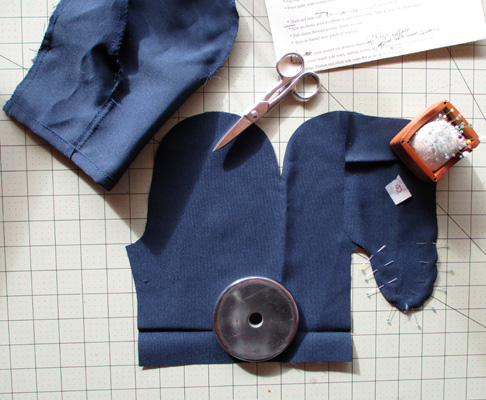
They're sturdy wind mittens, especially nice in the cold weather over a pair of knitted wool mittens. Since I haven't sealed the many seams they wouldn't do in much of a rain. I've worn them a lot hiking early winter before it got colder and I needed two layers of wool mittens and had to make a larger overmit. It was worth the fussing and I'm glad I persevered as I like the results. My next step then was to translate what I'd done and alter my main pattern for the next mittens. I was on the right track for a smooth palm and stress-free thumb crotch. But I wasn't there yet. Sue's Large Navy Overmits - Actually, most of our mittens are worn at least sometimes as over-mits. But these had a particular mission -- to fit over a beautiful pair of hand-knit 100% wool Finnish mittens that had been gifted to us, appropriately, from Finland. Large and warm, stretchy as only good hand knitted wool can be, they traveled in my pack all winter to pull on over my regular wool mittens when the temperatures dropped, especially when walking home from the car late at night, or when the temperature dropped on a winter hike. But when the wind also blew I knew a wind mit to go over all would keep my easily-colded fingers toasty warm, or at least not cold. Maybe we aren't outside as much in the winter as in the non-snow months but we certainly don't stay inside. The key for comfort is appropriate clothing, and the right mittens are a key ingredient for me. But I didn't want just OK covers, I wanted these to be the smooth-palm/stress-free design. I just had to come up with that pattern. At the same time Steve had need of another pair of nylon wind/overmits that were a little larger than the ones he had. The days were colder and we were doing a lot of winter hiking and his older nylon mittens were a very tight fit for two pairs of wool or fleece mittens underneath. I had several pieces of fabric that I'd picked up at the thrift store, lighter weight for Steve's (by request), and a bit heavier fabric for mine. Both were polyester or nylon, I have a hard time telling the difference, but the main thing was they were wind resistant, cheap, and I'd feel free to experiment. And trial and error experimenting I did! I won't go through that process (it was ridiculously long) but in the end I did, finally and happily end up with my flat palm, stress relieved thumb. Hurray! Now, to anyone else, these are pretty plain, basic mittens, nothing fancy. To me they are a satisfying accomplishment that pleases me greatly and keep my (and Steve's) hands comfortably warm.
At the bottom of the page are my instructions for sewing the mittens as well as links to photos of the patterns, laid out on my 1" x 1" grid rotary cutter pad so hopefully you can loft the pattern for yourself onto appropriate paper. Steve's is largest though he has moderate medium size men's hands; my Over-mits are a little smaller but they are made to go over two layers of knitted mittens. I plan to add the pattern for my own regular summer wind/mosquitoes mittens which will be a smaller size to fit my (small woman's) hands. Hopefully this will help and encourage you to make, design, and adapt for your own use. Silk Mitten Liners -
As the days got colder and we gathered more mittens to keep our
hands warm when hiking I thought about mitten liners. Something
light-weight, easy and small to stuff in a pocket, light wool or
silk. A layer that would add a little more warmth when needed
but be easy to stash in pocket or pack. We had purchased
wool-nylon glove liners for that purpose which worked fine when
it wasn't real cold. But I soon found that glove liners under
mittens didn't make a lot of sense because it turned out fingers
were warmer without than with when inside regular knitted wool
mittens. So I figured to buy some mitten liners. But to my
surprise there were none to b Well, that wasn't too big of a stretch given that I had been in a frenzy of mitten making lately. When I spotted a silk blouse at the thrift store I immediately thought - mitten liners! The fabric didn't feel very soft but I figured these would just be a test pair. If they worked I'd find some softer silk fabric. I had an old pair of silk glove liners so I already knew how well that fabric worked. There was plenty of
material in the blouse when cut apart. In fact my mittens came
out of just the sleeves. Though rather easily skewed and tendin
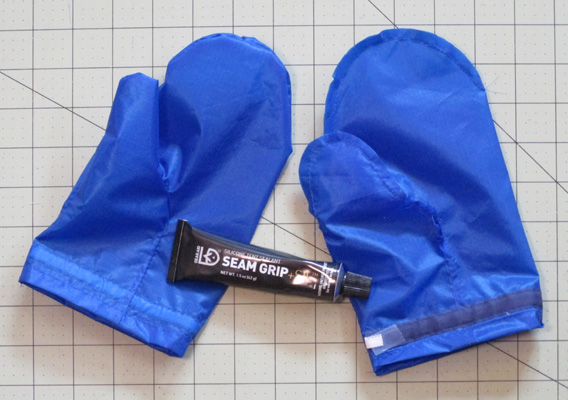
Sil-nylon Rain Mittens - Although sil-nylon is not the fabric to start your mitten-making adventure with, eventually you may want to add these to your stash. This fabric is incredibly slippery and can be more than a little frustrating to sew but it is also very light weight and waterproof - perfect for an easy-to-carry, easy to have available when needed rain mitten. I'd suggest having many pairs if they weren't so darn challenging to sew! But it's not impossible and it would be handy to have a pair in the pockets of whatever you might be wearing when it rains. But since I've just got through making one pair I think I'll wait awhile before the next. Maybe sew up something easy like a cotton bag or linen dish towel or something. Seriously, sil-nylon is sew-able, it just takes a little different approach. After all, my first introduction to sil-nylon was making a Ray Jardine Tarp-tent and Net-tent, on an old somewhat cranky sturdy but simple Singer sewing machine. I survived and so did the project. Of course, they didn't have any finicky thumbs to stitch! But don't let that stop you. Once you've made a few pair of mittens out of easier fabric you'll be ready to tackle the sil-nylon. Here are some TIPS for working with the material: ** Cut one layer at a time. Use heavy weights to hold pattern on fabric. ** A sharp rotary cutter may be easier then scissors, using the smallest size one for small curves. ** Use a smaller 8 or 10 size Sharps or Microtex needle. ** Loosen tension slightly. ** Use a Teflon foot, and/or tissue paper or wax paper on top. ** Use thin, sharp pins in the seam allowance. Pin fairly close together. ** Prismacolor pencils will mark on sil-nylon. ** Masking tape sort of sticks.
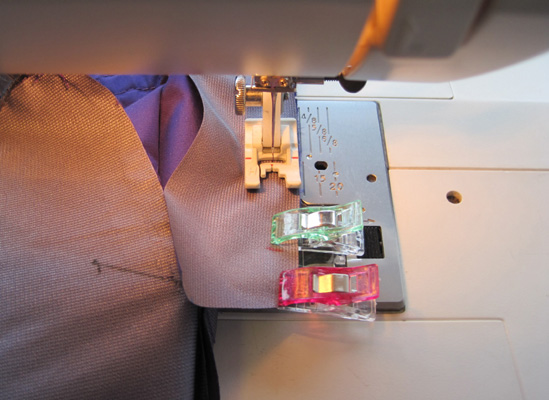
** Go slow and easy. When sewing thumb crotch it helps to pin a short ways, stitch, take out of machine and pin a little farther, stitch, etc. ** When done enjoy your accomplishment! Then... ** Seal the seams so you will have a true rain-proof mitten. Do this while mittens are still flat, before pulling elastic. SEALING SIL-NYLON SEAMS Turn mittens inside out. Wear disposable glove and coat seams using thinned 100% silicone caulk or seam sealer made specifically for sil-nylon. Do this in a well ventilated setting. ***
Then there is mosquito and black fly season. It's surprising what a relief a set of tight-woven, loose fitting, light-weight, bug-proof mittens can be. Though I haven't tried it I think the airy silk mittens might not work for this, but I'll test them out come spring. We've used nylon, sil-nylon and cotton, all for good protection. And the rains, light or heavy, cold or warm -- water-proof mittens feel good. And dry hands are warmer than wet. I don't usually opt to hike in the rain, but the weather doesn't always come as planned. So a pair of sil-nylon mits pulled out of pack or pocket is much appreciated. Doubly so if the day also includes mosquitoes (they seem to be attracted to wet people).
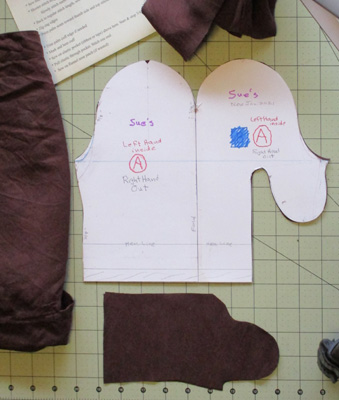
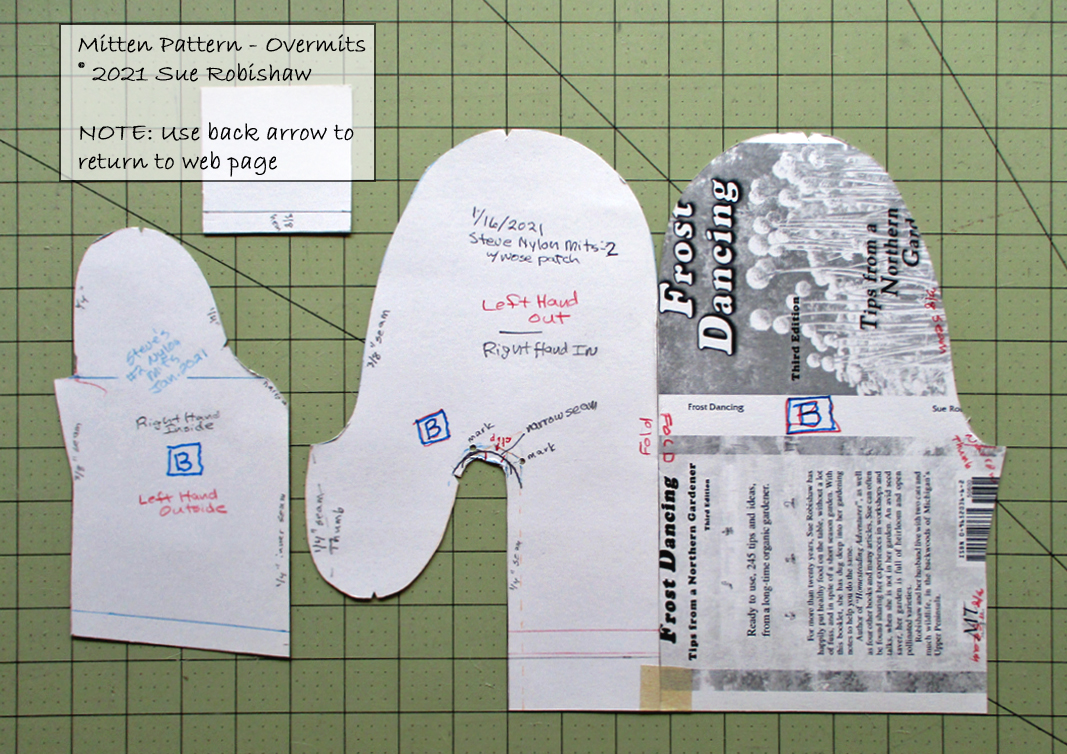
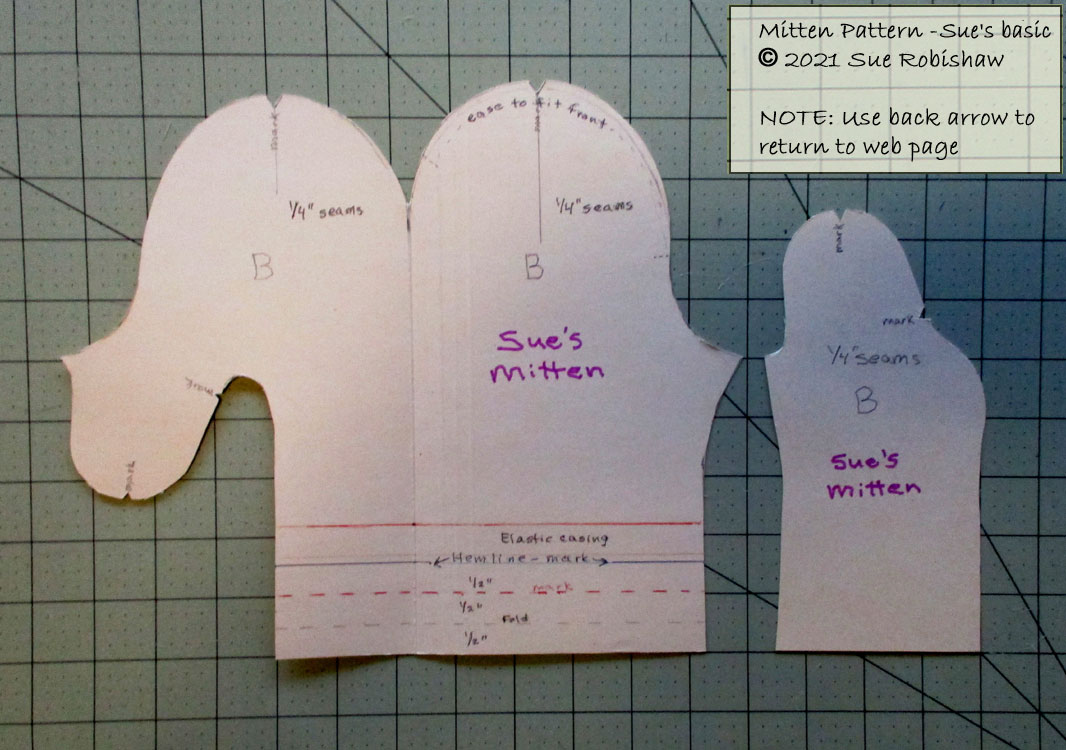
SUE'S SEWN MITTENS PATTERN INSTRUCTIONS Adjust seam size for fabric and fit wanted. With light fabric pin generously. * Cut out pieces -- Mark opposites A & B on one side -- Mark line-up spots (both sides) * Pin and sew thumb, then palm seams, up to but not including curve/thumb crotch. ZZ edges. * Clip around inner thumb curve on palm piece (short clips). Pin. * With shorter stitch length (#2) and narrow seam, stitch thumb crotch/curve, straightening clipped curve as you go. Double stitch if necessary. ZZ edge. * Press palm seam toward thumb side and top stitch (up to start of curve). * Trim cuff edge straight if needed Cuff Hem / Elastic Pocket (1) * Mark and sew cuff hem. * Elastic casing - Hem one end, position above hem, 1/2" from seam line. Other end at raw edge. stitch, leaving enough space between for elastic to fit. (Ribbon or seam binding work well.) * Pull elastic through pocket. Stitch end at raw seam. Leave some extra at hemmed edge (to pull later). OR (2) * Double turn and stitch larger combined hem/elastic pocket (insert elastic later). * Sew seam around top down to thumb, easing in extra material on back. Narrow seam and shorten stitch length near thumb. Don’t stitch past seam line. * Starting at hem edge sew lower thumb side seam up to thumb. See note above. If (2) combined hem/pocket start at top stitch line. * ZZ edge, careful not to fold thumb seam junctures one way or the other. * Flatten and stitch side seam flat as far up as reasonable. * Test fit. Pull (insert) elastic to fit, stitch down end(s), trim off extra. If (2) sew seam or turn in & stitch. * If waterproof or WBR rain mittens, seal seams. SUE'S MITTEN PATTERNS - Click on graphic to go to larger image. The grid behind the pattern pieces is 1" squares. Use your devise's back arrow to return to this page. Have fun making mittens. Share with me your results!
Page, words, graphics, patterns all Copyright by Susan Robishaw |
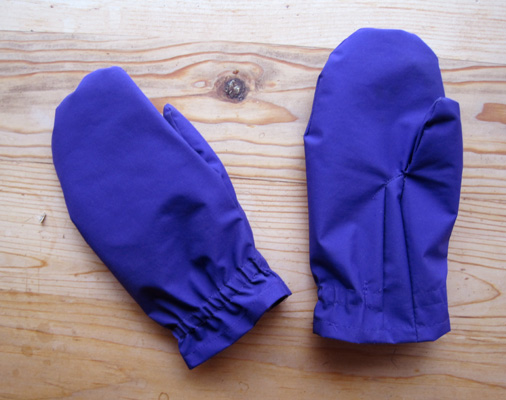
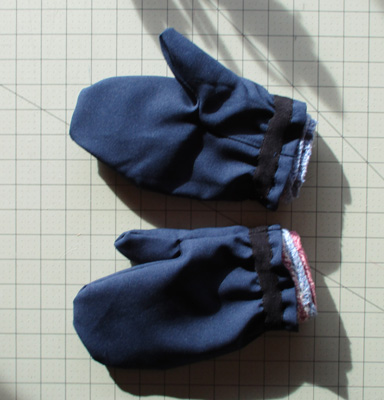
 Purple WBR Rain Mittens --
The fabric was a remnant I'd gotten from The Rain Shed. It was
interesting to sew with being a coated fabric but it was
do-able, though a bit challenging around that thumb crotch.
Craft clips helped hold the fabric together instead of pins.
They turned out fine, in looks, until I tried them on... Well,
that wasn't going to work. There was no give at all and my
thumbs didn't like not being able to move naturally out to the
side. I put them back in the sewing projects drawer where they
sat for several years. After coming across them every time I
sorted through that drawer I finally decided, either throw them
out or try to fix them. I still wanted the mittens.
Purple WBR Rain Mittens --
The fabric was a remnant I'd gotten from The Rain Shed. It was
interesting to sew with being a coated fabric but it was
do-able, though a bit challenging around that thumb crotch.
Craft clips helped hold the fabric together instead of pins.
They turned out fine, in looks, until I tried them on... Well,
that wasn't going to work. There was no give at all and my
thumbs didn't like not being able to move naturally out to the
side. I put them back in the sewing projects drawer where they
sat for several years. After coming across them every time I
sorted through that drawer I finally decided, either throw them
out or try to fix them. I still wanted the mittens.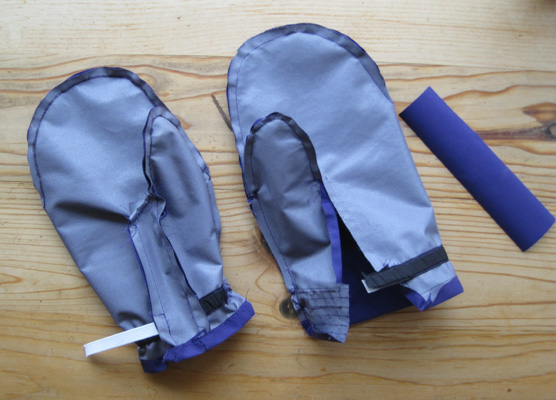
 e
found. Numerous options for glove liners were to be had, but
apparently no one thought mitten liners were worth it. So I did
what one has to do in such a case - made my own.
e
found. Numerous options for glove liners were to be had, but
apparently no one thought mitten liners were worth it. So I did
what one has to do in such a case - made my own.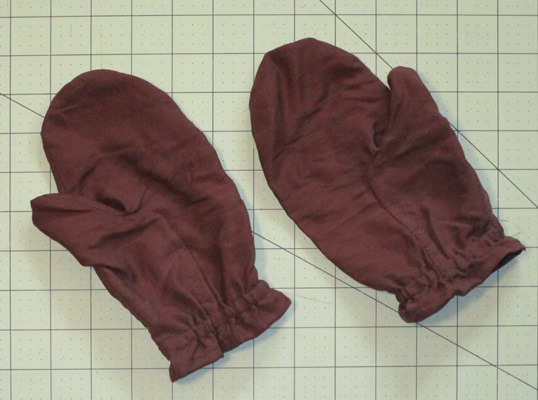 g
to ravel it was pretty easy to sew. I positioned the elastic
band closer to my hand than usual. This helps to keep a
light-weight or slippery fabric mitten snug on your hand when it
is the base or under layer or by itself. The silk is not at all
wind-resistant so I'm not likely to wear it over a knitted
mitten, but I think this attribute helps it to be more
breathable and work so well as a liner. In spite of my
misgivings on the softness of the fabric it turned out in the
wearing to be very comfortable and hardly noticeable. And they
added a surprising degree of warmth without over-doing it. They also
worked well as just a light single layer when it warmed up but
was still a little chilly (but they definitely aren't wind
shells). All in all I'm very happy with my
"test" silk mitten liners!
g
to ravel it was pretty easy to sew. I positioned the elastic
band closer to my hand than usual. This helps to keep a
light-weight or slippery fabric mitten snug on your hand when it
is the base or under layer or by itself. The silk is not at all
wind-resistant so I'm not likely to wear it over a knitted
mitten, but I think this attribute helps it to be more
breathable and work so well as a liner. In spite of my
misgivings on the softness of the fabric it turned out in the
wearing to be very comfortable and hardly noticeable. And they
added a surprising degree of warmth without over-doing it. They also
worked well as just a light single layer when it warmed up but
was still a little chilly (but they definitely aren't wind
shells). All in all I'm very happy with my
"test" silk mitten liners! 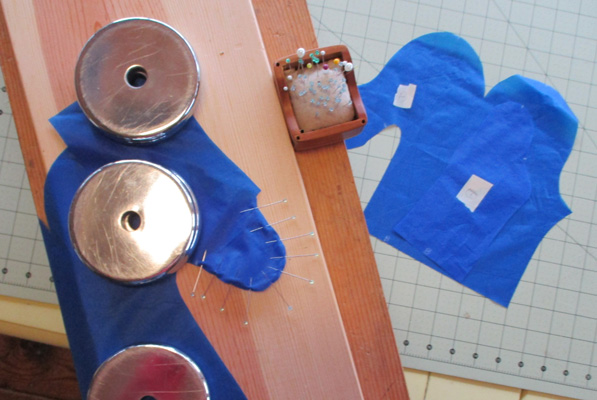
 **
Glue stick helps hold folded hem in place to stitch but be sure
to clean your needle when done.
**
Glue stick helps hold folded hem in place to stitch but be sure
to clean your needle when done.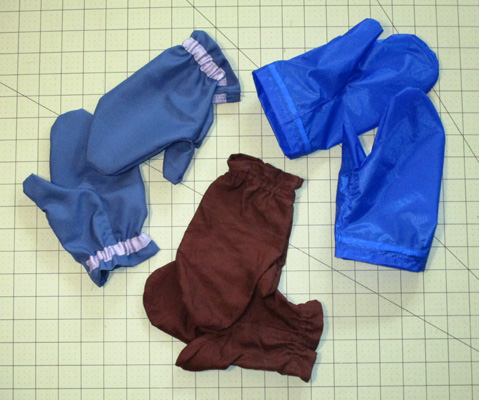 Light
Weight Summer Mittens -- We are as apt to wear our mittens
in the non-cold months as we are in the winter. Of course, the
upper midwest can be cold any day of the year. But even when not
cold-cold a very cool breeze when out for a walk or hike can
make it uncomfortable on the hands and make you work to pull
your fingers up into your sleeves. A handy pair of mittens
stashed in jacket pockets and slipped over those hands can be
very welcome and appreciated, with or without an inner layer.
Light
Weight Summer Mittens -- We are as apt to wear our mittens
in the non-cold months as we are in the winter. Of course, the
upper midwest can be cold any day of the year. But even when not
cold-cold a very cool breeze when out for a walk or hike can
make it uncomfortable on the hands and make you work to pull
your fingers up into your sleeves. A handy pair of mittens
stashed in jacket pockets and slipped over those hands can be
very welcome and appreciated, with or without an inner layer.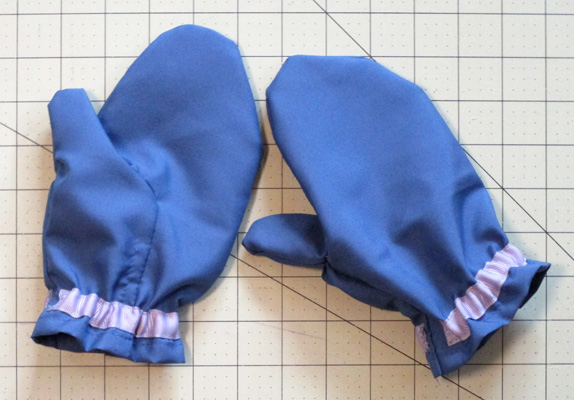

|
Back to top |
|
|
|
|
* Should you want to use all or part of one of our articles in a non-profit publication, website or blog we simply ask that you give proper credit and link (such as "article by Sue Robishaw/Steve Schmeck from www.ManyTracks.com"), and we'd enjoy knowing where it is used. Thanks! We always appreciate links to our site www.ManyTracks.com from appropriate sites, and we thank you for recommending us! |
|
|
Have you read "Frost Dancing - Tips from a Northern Gardener"? A fun short read. or "Homesteading Adventures" Creating our backwoods homestead--the first 20 years.
and
"Growing
Berries for Food and Fun"
A journey you can use in your own garden. |