March (2018) arrived mildly this year with beautiful sunny skies and moon filled
nights. I continued working through my “saved for winter” sewing pile, enjoying
both the long and short projects. This one was a quick one if one doesn’t take
into account the many weeks it took me to come up with my pattern! I just wanted
to make some simple leggings. One pair (purple) for kayaking and one pair
(black) for dance. With some nice sturdy but stretchy lycra fabric on hand I
figured it wouldn’t take long. Well, it didn’t, in the end. But I sure put
 in
the hours fitting and stitching and seam ripping, adding pieces here and there,
putting it all back together, carefully making the adjustments each time on the
paper pattern, over and over. Leggings ARE easy, but I’m rather picky about
comfort and I wanted these to fit just right - just tight enough to look good
but not so tight for comfort. Add a little here, subtract a little there, add
more there, move the wrinkles around until eventually they (mostly) disappeared. in
the hours fitting and stitching and seam ripping, adding pieces here and there,
putting it all back together, carefully making the adjustments each time on the
paper pattern, over and over. Leggings ARE easy, but I’m rather picky about
comfort and I wanted these to fit just right - just tight enough to look good
but not so tight for comfort. Add a little here, subtract a little there, add
more there, move the wrinkles around until eventually they (mostly) disappeared.
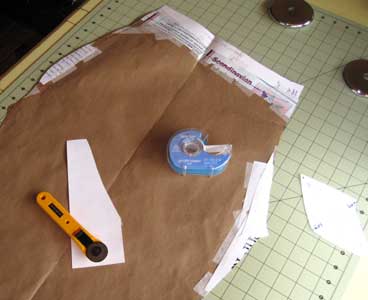
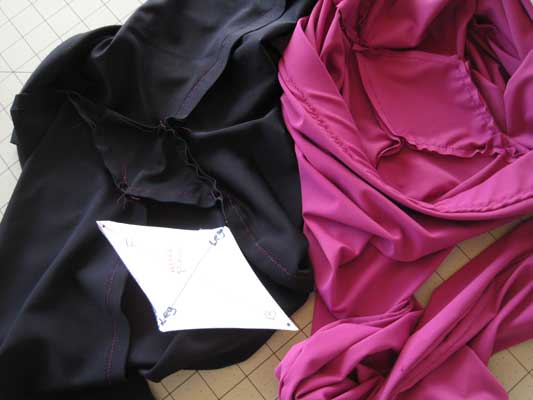
Of course, I should have had some ‘scrap’ fabric to make the trial pair, a
proper ‘muslin’. It would have been a lot easier as I wouldn’t have fussed about
the neatness and look of every change. But I didn’t - I used the raspberry
fabric that I had bought for my kayaking leggings, and only had enough for the
one pair. So it took longer, but in the end I had a pair of acceptable leggings
(even if they do have some extra pieces set in the calves and back end), and a
workable pattern. In a few days I cut out and sewed up the black lycra fabric
using my new pattern. It didn’t take long, and to my relief, they fit. The
pattern was good. I now have some nice, comfortable leggings to wear under my
dance skirts when the hall is cool (until I warm up by dancing!). I had fabric
leftover so I made a pair of lycra shorts, too. Unfortunately, I now have a good
pattern but I really don’t need any more stretch leggings or shorts. But that’s
the way it usually goes. I’ll still have the pattern if ever I want another pair
though.
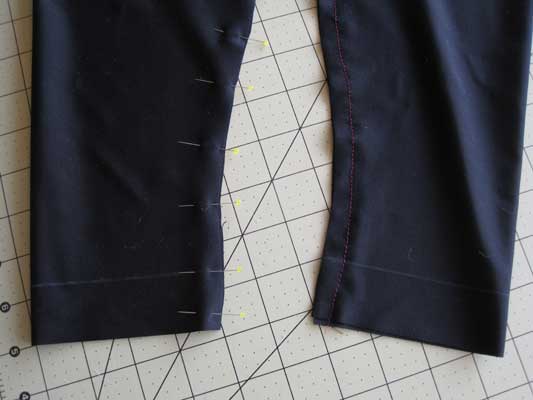 One-seam
leggings are quite simple to sew up, once you get used to the stretchy fabric.
If I’m not sure of the fit I use a wider seam allowance and sew the first seam
stitches with slightly different color thread - just enough contrast that it’ll
be easy enough to see if you have to take the stitches out. But not such a
contrast that it’ll glare out loudly if the main stitches give out and this
second row is on the line. (I know, seam stitches aren’t supposed to show but
with stretchy fabric they tend to show a bit where the fit is tight, and
leggings usually fit tight.) When I’ve decided the fit is right I sew the second
seam line just inside the first with thread that matches the fabric closely. I
use a narrow .5 width zigzag stitch. Real nice, sharp, quality, silk pins are
especially appreciated with this fabric. If I’ve used a 3/8” seam allowance I
trim near to the stitching to reduce bulk. But if I'm sure of my pattern and fit
I just use a 1/4” seam allowance to avoid having to trim and use matching thread
for both lines of stitching. One-seam
leggings are quite simple to sew up, once you get used to the stretchy fabric.
If I’m not sure of the fit I use a wider seam allowance and sew the first seam
stitches with slightly different color thread - just enough contrast that it’ll
be easy enough to see if you have to take the stitches out. But not such a
contrast that it’ll glare out loudly if the main stitches give out and this
second row is on the line. (I know, seam stitches aren’t supposed to show but
with stretchy fabric they tend to show a bit where the fit is tight, and
leggings usually fit tight.) When I’ve decided the fit is right I sew the second
seam line just inside the first with thread that matches the fabric closely. I
use a narrow .5 width zigzag stitch. Real nice, sharp, quality, silk pins are
especially appreciated with this fabric. If I’ve used a 3/8” seam allowance I
trim near to the stitching to reduce bulk. But if I'm sure of my pattern and fit
I just use a 1/4” seam allowance to avoid having to trim and use matching thread
for both lines of stitching.
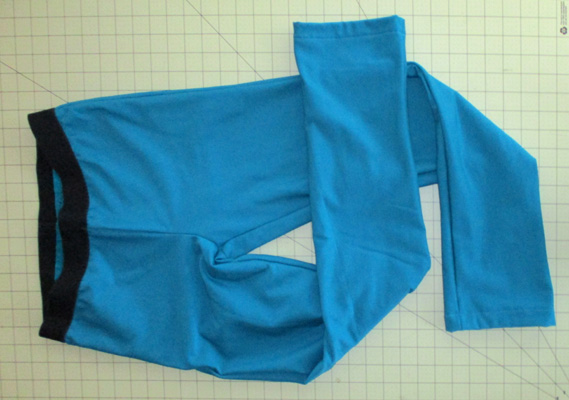
If I'm not sure of the fit I also leave extra fabric at the top and cuffs so I
have plenty to play with making them 'just right'. I should say, this is a good
idea to do this which I didn't do on that first raspberry-purple pair. But they
did just fine with an added piece around the top just below the elastic. Some
pants are made with a yoke or added waistband anyway, but with stretch pants it
seems the fewer seams the better. The black pair were cleaner with plenty to
spare at the top (I did learn!), trimmed off after fitting with elastic where I
wanted it.
 GUSSET
- Leggins are simple to sew up - unless you decide to add a gusset in the crotch
area - which I did. This is just a small diamond or oval shape piece of material
that can give one a bit of fits sewing it in but it adds much to the comfort and
eases greatly the stress on the seams in that area. I think it’s worth it.
There’s no way to know just how big or what shape to make this little piece
unless you already have something with a gusset to measure. So there’s nothing
for it but to just take a guess, make a piece, baste it in, try it on, guess
what subtractions or additions will make it fit better, take it out, make
adjustments, sew it back in... etc. Until it fits and looks to your
satisfaction, or you decide you simply are not going to take it out again and
it’ll be fine just the way it is. And it likely will. I did some trimming to the
gusset pattern after making the raspberry pair so I think the black fits better,
but the raspberry is OK, too. GUSSET
- Leggins are simple to sew up - unless you decide to add a gusset in the crotch
area - which I did. This is just a small diamond or oval shape piece of material
that can give one a bit of fits sewing it in but it adds much to the comfort and
eases greatly the stress on the seams in that area. I think it’s worth it.
There’s no way to know just how big or what shape to make this little piece
unless you already have something with a gusset to measure. So there’s nothing
for it but to just take a guess, make a piece, baste it in, try it on, guess
what subtractions or additions will make it fit better, take it out, make
adjustments, sew it back in... etc. Until it fits and looks to your
satisfaction, or you decide you simply are not going to take it out again and
it’ll be fine just the way it is. And it likely will. I did some trimming to the
gusset pattern after making the raspberry pair so I think the black fits better,
but the raspberry is OK, too.
Here’s what I did: Mark on your gusset the tip that goes towards the Front seam,
the opposite tip that goes towards the Back seam, and the side tips that go at
the leg seams. Also mark where the seam lines cross at the four tips (or where
the ‘tips’ would be if you’re using a rounded oval shape), and the inside of the
fabric. It seems so simple when looking at that little diamond shape until you
get sewing it in and can’t decide which is up or down, or get it wrong side
where. Marking the piece ahead of time helps.
Sew your leg seams. Then starting at one leg seam pin one side of the gusset up
the front, then the back, attaching the gusset to one side. Stitch starting at
the leg seam one way, then the other, again starting at the leg seam. Start and
stop your stitching at the seam lines or where they cross. Take your time, go
slowly and smooth the pieces before you sew. Use the sensitivity of your fingers
to make sure you are never sewing through more than the two pieces of fabric you
want to be sewing. And don’t cross over another seam or seam marking, just right
up to the spot. This avoids the gobby bulk that can happen at the points of the
gusset if you’re sloppy (I say this from experience). You’ll have funny points
of the gusset sticking up but that’s OK - you’ll trim them off later.
Now, you can either pin and stitch the other side of the gusset next, then sew
the front and back seams. OR stitch the front and back seams next, then the rest
of the gusset. Do what feels best to you. Either way I start stitching the
gusset at the leg seams. If doing gusset first, sew the front and back seams
starting from the gusset point. When all done take a break! And know that the
next one will be easier.
If there is a little space at the gusset points then use a needle and thread to
smoothly close them. You can run another line of stitching around the gusset
seams. But on the gusset I like to top stitch, smoothing the seams out to make
this area as flat as possible. You may also want to add a liner. I didn’t but if
I wanted to I’d glue stick the liner down and stitch it with the top stitching.
Sew around the gusset on the inside making sure the seams stay flat under the
stitching. I like to use a somewhat decorative stitch here.
Once you are on familiar terms with gussets and what they can do for ease of
motion in clothing you might find other areas to use them. They work great put
in at a lower armhole for easing an otherwise restrictive sleeve.
And now that your gusset is done you only have the top elastic and cuff hems to
do to your liking and your leggins will be ready for wear!
 February
2021 - Sue's Fleece Tights which could be classified
as leggings or stretch pants or long-johns or lounge wear or
base layer or mid layer ... I'll call them tights here. We call
them "fleeces". They don't seem to care one way or another. February
2021 - Sue's Fleece Tights which could be classified
as leggings or stretch pants or long-johns or lounge wear or
base layer or mid layer ... I'll call them tights here. We call
them "fleeces". They don't seem to care one way or another.
I'd bought the
Polartec 100S Single Sided polyester/lycra fabric five years ago
but was just getting around to using it. I really had no need
earlier but this fall we had started hiking more, right on into
the winter months and I was considering my layering options much
more seriously. First layer is almost always silk long-johns,
the work-horse of my underlayers, worn year 'round. Next I had
decades old fairly snug polypropylene long-johns and/or also
snug thin 100% wool long-johns (now these would be called base
or mid layers but they are old-school and not inclined to
change). Over all go hiking pants. They all worked but I'm not
very fond of tight and it always felt so good to get the
long-johns off when we'd get home from hiking (though I never
noticed it on the trail). I got to thinking about that light
fleece fabric I had wondered if that might be good a substitute
for the long-johns, or an addition when we went out in even
colder weather.
I had a pretty
clear idea of how I wanted them to fit -- form fitted but not
too tight in the top half to help limit the many-layers-bulk,
but looser in the legs so they would hang more easily and not be
as snug as the above long-johns, but not as loose as over-pants.
Something between tights and pants. They are a simple design so
shouldn't take long to sew up (true). I had a "verified" pattern
for one-seem stretch lycra leggings. I had a non-stretch, two
seam, pants pattern that I knew fit. I just needed to make a new
pattern for this in-between stretchy fleece. That shouldn't be
too hard (not true). Oh well. I was getting pretty used to the
finagling required when coming up with a new pattern.
I decided to go
with a two seam design. One, because I could make them more form
fitting without the loose-here/tight-there habit of single-seam
stretch pants. Two, because it would make it easier to adjust
and alter as I came up with the new pattern. Mostly I started
with my regular pants pattern, making some initial adjustments
knowing this would be a tighter fitting pant, mostly generously
marking in the seams. But I also compared with my leggings
pattern, particularly at the crotch though I decided not to add
in a crotch gusset but simply draw the pattern including that
piece in the main body. That worked well. If I make another pair
of lycra leggings I think I'll try that on them, too.
 It
did take some back and forth of fitting and adjusting but it
really wasn't too bad. I'd begun with very generous seam
allowances figuring that after I had my finished, confirmed fit
I would trim the seams (and my pattern) to 1/4", which is often
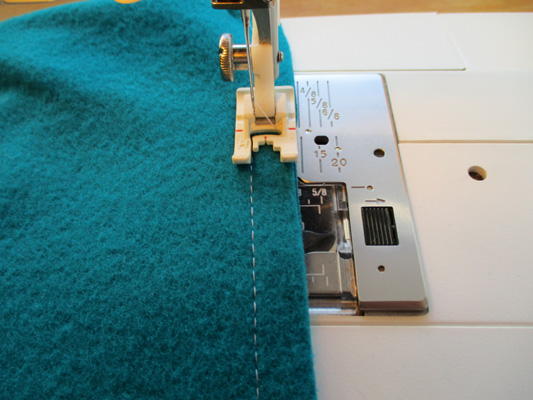
recommended for non-raveling fleece. But it turned out it was
much easier to sew a half inch seam where the whole sewing foot
could r It
did take some back and forth of fitting and adjusting but it
really wasn't too bad. I'd begun with very generous seam
allowances figuring that after I had my finished, confirmed fit
I would trim the seams (and my pattern) to 1/4", which is often
recommended for non-raveling fleece. But it turned out it was
much easier to sew a half inch seam where the whole sewing foot
could r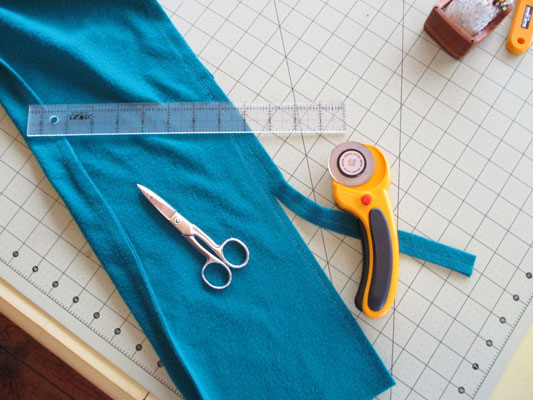 ide
flat on the fabric, even with this fairly light fleece, than it
was to sew a narrow 1/4" seam initially. With a rotary cutter
trimming the excess seam allowance was easy. Tighter crotch
curves were trimmed with small sharp shears. A plastic teflon
coated foot helped with sewing this single sided stretchy fleece
as did loosening the needle tension and the pressure foot, and
using a stretch needle. When I altered Steve's fairly thin
well-laundered double sided fleece pants a regular foot worked
fine and and I only loosened the needle tension. ide
flat on the fabric, even with this fairly light fleece, than it
was to sew a narrow 1/4" seam initially. With a rotary cutter
trimming the excess seam allowance was easy. Tighter crotch
curves were trimmed with small sharp shears. A plastic teflon
coated foot helped with sewing this single sided stretchy fleece
as did loosening the needle tension and the pressure foot, and
using a stretch needle. When I altered Steve's fairly thin
well-laundered double sided fleece pants a regular foot worked
fine and and I only loosened the needle tension.
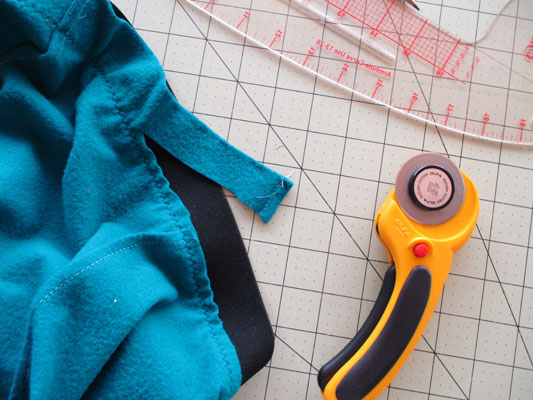 Instead
of the usual fold-over casing for elastic at the top I used a
single layer wide napped elastic, set slightly lower than I
would pants, to ease the bulk problem of many layers at the
waist. It didn't need to be real tight for these pants and
turned out to be more comfortable than I thought. To make it
simple I cut the fleece at what would be the top hemline plus a
quarter inch. Pinning the elastic even with the top edge I sewed
around the bottom edge of the elastic with a reasonably wide
zigzag stitch, then trimmed the extra fleece off near the
stitching. The cuffs are simple single fold, stitched. I chose
to make the pants with the fleeced side of the fabric in and the
smooth side out to help the slip between the fleece and the
outer pants, and to have the comfy fleece against my skin then
these were the bottom (or only) layer. Instead
of the usual fold-over casing for elastic at the top I used a
single layer wide napped elastic, set slightly lower than I
would pants, to ease the bulk problem of many layers at the
waist. It didn't need to be real tight for these pants and
turned out to be more comfortable than I thought. To make it
simple I cut the fleece at what would be the top hemline plus a
quarter inch. Pinning the elastic even with the top edge I sewed
around the bottom edge of the elastic with a reasonably wide
zigzag stitch, then trimmed the extra fleece off near the
stitching. The cuffs are simple single fold, stitched. I chose
to make the pants with the fleeced side of the fabric in and the
smooth side out to help the slip between the fleece and the
outer pants, and to have the comfy fleece against my skin then
these were the bottom (or only) layer.
I'm really happy
with the results. They went right into service. First time over
silk long-johns, next time (as it was warmer) by themselves
under nylon/poly hiking pants. They are warmer than expected and
much more comfortable than expected. I'm a died-in-the-wool
cotton devotee, except when hiking or on the water when
synthetics rule for all the reasons synthetics are preferred.
But when I came in from hiking I was in no hurry to change out
of the fleece tights, though I admit the non-fleeced side of
this fabric is synthetic feeling not cotton comfortable to the
hand. I was so enthused about mine Steve asked me to alter a
pair of loose fitting poly fleece pants he had to a similar
under-layer fit, which I did. His reaction after the first wear
was the same as mine - no hurry to take them off. These will
also work well when backpacking to change into when at camp or
at night if it's cold. I think I might have to make another
pair.
Nomenclature is a funny thing sometimes. I know these things are properly called
‘leggings’ nowdays but I have trouble calling them that. For me, leggings
(pronounced leg-ens) are wool pants you wore as a kid over pants or under skirts
to play out in the snow. These are now known as ‘snow pants’, not just for kids
and usually not wool. Tights were what we called the ones I just made. I’ve read
though that properly termed ‘tights’ are light weight and have feet. I knew
things of that sort as ‘nylons’ or ‘pantyhose’, or tights if they were heavier
and worn for skating or dance or such. My current dance ‘leggings’ are black
silk long-johns (also used for their intended purpose as long-johns). And our
old ‘bicycling tights’ were poly long-johns. But whatever they’re called, my
recently made leggins will see multi use under skirts when dancing, under shorts
(or not) when kayaking, under pants as long-johns, as camping night wear, and maybe
evening lounge wear. No matter what you call them they’re a pretty versatile
piece of clothing. And now that I have my pattern, easy to make. Too bad a
couple of pair are probably all I need!
Copyright by Susan Robishaw
|
