
![]() 'Woody'
'Woody'
![]()
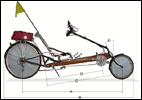
Bike #1 Design: "Woody"
Here we go... Bike #1 will be a test bed for this project. From
here on the format of this page will shift to a chronological, real-time
(as real as time is) documentation of the design and construction of the
bikes.
{ Measured drawing of 'Woody' }
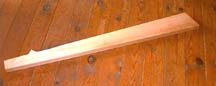 |
This is the roughed-out yellow birch plank - the start of the wood portion of the frame (2/20/97) |
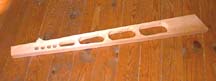 |
Same plank drilled out to reduce weight - 4lb. 12oz. (2/22/97) |
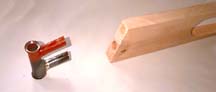 |
The front end of the 'frame' has been bored out to match the modified head tube (parallel 4" extensions which will be cross-pinned into frame) |
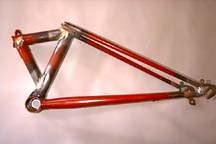 |
'Reconfigured' rear triangle from old Trek 400 upright bike. Seat tube cut to 8", seat stays bent down to mate to it, top of seat tube and top tube brazed on to provide adjustable suspension (trust me). This thing weighs in at 3lbs. 8oz. |
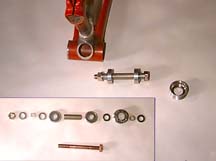 |
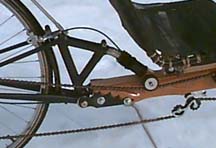
Rear suspension pivot detail. Bottom bracket has been left stock except for amputation of the down-tube. Standard bearings replaced with some sealed 30mm x 10mm bearings I had laying around. A perfect fit inside the old bearing shell. A grade 8 bolt, some washers and spacers completed the pivot. |
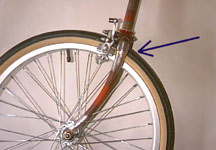 |
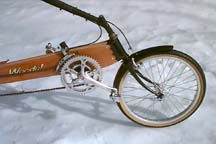
I cut out 4 ¼" of fork to allow the use of a 20" front wheel. This size chosen for its availability while on the road. Lucked out here (I hope) in that the lower portion of the fork leg fit up into the upper part so I'm not relying solely on the braze job. The dropouts had to be adjusted to acommodate their new angle at the axle. As you can see, I'm planning on using the old sidepull brakes. Inexpensive alloy rim and hub with 20"x1.5" 80 psi Kenda tire. |
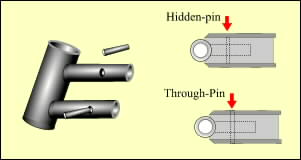 |
Made some progress on the headset mount. After a little carving on the end of the frame the headset unit fits and is ready to be pinned into place. Dilemma... pin through the yellow birch only; would look better because cherry sides will hide the ends of the pins, or wait and run pins through sides also; not so cool looking but serviceable. (3/1/97 am) |
 |
Discovered that I have a similar decision to make on the bottom bracket. The vertical tube (seat tube in a previous life) is larger and probably needs the strength of the laminated cherry sides. So, guess I'll be consistent (and conservative) and use through-pins. These will probably be 5/16" steel and friction-fit. (3/2/97 pm) |
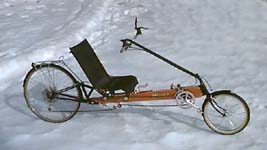 |
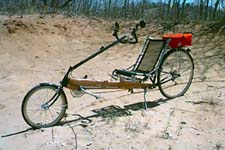
(4-7-97) Well, it's hard to believe that the bike (now named 'Woody') is almost completed. As you can see from the picture, we still have lots of snow on the ground so I have not had a chance for a test-ride yet. The seat is the only big project left. The old Maxam seat is mounted now but it is steel-framed and the new one will be aluminum as well as trimmed down a little in size. |
 |
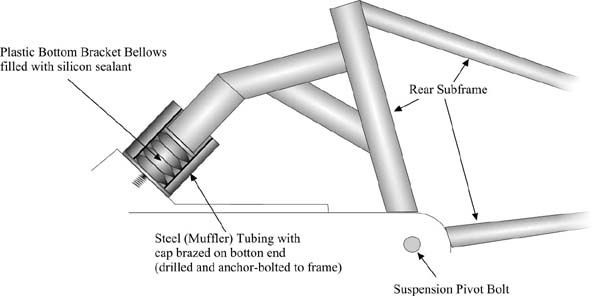
The rear suspension seems to be working OK but a road test will tell the tale. This design and my conservative nature caused the suspension to add over 10" to the length of the bike. It could have been done more compactly but I decided to go with strong rather than cut any corners here. The shock elastomer is silicon sealant in a bellows-like tube inside a steel tube. I found a Manitou shock boot fit it just fine. |
 |
The front end went together pretty well, though I consider the weak link in the project to be the front fork modifications. On the next bike I will be sure to arrange it so that the lower part of the blade will be inserted farther onto the crown end of the blade. Only time and miles will tell how durable the present fork will be. |
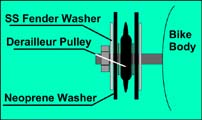 |
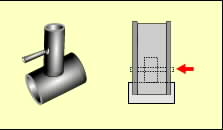
I Set the bike up on the rollers today and took it for a ride. Came up with two problems; Buzzing vibration from the idler pulleys used to guide the chain under the seat. The drawing at left shows what I thought would work. What is happening is that the chain, which is not under a lot of tension, kind of rides up and down on the teeth of the pulleys. Any ideas? The vibration caused by this arrangement is very objectionable as it can both be heard and, especially, felt in the pedals. |
 |
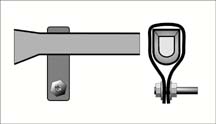
The second problem is that due to the unreasonable length to which the bike grew while I wasn't looking, I had to join two pieces of shifter cable to reach the rear deraileur. I cobbled something (left) but later found that Tandems, Inc. has a cool link that is designed for use with folding bikes. They also have tandem- and triple-length cables. I continue to use the one pictured. |
 |
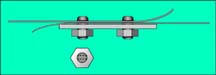
(4/14/97) Well, here is the current solution to the chain noise and control problem mentioned above. Though the drawing doesn't really show it very well, what I've done is rework a high density polyethylene tool handle (recently replaced with 3/4" PE tubing) into a tubular chain guide. The tube is about 6 inches long and is very smooth inside. It is mounted by wraping a section of rubber shock strap material around it and fastening that to the old chain guide bolt. Due to the combination of slippery material and rubber isolation mounting it is both quiet and smooth in operation. Again, time will tell how it will hold up but for now it works! (Still cool after 700 miles - 6/98) |
|
|
(6/23/97) Woody has just under 400 miles on him and is just about completed (as much as a homebuilt, evolutionary bike ever is). Weight with the new aluminum seat, complete with fenders, rack, etc. is 37 lbs. Weight distribution is 40/60, Front/Rear. I ended up installing a new rear wheel with a 700 x 41C cross tire and a 11 x 32 7-speed cassette. With the 24,38,50T chainrings Woody has a range of about 22 to 126 gear inches. - Almost time to get to work on bike #2 for Sue (She is riding the 44 lb. Maxam and is ready for her new under-30 lb wood recumbent). |
(7/1/97) Woody has been doing fine (see Woody's Odometer at top of this page) and I've begun work on Sue's bike. Due, in part, to harassment from Charles Brown (the godfather of wood recumbents), I am throwing caution to the wind and building TreeBike as light as possible. Sue weighs in at around 100 lb. and this bike probably won't see any heavy loaded touring so the design has been modified somewhat: no suspension, all wood frame from headtube to dropouts, smaller frame dimensions and thinner sections through the frame.
Because of the interest shown and questions asked about construction details of Woody I'll be sharing the building process of bike #2 on this site. Please refer to TreeBike's page for those details. This page will continue to report on the evolution and upgrading of Woody. - - - Hope you're having some great pedaling!
{Back to Recumbent Archive}