The solar oven has its idiosyncrasies, as we all
do, but once you allow it to be itself, it will give you service as long as you
want to keep it going. If it wears out, you can simply make another, and
incorporate all those changes you’ve pondered all those years. Solar ovens
come in as many designs as there are people building them. I think I love that
diversity as much as I love the oven. As different as they may be, they all have
one thing in common -- they need sun to operate. Good sun. Long sun. Not mostly
cloudy, not partly shaded, not time limited. It is a solar oven and the sun is
its fuel.
So what do you do when it is cloudy?
Use a different fueled stove. The solar oven is a cooperative tool, it works
well with others. There is no reason for it to do more. It’s true that most
people in this country don’t use solar ovens, but it works well for us, as it
does for many thousands of other solar oven users. I’d like to share our
latest solar oven design with those who would like to give it a try themselves,
or who are ready to go beyond the cardboard and aluminum foil temporary unit, or
want a more substantial cooker than the one-lid-box cooker offers.
A cardboard and aluminum foil oven is
a great place to start. It does need to be weighted or tied down so it doesn’t
blow away, and you can’t leave it out in the rain, and it’s a bear to store,
but it works surprisingly well and is a good way to test out your own design. It’s
much easier to modify and make changes in cardboard than in metal or glass!
We made our first
aluminum-foil-glued-to-cardboard model long ago and have been hooked since.
Information on that and subsequent early designs are in my "Homesteading
Adventures" book (obtainable through libraries or Countryside Bookstore).
We’ve gone through many adaptations and trials, all worked and cooked but all
were in need of tweaking. The latest, however, breezed through a season of use
with flying colors. Because of the short days, cold, and low sun we don’t use
the oven in the winter but store it and use our wood stoves for cooking when the
snows arrive.
I don’t have exact plans for our
oven but then you won’t have the same salvaged pieces that we did so it doesn’t
matter. There are many detailed designs around for oven patterns if you want.
Look in books and articles -- both in paper and online. If you haven’t
internet access at home, you can usually get it at your local library. There is
so much information online now that it is worth searching there. Even if you
aren’t on speaking terms with computers, there is usually someone around who
can help you out. The most important thing is not a particular design but to
understand the reasons behind the particulars.
There are also good commercial units
available should you not want to make your own. Most are well designed and do a
good job of cooking. But for the do-it-yourselfer, here are some ideas and
information on our cooker, to hopefully encourage you to salley forth to build
your own.
COOKING BOX -- It all
started with an old, salvaged stainless steel commercial steamer pan we picked
up years ago. Heavy but durable, it has lasted through all our designs and will
no doubt well outlive us. At 9 x 11 x 20 inches inside, it is large enough for
an array of pots yet small enough to heat well. It is painted black with
heat-proof paint (such as used for chimneys and grills) to better absorb the sun
and not reflect it back out.
In our design, the box is tipped
toward the sun, tilting up and down to follow the sun’s path, so it has need
of a swinging shelf inside to allow the pots to sit flat no matter the angle of
the box itself. So a metal shelf was designed to fit the pan. The ends are bent
up and screwed into the sides of the steamer pan (holes drilled first). You don’t
want your shelf to swing loosely or it will, and not necessarily the way you
want it to. Set a pot on it not exactly centered, or tilt the oven to follow the
sun, and pot and contents tip and spill necessitating a messy clean-up (trust
me, this is something you want to avoid). So tighten your screws enough so the
shelf won’t swing at will, but not so tight that you can’t move it yourself
in order for your pots to sit level when you tip your box to a new angle. Before
drilling holes to mount the shelf, make sure it is not so large or set so low
that you can’t tip it up out of the way to clean up underneath when the
inevitable happens and your pot of dinner ends up in the bottom of the pan.
You can also simply set bricks or
rocks or other heat-safe things in the bottom to set your pots on, adjusting as
necessary. But the shelf makes solar oven life a lot easier and is highly
recommended.
There are numerable options for your
cooking box. Just make sure it is of heat-proof material (won’t fry, burn,
melt, etc.) and won’t outgas something nasty when heated. It needs to be a
size that is manageable -- large enough for the pots yet small enough that it
will heat. A too-large area will not get hot enough to cook. If you already have
a good outer box, then your inner box will need to fit in it with room enough
for insulation.
OUTER BOX -- The outer box
needs to be sized to fit the inner box (in our case the stainless steamer pan)
and allow at least several inches of insulation between the two. Our inner pan
is well sealed from the insulation so we used styrofoam for the outer layer as
we had scraps on hand, plus fiberglass duct board. But if there is any chance of
outgassing into your cooking chamber due to your design, don’t use foam board.
Choose something less obnoxious.
A solar oven is usually awkwardly
large and heavy and hard to move so a priority for us is to have one that can be
left out in the rain without damage. Our previous models have leaked and soaked
through so Steve started designing this oven by thinking of the shell first.
Waterproof, available, workable, and not too ugly -- we pondered this for quite
some time. Then the solution was found at a local salvage store -- sheets of
flat, thin, coated steel roofing metal. Just what we needed.
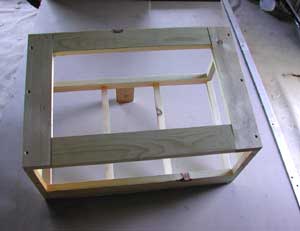
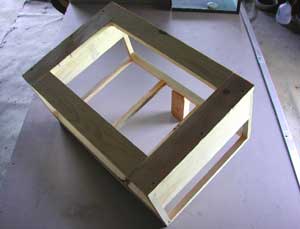
The thin metal can’t support the oven itself, so Steve built an open inner
frame of pine. Solid wood or plywood would work fine but we’d trucked around
previous overweight ovens enough to want a lighter haul this time. So, sturdy
enough but not overbuilt was the goal.
Another consideration is the need to
hang the oven on something to allow it to pivot both up and down and side to
side in order to follow the sun. Steve had earlier come up with the idea of
floor flanges screwed to either side of the box with short pieces of pipe
screwed into the flanges, these arms resting on/in cutouts in a wooden frame in
which the whole unit is suspended. Where to put the flange can’t be determined
until the oven is done, complete with door and reflectors, so a 1 x 6 was put at
the top of the sides to allow room to adjust the placement of the flanges.
You also need a good surface to
attach the oven glass door and the reflectors (which can be quite hefty). So
wider boards were used around the top, cut to the size of the inner pan.
 The metal sheathing was designed to best cover the box with the fewest seams and
catch spots for rain to get inside. It was cut to size using a cutoff wheel to
keep it from wrinkling and buckling as shears might do, then bent to shape
(using a home-made 2x4 brake) to fit the box frame tightly. If you’re going to
go this route, it’s a good idea to do a mock-up with paper first, thinking of
how the box will hang and where leaks might occur. In order for the insulation
to do a good job, it’s important to keep it dry so the goal is to have as
waterproof a covering as possible. Finding a waterproof outer box first, then an
inner box to fit inside might be easier, but one does with what one has.
The metal sheathing was designed to best cover the box with the fewest seams and
catch spots for rain to get inside. It was cut to size using a cutoff wheel to
keep it from wrinkling and buckling as shears might do, then bent to shape
(using a home-made 2x4 brake) to fit the box frame tightly. If you’re going to
go this route, it’s a good idea to do a mock-up with paper first, thinking of
how the box will hang and where leaks might occur. In order for the insulation
to do a good job, it’s important to keep it dry so the goal is to have as
waterproof a covering as possible. Finding a waterproof outer box first, then an
inner box to fit inside might be easier, but one does with what one has.
The box frame was assembled, then the
metal skin installed using a minimum of small galvanized nails and enough
silicone caulk for a good seal but not so thick to cause joint burps or gaps.
The insulation board was cut and packed into the box leaving enough room for the
pan, then the pan set in on a nice bed of caulk (our pan has a convenient lip
around the upper edge that made this easier). This is a high potential leak area
so pay close attention to your caulking here.
 Then the dilemma, where to install the floor flange for the pipe arms. You need
to have the reflectors installed to find the natural center of gravity for the
unit. But even then, how do you hold the oven up, letting it swing loosely in
order to find that center of gravity BEFORE you install the arms in order to
determine where to put the arms that you haven’t yet installed. Solution --
screw the pipe flange on in the upper middle of the sides and plan on filling
the screw holes when you have to move the flange later to get the hang right.
There is no one perfect spot since the weight changes as the oven is tipped, but
a happy medium is nice. If you don’t get it close, the oven will want to bang
flat on its back when loose. Which is only a problem when you have a pot or two
of something cooking inside and the tighteners loosen up and the oven swings
free, happily spilling everything inside. The cook usually doesn’t think it’s
so funny.
Then the dilemma, where to install the floor flange for the pipe arms. You need
to have the reflectors installed to find the natural center of gravity for the
unit. But even then, how do you hold the oven up, letting it swing loosely in
order to find that center of gravity BEFORE you install the arms in order to
determine where to put the arms that you haven’t yet installed. Solution --
screw the pipe flange on in the upper middle of the sides and plan on filling
the screw holes when you have to move the flange later to get the hang right.
There is no one perfect spot since the weight changes as the oven is tipped, but
a happy medium is nice. If you don’t get it close, the oven will want to bang
flat on its back when loose. Which is only a problem when you have a pot or two
of something cooking inside and the tighteners loosen up and the oven swings
free, happily spilling everything inside. The cook usually doesn’t think it’s
so funny.
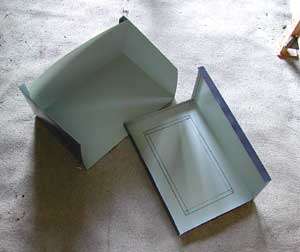
DOOR -- Our oven door is of
simple single pane of double-strength glass with edges sanded smooth. It is
attached with hinges made to hold glass and screwed to the top of the box. The
handle is a U shaped piece of metal that slips over the glass, similar to the
hinges, with a wooden knob -- both "glued" on with heat resistant
silicone caulk (RTV).
Since our inner pan has a lip around
the upper edge it sticks up above the wood top and that is what the glass would
hit against. To avoid that metal to glass contact, we put two layers of felt
weather-stripping on the box, around the lip, for the glass to close against.
The felt is held down with plenty of caulk to prevent (most) rainwater from
getting into the pan, and (hopefully) none from getting down into the box. After
a downpour I usually have to sop some water out of the bottom of the pan but it’s
not a big problem.
 REFLECTORS -- Though on the outside, these are really the heart of the
solar oven and will have a lot to do with how well your oven works.
Considerations here are angle, shape, reflectivity, and size. These tend to be
the most difficult part of the oven, but are the most important so worth
spending some time, and money if necessary, on. A one flap reflector may work
adequately in hot, sunny climates and is certainly the easiest design. Try it
and see if it works where you live.
REFLECTORS -- Though on the outside, these are really the heart of the
solar oven and will have a lot to do with how well your oven works.
Considerations here are angle, shape, reflectivity, and size. These tend to be
the most difficult part of the oven, but are the most important so worth
spending some time, and money if necessary, on. A one flap reflector may work
adequately in hot, sunny climates and is certainly the easiest design. Try it
and see if it works where you live.
We need more reflector surface than
that in our neck of the woods. The more reflectors the more sun reflected into
your oven, the higher the temperature you can achieve, within practical
consideration and reason, of course. The optimum size of your reflectors depends
on the size and shape of your box. Make model reflectors of aluminum foil glued
to cardboard before buying or cutting any more permanent material. Try different
angles, watching (carefully -- you don’t want to fry your retinas) to see
where the most sun is reflected into the oven.
Cut off or add to your trial
reflectors to determine how tall each needs to be. No use making them larger
than necessary, both for material expense, wind catching, and ease of getting to
your oven. We discovered we could make our bottom reflector shorter thereby
making it easier to reach into the oven.
What to use for your reflectors? You
want high reflectivity (shiny, shiny, shiny), weatherproof (both the material
and the reflective surface), sturdy but not too heavy (both for the oven and for
cutting), available (the big bugaboo), and affordable (an equally large bugboo).
Check around, ask around, search any place that might sell or use shiny metal.
We couldn’t find any spectral aluminum such as they use on the commercial
models, but found some reasonably shiny stainless countertop material at a local
heating and plumbing shop. Not cheap, nor easy to cut, but it will last as long
as we do, and Steve was able to spruce up the reflective surface with some
elbow-grease polishing. Aluminum foil glued to something appropriate does a
surprisingly good job, though a bit tender and hard to clean. But it will
suffice till you find, or can afford, a better material.
The reflectors are bent in at the
edges so they can be bolted to each other and to custom brackets screwed to the
box top, and so easily be taken apart for storage. It helps to mark adjacent
edges and matching brackets to make reassembly easier. The reflector as a whole
is awkward and unwieldy until attached to the oven box.
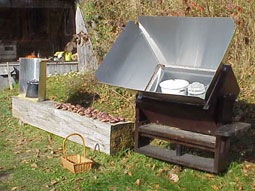
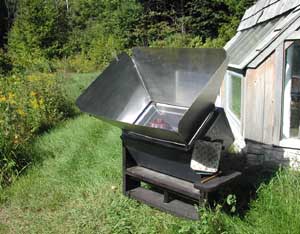
 STAND -- You can simply prop your oven up and aim it for mid-day or
mid-afternoon sun and leave it. It will do a pretty good job this way. However,
you’ll get longer and better heating/cooking if you can track the oven to
follow the sun. And that will be a lot easier if the oven is suspended on
something that can turn or allow the oven to turn. The center of gravity on the
oven changes a lot when you add the reflectors and as the oven is tipped, plus
the oven itself is quite heavy, so it’s nice to have a reasonable and
convenient way to manage it. Steve’s solution was to build a wooden frame out
of 2x8 for the oven to hang in, with the arms sitting in half circle cutouts in
the uprights (see photos). A board with a matching cutout slips over short
pieces of threaded rod, and tightened down with nuts to keep the tilted oven
firmly in place. One of the nuts has wings welded to it so you can
loosen/tighten it by hand without a wrench, allowing you to easily adjust the
tilt of the oven as the sun moves up and down seasonally in its trek across the
sky.
STAND -- You can simply prop your oven up and aim it for mid-day or
mid-afternoon sun and leave it. It will do a pretty good job this way. However,
you’ll get longer and better heating/cooking if you can track the oven to
follow the sun. And that will be a lot easier if the oven is suspended on
something that can turn or allow the oven to turn. The center of gravity on the
oven changes a lot when you add the reflectors and as the oven is tipped, plus
the oven itself is quite heavy, so it’s nice to have a reasonable and
convenient way to manage it. Steve’s solution was to build a wooden frame out
of 2x8 for the oven to hang in, with the arms sitting in half circle cutouts in
the uprights (see photos). A board with a matching cutout slips over short
pieces of threaded rod, and tightened down with nuts to keep the tilted oven
firmly in place. One of the nuts has wings welded to it so you can
loosen/tighten it by hand without a wrench, allowing you to easily adjust the
tilt of the oven as the sun moves up and down seasonally in its trek across the
sky.
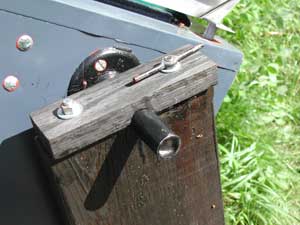
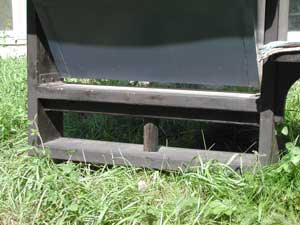
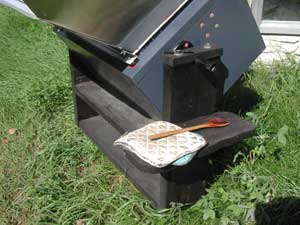 The daily tracking of the oven east to
west is accomplished by pivoting the unit
on a piece of pipe pounded in the ground. A hole slightly larger than the size
of the pipe was drilled in the bottom board of the rack and in a 2x4 brace that
is under the center cross board. The frame slips over and rests on the pipe
allowing it to pivot. The unit with oven is heavy enough, and the holes and pipe
sized close enough, that it doesn’t have much tendency to turn on its own in
the wind but is easy enough to pivot by hand as you walk by, keeping the oven
aimed directly at the sun. A shelf on the side is handy for setting spoons and
pots and potholders.
The daily tracking of the oven east to
west is accomplished by pivoting the unit
on a piece of pipe pounded in the ground. A hole slightly larger than the size
of the pipe was drilled in the bottom board of the rack and in a 2x4 brace that
is under the center cross board. The frame slips over and rests on the pipe
allowing it to pivot. The unit with oven is heavy enough, and the holes and pipe
sized close enough, that it doesn’t have much tendency to turn on its own in
the wind but is easy enough to pivot by hand as you walk by, keeping the oven
aimed directly at the sun. A shelf on the side is handy for setting spoons and
pots and potholders.
 USING THE OVEN
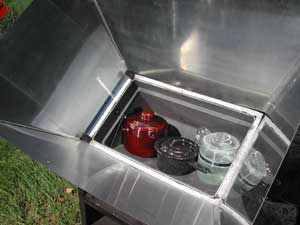
-- Gather an array of pots and pans that will fit in your
oven, put some food in them, set your oven in full sun, and you’re ready to
go. Anything that can go in a regular oven can go in your solar oven. Because of
the tight space, and the usual desire to utilize (or cram in) as much as
possible, you’ll soon come up with ingenious solutions. A quart jar with metal
lid (poke a hole in the lid to allow steam to exit) works, as does regular pots,
pans, crockery, and glass cooking vessels. Dark color is probably better than
shiny, but shiny is better than nothing. We use our oven not only for cooking
but also for hot water, so whenever there is room, there is a glass coffee pot
full of water inside.
USING THE OVEN
-- Gather an array of pots and pans that will fit in your
oven, put some food in them, set your oven in full sun, and you’re ready to
go. Anything that can go in a regular oven can go in your solar oven. Because of
the tight space, and the usual desire to utilize (or cram in) as much as
possible, you’ll soon come up with ingenious solutions. A quart jar with metal
lid (poke a hole in the lid to allow steam to exit) works, as does regular pots,
pans, crockery, and glass cooking vessels. Dark color is probably better than
shiny, but shiny is better than nothing. We use our oven not only for cooking
but also for hot water, so whenever there is room, there is a glass coffee pot
full of water inside.
If your oven is well built and there
is good sun, the temperature inside will probably be between 250 and 350
degrees. Temperature varies with weather and sun conditions so this is not the
spot for nit-picky baking or cooking. This is a down-to-earth, practical
no-frills cooker. Think of it as a large crock-pot or slow-cooker. You can get
as creative and fancy as you want (and the cooking can be as easy or as
difficult as you choose to make it!), but simple seems to suit it (and me) best.
Beans, baked potatoes, rice, soup -- these are standard oven fare for us. The
best "recipe" I can give you is titled "Experiment!". No two
ovens or people or meals are the same. Enjoy the differences and suit yourself.
When I want to cook in the oven, I
look first to the sky and the day. Does it look like there might be a few clouds
wandering by? Might it cloud up later? What can I cook? The oven heats up even
on a partly sunny day, just not as hot, so you might be able to slow (very slow)
cook some vegetables or heat up some leftovers, but probably won’t be able to
cook rice or anything that requires a good, steady moderately high temperature.
I like to cook things I can put in and not have to fuss with or worry about
except for an occasional stir or turn of the oven. Summer is a full and busy
time and this kind of cooking suits me. What I cook depends on what is ready for
harvest or what is in the pantry. Dried beans and rice are favorite solar oven
fare, baked potatoes whenever there are potatoes to bake, any number of
combinations of steamed vegetables, soups of infinite variety, leftover
surprises. Whatever you normally cook, try in the solar oven, adjusting recipes
to suit the situation.
From the emergence of the first
rhubarb until the oven is put away in late fall, breakfast fruit sauce is a
regular, using whatever fruit is ripe. Leftovers heat easily, and when there is
sun there is always hot water for tea or washing. I generally don’t bother to
bake in the solar oven, finding its easier and faster to use the wood cookstove,
but that doesn’t mean you can’t. Many people do -- biscuits, cookies, small
breads -- depending on how hot your oven gets, and how tolerant you and your
recipes are. You may have to modify or make baking sheets to fit your oven,
propping them up on something or against the sides of the inner pan to allow a
larger surface.
The possibilities for using the solar
oven aren’t limited to cooking. I enjoy experimenting with natural dyes and
mordants and occasionally get in the dyeing mood, which can get a bit odorous
inside the house. Not that that stops me but we’re probably all happier when
my dyepots are moved outside and into the solar oven. Just prop the door open a
bit to allow the steam out.
Speaking of propping the door open. A
good but simple accessory for the oven is a clothespin clipped to the side
reflector, at the ready to clip the glass door open so it doesn’t unexpectedly
blow and bang shut when you want it open for some reason.
Another good accessory is a blanket
or quilt. Often in the summer the sun goes down before we do. And the long
summer days tend to push our eating time (never on a strict schedule anyway)
late into the evening. When the sun leaves, the heat leaves, and the oven starts
cooling. So I lay a folded blanket over the glass, and whatever is hot inside
keeps warm for quite some time allowing us a hot supper, or hot water, when we’re
ready.
The solar oven is such a handy,
useful, and satisfying tool that it is worth building one that you can enjoy
using for years. Make it convenient and simple to use, and you will, to great
benefit for all. Not to mention that it is just plain fun. It’s a wonderful
and practical project for your imagination and creative, homestead self. And I
wish you great fun in designing, building, and using your own solar oven.
* * * * * *
Copyright
© 2006 by Susan Robishaw and Steve Schmeck