Although you can certainly plant too
early even in a cold frame, it does give you, and the seed, a chance to get an
earlier start than open ground planting might allow.
Of course, cold frames are not just spring tools, though that’s
their busy time. I use them as well in the fall, and some years all summer long.
In milder climates winter is their season. With the varying and unpredictable
weather we have, they are a tool to reach for any time of the year.
In our short growing season of the upper Midwest, cold frames
are more than just an interesting tool, they are a necessity in my quest to grow
most of the food we eat. They ease the "frost stress" part of
gardening, which makes this gardener a happier camper. And they allow for more
in-season-out-of-the-garden eating, which makes for healthier, happier, and
richer homesteaders. Besides which, they are easy and inexpensive. I wouldn’t
want to garden without them.
MAKING THE COLD FRAME -- Cold
frames can be fancy or simple. Like many of the tools on our homestead, ours are
straightforward and functional, using recycled and scrap materials. Our current
frames are of two designs based on the windows used for the tops. I prefer glass
for glazing over plastic, not only because of the non-disposable aspect
(important to me) but because they are heavier and not as apt to blow off in a
wind. Even with that weight, I’ve had a few go flying in a good gust, but it
is rare and in over twenty years have only had two break. It’s nice to make
use of something destined for the landfill rather than buy new something that
will have to be landfilled and replaced many, many times over the life of the
cold frame.
 INSET FRAMES: We made our first cold frame windows ourselves because we had
extra glass left over from building our house. Window glass is also readily
available in old windows whose frames are past use (or that had lead based paint
which you don’t want in your garden). Just remove the frames and use the
glass. Or look for good, used framed windows. Our homemade window frames are of
simple, overlapped corners design, made of pine.
INSET FRAMES: We made our first cold frame windows ourselves because we had
extra glass left over from building our house. Window glass is also readily
available in old windows whose frames are past use (or that had lead based paint
which you don’t want in your garden). Just remove the frames and use the
glass. Or look for good, used framed windows. Our homemade window frames are of
simple, overlapped corners design, made of pine.
Whether you make your own or use recycled windows, scrape off
any loose paint and caulk around the glass with silicone sealant. You can use
any non-toxic oil finish for the wood (remember, this will be in your garden).
An inexpensive and easy solution we’ve used is two parts raw linseed oil to
one part turpentine. I’ve also used a more expensive commercial pine-tar based
product, thinned with raw linseed oil to make it go farther (it is a black
finish). Boiled linseed oil would be fine, too. Or just leave the wood
unfinished.
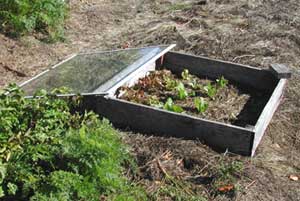
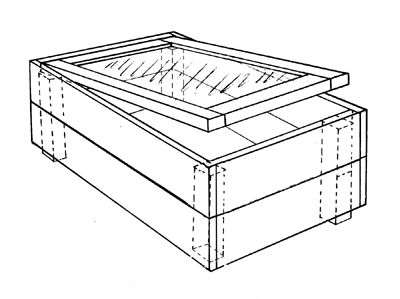
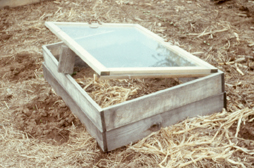
You could set your windows on a plain wood box for a cold
frame, and I’ve done that. It works, but if your window frame isn’t flat on
the bottom, there will be a too-generous air leak on two edges. And when you
tilt the window up for air circulation (which you will be doing quite often), it
has a tendency to slip right off the back of the box. Our solution for this set
of windows was to build the frame box large enough to set the windows down in.
The
size of your box will be determined by the size of your windows. Add a half inch
to the measurement of the window (both length and width) and that will be the
inside dimensions of your box. The extra half inch (1/4" on each side) is
important because your box is likely to swell and warp some in the rain and sun,
preventing you from opening the window if it is too tight. It does give space
for some air leakage, but I’ve not found that to be a problem. I rather prefer
the design because of that little bit of air circulation.
Use whatever wood you have or is available. Our first boxes
were of poplar -- probably one of the least recommended woods for outdoor use.
But it was what we had, and those boxes lasted for many years (long enough I can’t
remember just when we first made them). When they finally did rot enough that
they were falling apart at the corners, we rebuilt out of salvaged wood from our
torn-down chicken coup -- a combination of poplar, pine, and cedar -- much of
which was, itself, salvaged from some other project! As with the window frames,
just make sure the wood doesn’t have a toxic finish you don’t want in your
garden.
Cut your boards to size, then nail or screw them together at
the corners to form a box. We’ve found deck or drywall screws to work well.
Then make 2x2" blocks for the corners. Two of them, installed in opposite
corners, should be as long as the width of your boards (the height of the cold
frame box). The other two, installed in the other opposite corners, should be
the width minus one inch. Install (with appropriate sized screws) the long ones
so they stick down one inch, the other two so they are even with the bottom of
the box. This way all of the corner pieces are one inch down from the top and
this is what the window rests on, inside of the box. In both securing the boards
to each other and installing the inside corner pieces, it helps to first drill
holes for the screws. The corner pieces not only hold up the window, they add to
the rigidity of the box which is necessary since you’ll be moving the boxes a
lot over the years.
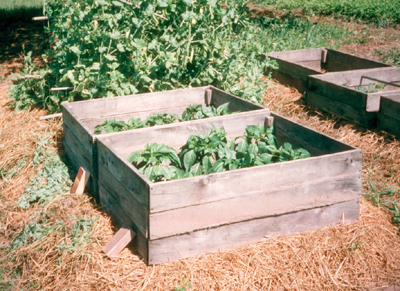
So what about the two corner pieces that stick down? Well,
one box is seldom tall enough for the cold frame as the plants grow so you will
soon want to add one (or more) boxes, one on top of each other. These lowered
corner pieces fit into the box below and help stabilize the stack, keeping you
from pulling the top box off as you open and close the windows. It’s not
necessary, but it helps a lot.
The last refinement is to add some type of handles to your
windows so you can easily open them. Ours are a wide variety of salvaged and
homemade designs. Anything that will allow you to lift the window up for
propping it open will do. Since my frames are rectangular and used sometimes
across and sometimes lengthwise on a bed, I have handles on two adjacent sides
of the window.
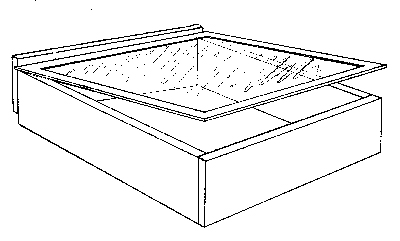 TOP SET FRAMES -- Another simple design is the top-set frame, but with a slight
enhancement to keep the window from slipping off the back. We came up with this
second cold frame design when a friend gave us a batch of old aluminum clad
windows he’d replaced on a job. They were pretty flimsy compared to our
wood-framed windows, and not easy to attach a handle, so we made a box they
could sit on. This design can, of course, be used for any window that is flat on
the bottom, whether metal or wood framed.
TOP SET FRAMES -- Another simple design is the top-set frame, but with a slight
enhancement to keep the window from slipping off the back. We came up with this
second cold frame design when a friend gave us a batch of old aluminum clad
windows he’d replaced on a job. They were pretty flimsy compared to our
wood-framed windows, and not easy to attach a handle, so we made a box they
could sit on. This design can, of course, be used for any window that is flat on
the bottom, whether metal or wood framed.
We had also been given some pallets which we tore apart to
use for the boxes. These boxes are slightly smaller than the dimensions of the
window with the back board (which should go entirely across the back) sticking
up 1/2" to 3/4". The window then sits on top of the front and sides of
the box, snug against the raised back board. This prevents the window from
sliding off the back when propped open, and gives some stability when the boxes
are stacked as the raised board of one snugs into the raised board of the other.
With the aluminum windows, we sized the boxes so the window would stick out over
the front edge which allows us to easily lift the window.
These boxes also have 1 1/2" to 2" corner pieces to
sturdy up the box, particularly needed since our pallet lumber was only
1/2" thick. These salvaged cold frame boxes are pretty fancy with wood of
cherry, maple, and oak. They definitely weigh more than the poplar and pine
ones!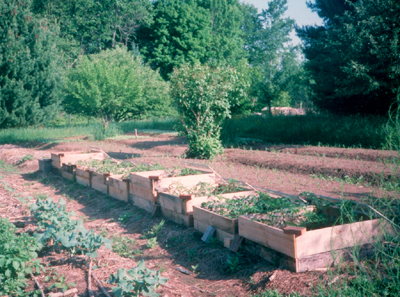
USING THE COLD FRAMES -- The
biggest danger of using cold frames is forgetting to open the windows on a sunny
day. Plants will be damaged more by over heating than cold. So a prop is an
important part of the system. I’ve found a 6" length of 2x4 to be a good
prop giving you three easy options for how far you want the window open --
2", 4", or 6". Generally my cold frames are set up to open from
the south, but if there is a strong wind out of the south, I will prop them open
on the north to keep a gust from flipping the window off. Since my frames are
set flat on the garden beds, there is really no front or back, so they are quite
flexible.
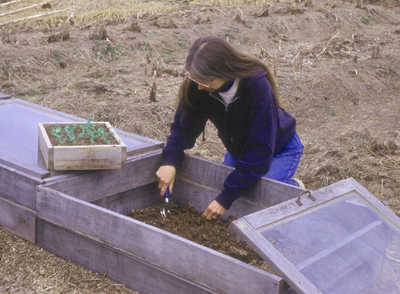
On a warm, sunny day the windows can be simply lifted up and
slid over the back edge of the boxes (or to one side), depending on what other
plants are nearby. If you are going to be gone and it is too cold to leave the
windows open, cover the cold frame with a blanket or rug. It is better to have
the plants in the dark for a day or two that have them freeze or cook.
MINI-GREENHOUSE -- If you don’t
have a greenhouse (or even if you do), you can make a large cold frame to do the
job of starting seedlings. For many years we had a five window long permanent
cold frame in the garden made of discarded windows with back and front walls of
used unmortared cement blocks. The back was taller than the front and the sides
were made of scrap boards. We also put scrap boards on top of the cement blocks
nailed to blocks of wood wedged into the blocks to make a nicer top for the
windows to rest on. Into this large garden cold frame, I moved my
windowsill-started plants as soon as it was warm enough. I also started many
crops such as the coles and cucumbers directly into the cold frame dirt,
transplanting later into the garden. For squash seedlings it was great as you
could use a shovel to transplant and so avoid the transplant shock usually
associated with the cucurbits.
We now have a greenhouse and that does do a better job,
particularly with the warm weather crops such as tomatoes and peppers. But a
large, permanent cold-frame can perform surprisingly well, either as a
substitute or as a supplement to the greenhouse. The large area is warmer than
individual cold frames which the early plants appreciate.
 CROPS IN THE COLD-FRAME -- Once you have a few cold frames, you’ll find many
uses for them throughout your garden. You will soon be scrounging up materials
to make more. In the late-summer and fall I start lettuce seedlings in a cold
frame box in the garden. As the weather gets cold and frosts and freezes arrive,
I add the window to protect them, propping it open on warm days. As the cold
settles in, half of the seedlings get transplanted to the greenhouse for late
fall and winter eating, the others continue to grow in the cold frame in the
garden. As the freezes end our regular lettuce crop, we eat the cold frame
protected plants until winter and deep snow arrives and our harvesting turns
inside to the greenhouse (where the plants are, hopefully, well along and
producing). In a milder climate this could continue throughout the winter, and
for other crops.
CROPS IN THE COLD-FRAME -- Once you have a few cold frames, you’ll find many
uses for them throughout your garden. You will soon be scrounging up materials
to make more. In the late-summer and fall I start lettuce seedlings in a cold
frame box in the garden. As the weather gets cold and frosts and freezes arrive,
I add the window to protect them, propping it open on warm days. As the cold
settles in, half of the seedlings get transplanted to the greenhouse for late
fall and winter eating, the others continue to grow in the cold frame in the
garden. As the freezes end our regular lettuce crop, we eat the cold frame
protected plants until winter and deep snow arrives and our harvesting turns
inside to the greenhouse (where the plants are, hopefully, well along and
producing). In a milder climate this could continue throughout the winter, and
for other crops.
Spring is when the entire troupe of
cold frames end up out in the garden, some going from one crop to another,
others sticking with their initial inhabitants until the weather warms and
stabilizes. Lettuce and greens are the first -- some to be planted in a cold
frame, others transplanted from the greenhouse. These first outside-grown early
greens are appreciated as no others can be. Sometimes I try some extra early
carrots as well, though they don’t do as well as those planted when the
weather is more suitable.
As the weather warms, I set out frames to
start cucumber and squash seed in, planting directly into the ground where they
will grow. Later the greenhouse tomato and peppers seedlings are transplanted
into more frames. As they grow, frames are stacked on to keep up. Hopefully, the
weather warms up before I run out of frames. The early lettuce and greens are
sturdy enough by then to have their frames removed and they can be used
elsewhere.
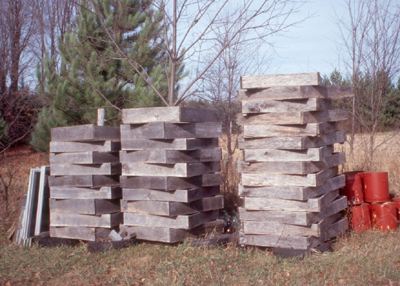 In a good year (thankfully most years), as summer arrives and frosts abate, the
cold frames are removed from all of the plants. Four of the windows go on the
solar food dryer, while the rest are stored in the shed until needed in the
fall. The boxes are stacked out of the way not too far from the garden. If you
stack them up off the ground, kitty-corner to one another in the stack, they
will dry better and last longer. I’ve found old tires to be a good base, as
are used cement blocks.
In a good year (thankfully most years), as summer arrives and frosts abate, the
cold frames are removed from all of the plants. Four of the windows go on the
solar food dryer, while the rest are stored in the shed until needed in the
fall. The boxes are stacked out of the way not too far from the garden. If you
stack them up off the ground, kitty-corner to one another in the stack, they
will dry better and last longer. I’ve found old tires to be a good base, as
are used cement blocks.
There are those years, however, that some of the frames never
leave the garden. Those are the cold, cloudy summers that make us worry if we
will get even one ripe tomato to eat, let alone enough to can. These are the
times that we really appreciate the cool weather cole and root crops as we
continue to stack cold frames on the pepper plants as they grow, snug and warm
in their protective boxes, producing in spite of the weather. Cold season
gardeners often manage to grow melons and watermelons this way as well, and the
smaller varieties of tomato plants, too. Larger plants usually soon outgrow
their cold frames and take their chances with the weather with blankets to cover
them on frosty nights.
If you’ve spaced your plants right, you can replace the
cold frames in the fall over the full grown plants to get them through those
early frosts, and extend the harvest just a few more weeks. There is some aspect
of game and some of challenge, along with fun and just plain gathering for food
in gardening. No matter which, cold frames can help the gardener out, and make
the gardening life a little easier. If you take your plants’ natural needs
into consideration, they, too, can appreciate the cold frame as much as we do a
good sweater on a cold night.
*
* * 2008 * * *
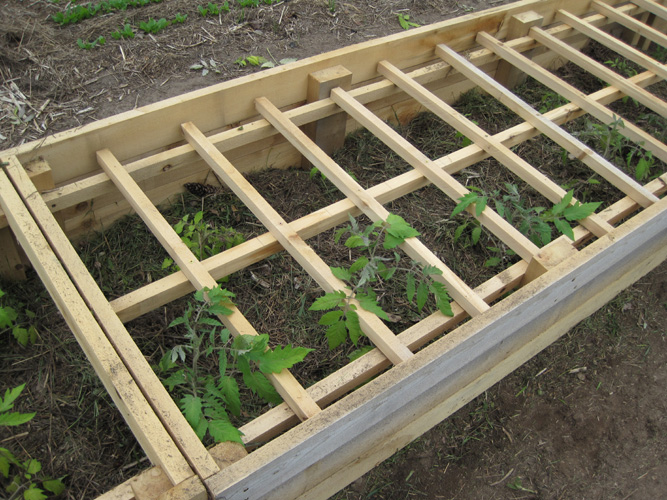
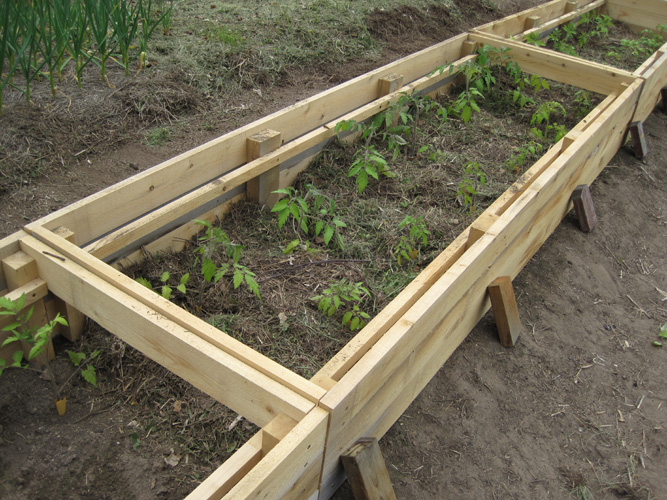
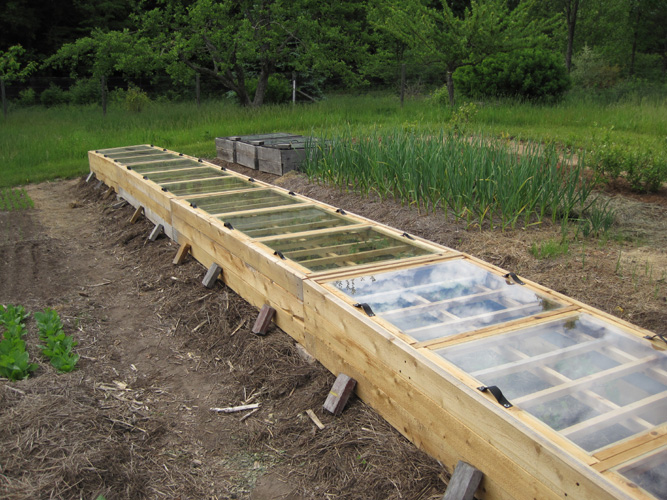
The above
article was written many years (decades!) ago, but I'm still (2021) using the
same or similar cold frames. Some boxes have been replaced, some windows redone,
but they are still one of my most important gardening tools. The individual
boxes above work fine but some years ago I envisioned a larger, plot sized cold
frame for my tomatoes, with removable rack to hold semi-determinant plants
upright. Steve helped me design and build it and it has been great -- four eight
foot long cold frames, which fit my 4 ft x 32 ft plots. The last few years when
I didn't grow so many tomatoes they served well for peppers, and squash. They
are no longer fresh-wood-gold colored now but they still work great.
Copyright
© Susan Robishaw