If you
already have raised beds, then you’ll know what I’m talking about. If you don’t,
I think you are in for a pleasant surprise at the benefits. There is a myth that
it’s much easier and faster to get out that roaring tiller or tractor and take
care of the entire garden at once. That may be, but having done it both ways, I
don’t think so. Not in the long run. And I’ve discovered that doing things for
the short run almost always means a lot more work, and time, later. As much as I
love gardening, and the time I spend growing food is not begrudged in any way,
there are many other things I want to do as well. So I have permanent raised
beds.
WHY RAISED BEDS?
One of the best aspects of permanent beds is, to me, psychological not physical.
Instead of being confronted with a big expanse of ground that needs to be
planted (or weeded or tended or harvested), I can easily take it one bed at a
time. Thinking about weeding one bed is a whole lot less work for the brain than
thinking about weeding the entire garden. It’s surprising the difference that
makes. Rather like the satisfaction of a good conversation with one person,
instead of the chaos of talking with ten people at the same time.
For the plants and soil communities, having a bed that is not violently
disrupted on a regular basis makes for a healthier and happier crew. It allows
them to develop, nurture and maintain their systems and networks. And that
allows us to harvest a lot of good food year after year. When we participate in
cooperative gardening, with full respect for all of the participants, instead of
divide and conquer combat, amazing things happen. Gardening becomes a satisfying
part of our lives instead of a chore. It doesn’t eliminate the weeding, however.
Having your rows consolidated into regular (or irregular) plots or beds, with
paths between the beds instead of between every row, means more of your garden
will be involved in growing food, instead of weeds. There will also be less
compacted soil for the roots and beneficial organisms to deal with. And when you
add your scarce and valuable compost, it’s easy to put it where the plants will
be, not be wasted on walking paths.
Isn’t it easier to till weeds than pull them out by hand? If you have sod or a
massive plot of weedy ground, it probably is easier to till or plow it in. To
begin with. And depending on the weed plant. Funny thing about weeds is (well,
it’s only humorous when you’re in a particularly good mood), many of them thrive
on being chopped up. That’s just a good excuse to propagate and spread. But I
don’t think they really have anything against being pulled up root and all to
rot and compost on top of the soil. It’s all a part of the game.
I prefer the pull once routine, rather than having them grow up again soon after
they’ve been tilled in. It is pretty easy to pull a weed from a non-compacted,
mulched permanent bed. There are always new weeds to deal with, of course, but
they are quite manageable. And a good mulch helps a lot. A hoe works fine, too.
Usually I go over the beds before planting in the spring, then once again
mid-summer, and that pretty much takes care of things -- along with the natural
pulling of weeds as I harvest or walk through the garden. Unless there is a bad
infestation of something, this is a here and there kind of thing. My beds are
never completely weed-free, but they are a background, not the foremost thing in
the garden. And they are a natural part of the community. Weeding gets you down
in personal contact with that community, and when it’s not overwhelming, this
can be an enjoyable relationship.
MAKING THE BEDS
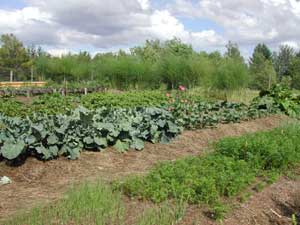
You can have permanent beds without having raised beds, of course, but I find
the small rise makes it easier on the body when tending to the things on the
ground. So I make raised beds, the top of the bed being maybe six or eight
inches higher than the paths. It varies year to year and bed to bed. And one
side of my beds is higher than the other since the land is on a gentle slope
with the beds laid out across the slight hill like small terraces.
I like to make new beds in the autumn, which gives them the winter to settle in.
But you can make them anytime you can work in the garden, one plot at a time, or
a portion of the garden, or the whole nine yards -- whatever suits your personal
gardening schedule. If it’s new ground, I give it at least one season of growing
and tilling in green manure. If it is an established garden, till it one last
time when everything has been harvested. You can made beds without tilling the
ground first, but it does make it easier.
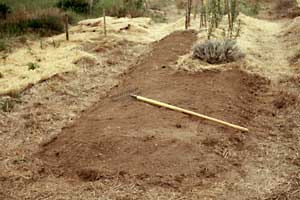
Once the area is worked up, string line every 3 1/2 feet where you want your
beds to be. If your land slopes, go across the hill to help prevent washouts
running down hill down your beds. Though if you mulch and your soil is well
endowed with organic matter, this isn’t going to be much of a problem unless
your slope is fairly steep. Depending on the shape of your garden, and personal
preference, you’ll want a path or two running up and down across the rows. Mark
where those paths will be as well. After many years and various configurations,
most of my beds ended up being about 30 feet long. Any longer without a cross
path and you’ll end up walking across the bed anyway for convenience. You might
as well make a designated path.
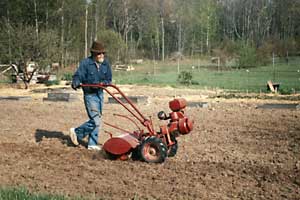
Now go down every other wide row (which will be the beds) with a garden fork,
loosening up the soil as far down as your fork will go, going backwards down the
row so you aren’t walking on the soil once you’ve loosened it. Tillers (and
plows) are notorious for making a firm, compacted plow-pan just under the tines.
The plant roots will appreciate your breaking this up a bit. I’m not talking
about double digging or anything so drastic and disruptive. Just push your fork
down as far as it will go and pull back to loosen up that plow-pan. Then
continue across and down the bed. It doesn’t take that long once you get a
rhythm going, though for muscle sake, you might want to spread this chore over a
number of days if your garden is very large.
Then go down the adjacent path shoveling soil onto the bed. You don’t need to
dig down, just skim off the top loose soil. If you want higher raised beds, take
more; for shorter beds, take less. Or if you don’t want raised beds at all, skip
this step. Just keep the paths/beds marked until it is obvious which is which.
Just by walking only in the paths and not in the beds, the growing area will be
slightly higher naturally.
Take the strings down and flatten the beds with the back side of a garden rake
(or whatever works best for you). The formed beds will end up being about four
feet wide on top, and the paths about 2 feet (the other foot being the sloped
sides of the bed). I’ve found this to be a convenient reach for working in the
beds, with enough room for walking and
 running the wheelbarrow in the paths. If
you want more or less, adjust your strings appropriately before you start making
the beds. If I did it again I'd make my paths narrower but this arrangement does
give you comfortable room to maneuver.
running the wheelbarrow in the paths. If
you want more or less, adjust your strings appropriately before you start making
the beds. If I did it again I'd make my paths narrower but this arrangement does
give you comfortable room to maneuver.
Since the soil has been unnaturally aerated and fluffed with all this digging
and moving, you’ll want to let it settle back to normal before planting. If this
is a fall project, cover with a blanket of mulch and it will be all set to plant
in the spring. If you're doing it in spring or summer take a piece of plywood or
such and work it on down the plot, stepping on the plywood as you go to gently
tamp the dirt down.
BED SIDES
In the raised bed crowd there are the permanent sided folks, and the natural
sided folks. They both have their pros and cons. I’ve found the natural dirt
sides to suit me best. It allows for the most flexibility in moving and changing
beds, and is the easiest. I can rake the beds to whatever widths I want --
narrower for tomatoes, wider for peas. I can easily (and have a number of times)
change the layout and length of my beds, moving paths, adding or taking out
trees or shrubs, making the garden larger, and smaller. I guess I’m not a very
static person, and my garden reflects that.
However, those who put in permanent sides, whether wood planks or beams or stone
walls, like them as well. Suit yourself. Try it both ways. If you have trouble
physically kneeling or sitting on the ground to work among the plants, then a
firm wall you can sit on could be a great help. You can make it as high as you
need. Paths can be made wide to accommodate wheelchairs or walkers. Gardening is
wonderfully adaptable.
PATHS
Wide or narrow, mulched or naked, one thing most paths have in common is weeds.
In general my entire garden is mulched, including the paths. So weeds aren’t an
overwhelming problem, unless I’m short of mulch. I try to make it a point to
weed the nearby path whenever I’m weeding the bed. If I don’t, I tend to ignore
the paths. If they get particularly weedy, I rake the mulch off (up onto the
sides or top of the adjacent bed) and spend some time with the hoe. Then I
remulch before the weeds have a chance to take over again. Pulling by hand works
best, however, with a sturdy trowel or knife for the stubborn ones. If you do it
after a nice rain when the soil is moist it's easier.
You can also till your paths. But that makes a mess, and then you have to rake
it flat several times or it gets pretty lumpy from your footfalls in the loose
dirt. Mulch is so much more pleasant and easy.
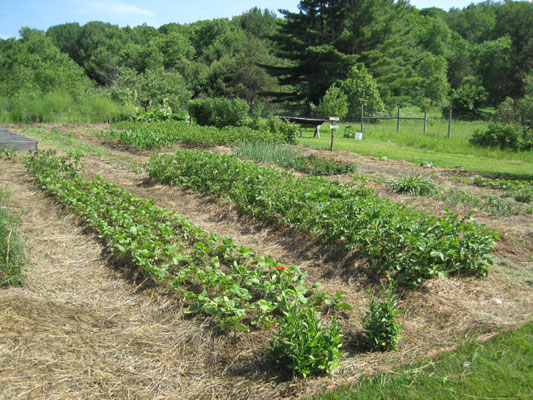
Another advantage to permanent beds is being able to easily leave areas
undisturbed for various crops. You can have a bed of strawberries in your
garden. You can plant your garlic in the fall when it is convenient, without
working around the fall tilling or plowing schedule. You can let certain plants
(such as dill, or chamomile, or seed plants) self-sow, to grow new plants in the
spring without your having to plant the seed. You can put a permanent herb bed
right in the middle of your vegetable garden if you want. Or a bed of
raspberries, or blueberries. Maybe a flower bed. Maybe a fountain!
Permanent beds require a different perspective and planning than the tilled
garden, but if you allow yourself that change of view I think you’ll enjoy the
scenery. It’s one step closer to Nature’s permaculture, and a very satisfying
way to garden.
* * * * * *
Copyright
© 2002 by Susan Robishaw
 2022
-- Twenty years later (how funny to write that but that's how long it's been!).
I'm still gardening, still have permanent raised beds, still passionate and
loving it. The garden size has changed over the years, having added and
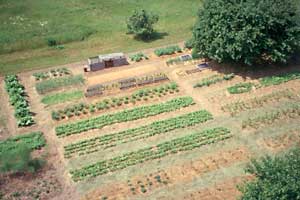
subtracted beds. It's about 50 feet by 80 feet now, with sixteen beds, including
berries and perennials. At some point I made the paths narrower so I wouldn't
have so much space to mulch. I like it, it's fun, and it feeds us well. I'm
looking forward to the next 20 years!
2022
-- Twenty years later (how funny to write that but that's how long it's been!).
I'm still gardening, still have permanent raised beds, still passionate and
loving it. The garden size has changed over the years, having added and
subtracted beds. It's about 50 feet by 80 feet now, with sixteen beds, including
berries and perennials. At some point I made the paths narrower so I wouldn't
have so much space to mulch. I like it, it's fun, and it feeds us well. I'm
looking forward to the next 20 years!
The management of the
perimeter of the plot has changed over time. I've tilled it, mulched it,
carpeted it, hoed it. It was always a challenge to keep the grass and vegetation
surrounding the garden from enthusiastically moving into that wonderful, rich
garden soil.
Years ago I had a patch of rhubarb growing behind the compost bins between
them and the yard. It did a great job of keeping the grass back by heavily
mulching that space with their large, thick leaves. I figured rhubarb had to
be the ideal barrier plant but I really didn't want THAT much rhubarb.
Surely there were other plants that would do, so the idea of a border
barrier bed grew. I researched possibilities, imagined outcomes, made lists,
bought a few plants but mostly ended up using what I had. One of the most
challenging areas was along the asparagus bed which is along the east side
of the garden. The grass and sorrel loved to make their way into that
fertile soil and it was hard to get out. So I made a new adjacent bed,
taking some of the asparagus space (there was more than we needed)
(asparagus does not give up its space easily I soon found!) along with the
current path, digging, raking, weeding, reconfiguring the space to suit me -
6 feet wide, half of the width for the asparagus, half for the new bed - so
I can easily reach across to care for both from their respective sides - 45
ft long.
I filled the new bed with plants that will spread out to mulch their space
but not spread so much as to invade the asparagus. At least that's the plan;
we'll see. Some plants will take a few years to spread, others are already
doing their best to fill their space. Mainstay and king of the
mulch-barrier-plot Rhubarb is at either end, in-between sits Oregano,
Russian Sage, Borage, Catnip, Tarragon, Stachys, Hyssop, Helenium,
Coneflower, Lemon Lillies (these I know will need to be thinned often to
keep them in their space - they are amazing spreaders!). In between all I
planted annual Chard and Broccoli to help fill the spaces as the perennials
grow. Chard is doing a great job and may end up being a permanent resident.
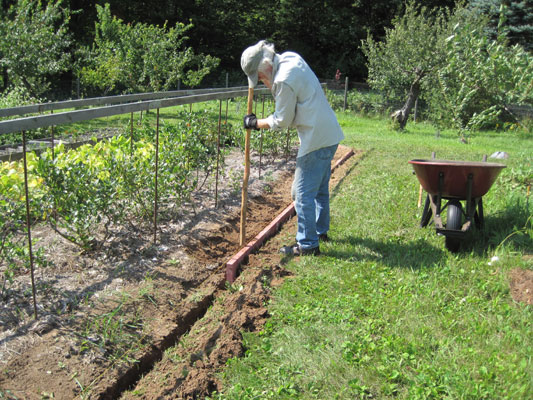 That
worked more or less, depending on the plant. But it wasn't a solution for the
entire garden. Finally I made the decision to put a solid barrier around the
whole thing. I decided, but Steve did the
work. Most trips to Escanaba included a stop at Menards to pick up our quota
of 20 inexpensive paving blocks. That was all we could safely haul in the Prius
at one time (and maybe too many, with necessary spring and shock replacements
later!). The stack grew and grew, then Steve started the job, August 2017,
first along the south border in front of the raspberries. That seems to be
working well so he dug in and went up along the east edge along my new Border
Barrier Bed. The routine continued the next year, and the next, until the entire
garden was surrounded.
That
worked more or less, depending on the plant. But it wasn't a solution for the
entire garden. Finally I made the decision to put a solid barrier around the
whole thing. I decided, but Steve did the
work. Most trips to Escanaba included a stop at Menards to pick up our quota
of 20 inexpensive paving blocks. That was all we could safely haul in the Prius
at one time (and maybe too many, with necessary spring and shock replacements
later!). The stack grew and grew, then Steve started the job, August 2017,
first along the south border in front of the raspberries. That seems to be
working well so he dug in and went up along the east edge along my new Border
Barrier Bed. The routine continued the next year, and the next, until the entire
garden was surrounded.

I like it. It looks a little
more formal (in a homestead kind of way) than I'm used to but it works much
better than anything else.
Copyright
© Susan Robishaw