A
hardy perennial of the mustard family, grated horseradish root has been enjoyed
as a condiment for centuries. Not as common as mustard sauce in this country, it
is still a favorite for many and well deserved of its special status. There are
few crops that give so much for so little work.
I started
growing horseradish in our first few years of gardening. Having read that it was
good to plant with the potatoes to keep potato beetles at bay, I carefully put
roots at each end of the potato plot. As I was also diligently rotating all my
crops in those days, following the expert advise I’d read, the venerable
horseradish followed our potatoes through the garden. As I gained more
confidence in my gardening skills I began to depend more on my own thinking and
observation than the book lore. And it was soon obvious that the
horseradish/potato team was one of those "better in theory than
practice" recommendations. Not that they didn’t do well together, but the
horseradish left a trail of persistent offspring behind while the potato bugs
were content to follow the potatoes wherever they went, with or without the
horseradish.
In spite of
frequent and careful digging, I wasn’t able to clear the plots of horseradish
until we moved our garden right out of that area. Even then the horseradish
persists, and 20 years later it is still there among the grasses and plants of
the field.
GROWING --
Though horseradish will grow in such conditions, it grows better roots for
harvesting if given its own space and attention. It favors rich, deep loam and
will not thrive on overly sandy or dry, gravely soil. And being a deep root
crop, it needs depth to grow, so a hard subsoil won’t be to its liking either.
But in the wide area between the extremes, which is pretty much any healthy
garden soil, it will give you a good crop with little fuss. Give it a spot of
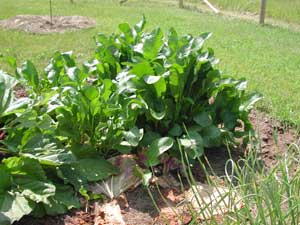
its own where its spreading habit can be contained. It’s a large leafed, tall
perennial plant so make sure it won’t be overpowering a more delicate
neighbor.
Some years ago,
in one of my many garden rearrangements, I invited our horseradish out of the
field and back into the garden. I had space at the end of the new rhubarb bed
which seemed the perfect spot. Being at the edge of the garden, it has tilled or
hoed border on two sides, rhubarb on another, and a well mulched path on the
inside. A great home for the enthusiastic horseradish. Though the bed was new,
it was part of the old garden so the soil was good. Both the rhubarb and
horseradish responded to these fresh, rich digs with such enthusiasm that I will
be happy when the soil wears out a bit.
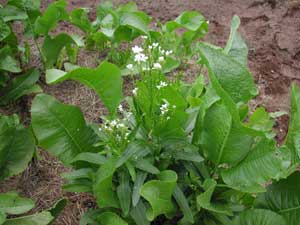 Though horseradish flowers, it seldom sets viable seed so
propagation is by root or crown divisions planted in early spring or in the
fall. It doesn’t take much of a root piece to get the horseradish growing,
which is why it is so hard to eradicate once established, but you’ll get a
better plant (and root) with a good sized start of root or crown. Plant the
crowns as they were growing originally, with the top level with the top of the
soil, and the roots horizontally several inches deep in the soil, 12 to 18
inches apart in the bed. Mulch it well and let it grow, adding more mulch later
as needed. As with most crops, if you have decent soil and a good mulch, you won’t
need to artificially water the plants. They can handle the wet years and the dry
years, the cold and the hot.
Though horseradish flowers, it seldom sets viable seed so
propagation is by root or crown divisions planted in early spring or in the
fall. It doesn’t take much of a root piece to get the horseradish growing,
which is why it is so hard to eradicate once established, but you’ll get a
better plant (and root) with a good sized start of root or crown. Plant the
crowns as they were growing originally, with the top level with the top of the
soil, and the roots horizontally several inches deep in the soil, 12 to 18
inches apart in the bed. Mulch it well and let it grow, adding more mulch later
as needed. As with most crops, if you have decent soil and a good mulch, you won’t
need to artificially water the plants. They can handle the wet years and the dry
years, the cold and the hot.
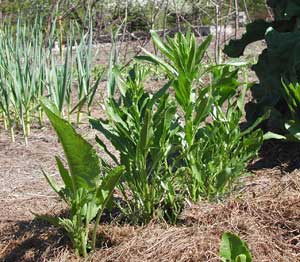
If well grown,
the horseradish coexists amiably with the various insects that enjoy the plant.
Flea beetles like to pepper my plants in the spring, but the leaves soon outgrow
the onslaught and everyone is content. I’ve never had a problem with root
maggots, but if you do, a sprinkling of wood ashes around the plants during the
early season should help, as it does for the related radishes and cabbages. If
your horseradish is overrun with pests, it’s likely your soil is not adequate
for good growth. Work on the soil and let the horseradish and birds work on the
pests.
The plants grow and the roots enlarge and thicken as the season
progresses, working toward those tanned skinned, white fleshed, fairly firm
roots that have such a firey reputation to, as the 1937 Taylor’s
Encyclopedia of Gardening says, "tickle the jaded appetites of the
overfed". Or simply to add some welcome spice to the homestead meal.
DIGGING --
Horseradish roots can be dug any time the ground isn’t frozen. But as with
most root crops, it is at its best in the fall, and even better after cold
weather has arrived but before the ground freezes. This is generally when the
bulk of the roots are harvested. You can harvest the first fall after planting,
but it might be better to let it grow another year to let it get established.
The plant grows a large, long taproot with many branches and long side shoots.
If you are going to grate the root by hand, you’ll want only the sturdy main
root. But if you are going to chop or use a blender, then you can also make use
of the larger of the side shoots.
When ready to
harvest in late fall, I rake off the mulch, roughly dig up the main plants with
a garden fork, and take the often branched main root and a number of the long
slender shoots. There are many shoots and roots left throughout and I rake the
dirt back and let it go at that. Of course, there goes the nice and neat
spacing, as next spring the plants will now grow here and there as they will.
But it works and is an easy way to manage the plot. However, you can be more
diligent in harvesting roots, pulling all you can find, then replanting 6 or 8
inch lengths of pencil or small finger size roots, or divisions of the crown of
the main root as you did originally. There will still be many missed roots
putting up small shoots, but the main plants will be as you planned and planted.
This will probably give you a better crop.
You can also
just dig up roots as you need them. If you have a thick mulch, or deep early
snow, the harvesting period can be extended until the depth of winter. Roots can
also be dug in late winter/early spring when the ground thaws. But the plant
starts growing early so this harvest window is usually fairly small. Once growth
has started, its best not to disturb the plant so it can put all its energy into
producing good roots for fall, and not have to spend time repairing damage done
by mid-season harvesting.
ROOT STORAGE --
If you want a continuous supply of horseradish sauce and you live in the far
north, you’ll need to store roots for making fresh sauce throughout the winter
and spring. If well stored, roots can probably be saved and used on through the
summer, but so far I haven’t had enough roots left to try that. Besides, for
us, horseradish sauce isn’t as much desired in the summer as winter.
Roots can be
stored neatly in slightly damp sand or leaves in a cold (but not freezing)
cellar or space over winter. Or, as I do, put a layer of leaves or mulch in the
bottom of a plastic bucket, put in as many freshly dug roots as will fit, cover
with more leaves or an old towel. This works, too.
Use the smaller and damaged roots
first, as the better and larger roots will store longer. You could also dig a
trench in the garden to store the roots with other root crops such as potatoes
and carrots. Buried and covered with a thick mulch, they can be harvested until
the snow gets too deep or the ground freezes. In early spring, these roots will
be much fresher and in better shape than cellar stored ones. You run a risk of
unexpected deep freeze or rodent damage, but the quality is worth the chance if
you have enough roots.
The longer the
roots are stored, the less pungent (relatively speaking) they will be, which can
be a positive or negative effect depending on your taste. The prepared sauce
also becomes mellower with age.
SAUCE -- Our
sauce experience is rather mild compared with true horseradish affectionadoes,
though we’re quickly becoming heavy users. I barely remember the first sauce I
made from a few roots grown in our first back-yard city garden almost 30 years
ago. But I DO distinctly remember the result when I took the lid off the blender
for the first time -- GASP, GASP!! Great stuff for clearing the
sinuses--instantly, and cheaply. Highly recommended.
After we moved
to our northwoods homestead, and having grown the stuff for several years, I
decided I really needed to do something with it. At that time, I felt I had to
can or preserve in some fashion everything I grew or could harvest. But the only
thing I knew to do with horseradish sauce was as a condiment with meat. And,
living without refrigeration for the first time, we were well on our way to a
non-meat diet. I did harvest some roots though and decided to give it a try.
Our electricity
was limited then and came from our sole solar panel. Besides, we had left the
blender and other such encumbrances behind. So I got out the simple but
effective common box grater and (the earlier horseradish eye-watering experience
still fresh in my mind) took it out in the yard on a breezy day and grated up a
half pint for sauce. It did wash out a few tear ducts but not nearly as
violently as the blender in the kitchen had. I think I mixed it with vinegar,
per the preserving books I had, but still didn’t quite know what to do with
it. We not only weren’t eating meat, we didn’t have refrigeration. Living in
our small cabin, we didn’t even have much of a cool spot. And the books said
you had to keep the prepared sauce refrigerated. So we gave the sauce to my Mom
and Dad.
But the
horseradish was growing well, and I wanted to use it, so I figured I’d have to
can it. Not knowing quite how to do that, I wrote to the one source I thought
might be able to help -- Countryside magazine. How, I inquired, does one
can horseradish sauce?, hoping they (not knowing who "they" were at
that time) might print a reply in a future issue. To my great surprise, I
received a hand-written note back from the editor (also publisher, manager,
writer, man-of-many-talents), JD Belanger. One doesn’t CAN horseradish sauce,
he (I assume with some restraint) kindly explained, it would ruin the flavor. He
said he regularly made quarts of sauce, simply keeping it in the refrigerator,
and eating it with breakfast eggs every morning. QUARTS?! Wow.
Some 25 years
later, I’m still awed by receiving a hand written note (the first of many)
from a VERY busy man, and by his QUARTS of horseradish sauce. Thankfully, my
relationship with Countryside continued on with a steadier course than my
relationship with horseradish sauce.
Even when I moved my horseradish from field to garden, I didn’t seriously
consider making sauce. It was as much for having good roots to give away that it
made its way back into my life. A good friend, gardener and amateur chef, Peter
Copenhaver, mentioned wanting to get some horseradish growing on his and Melissa’s
new place. So the first harvest from the prolific new plot was a bucket of roots
and crowns for him to plant and make sauce. Later he kindly gave us several
half-pints of his prepared sauce in return. So of course we had to at least try
it. But with what? No meat to eat it with, and since our years of raising
chickens was long past, we seldom ate eggs.
A common supper
for us in fall and winter is potatoes (baked if the heating stove is going) with
various vegetables -- whatever is in season or in storage -- sauted and steamed
with onions and garlic. That’s what was on the table, so that’s what we
tried Peter’s horseradish sauce with. Wow! It was delicious, and a great side
for the potato dish. We were hooked. Those two pints went fast.
It was too late
in the winter then to dig roots, but the following fall I harvested a good crop
for both Peter and myself. We were now hooked on making and eating our own
horseradish sauce. But this time, there was no problem with how to store it. We
eat it too fast for one thing, but I also found the sauce keeps just fine for
many months in our cool root cellar.
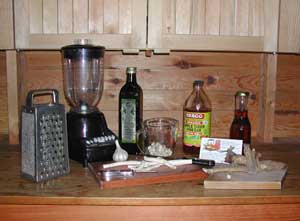
Although I knew
I could grate the roots with the grater, it is a slow process. So our next trip
to the St Vincent de Paul store gained us a small, used blender. Our solar array
was much larger now than our early one panel system, and we could afford the
electricity. Although still not fond of kitchen gizmos that take up too much
space and time, I do like the blender for making horseradish sauce. And although
we did the job outside in the woodshed that time, which was pleasant, we've
since made it in inside the house. Either our roots aren't as pungent as those
first ones we had, or we have become more tolerant.
 RECIPES -- Peter’s sauce had a great flavor, so I asked him for his
recipe. He didn’t have exact quantities, but this is what he thought he put
in:
RECIPES -- Peter’s sauce had a great flavor, so I asked him for his
recipe. He didn’t have exact quantities, but this is what he thought he put
in:
2 cups grated horseradish root
2 large cloves elephant garlic
2 tablespoons cane sugar
2 teaspoons coarse Kosher salt
1/8 cup Extra Virgin Olive Oil
2 teaspoons ground prepared mustard
1/4 cup white distilled vinegar (maybe more)
Sue's Sauce:
Being a homesteader, I adapted Peter’s recipe to my own preferences and what I
have on hand. This is my rough and ready recipe for the ManyTracks Horseradish Sauce:
Wash and scrape horseradish roots with a knife (small roots) or carrot peeler
(large roots). Cut into small pieces
4 cups chopped horseradish root
0 - 6 cloves regular garlic
1/2 cup olive oil
1/2 cup maple syrup or honey
1 teaspoon salt
0 - 4 teaspoons prepared mustard
maybe some chopped up pickles
1 to 2 cups cider vinegar (homemade is nice)
If using a blender,
add small quantities of root at a time with as much vinegar as needed to keep it
working. Add other ingredients and blend to your liking, adding vinegar for a
good consistency. If using a grater, grate the roots, mince the garlic, and mix
all the ingredients together. Put in clean jars. Makes 3 to 5 half pints.
Last year I had a mostly empty jar of yellow mustard on hand, so I
"rinsed" the jar with cider vinegar and used that in the horseradish
sauce. Nice! A bit of extra flavor and a beautiful pale yellow color (which
doesn't really fit the bite of the horseradish sauce, but I like how it looks).
So I've added mustard to my recipe.
Be prepared,
the fresh sauce is usually pretty potent, depending on the time of year and age
of your roots. Some like it freshly hot; while I like it better after the sauce
has mellowed for a month. Either way, it’s a great accompaniment for a variety
of meals, whether plain or fancy, hot or cold. It’s also an effective healing
herb for congestion, coughs, bronchitis and sinus problems. It's a great
addition to the cold climate garden.
Some questions
I've received (and answered):
* * * * * *
HORSERADISH FLOWERS -- I just discovered
your website when searching for how to grow and harvest this horseradish that is
taking over my garden. I inherited some plants in a garden plot when I moved
into this house the previous winter. Instead of ignoring it I am now looking
forward to making sauce this fall. My question is do I cut off all these white
flowers that are blooming on it? Someone said that it would direct more of the
plant energy to the roots. -- Sandy from Maryland
As you've no doubt noticed, horseradish can be quite a persistent weed! It's
hard to clean out of a garden but I found that by continually weeding and
pulling the roots out it does wear down after several years. Meantime, it's good
eating. I don't cut the flowers off and I have good harvests. Besides, many
pollinators appreciate the flowers and it's a small matter to leave them for
these hard working and wonderful creatures.
It's also usually said that one should keep rhubarb flowerstalks cut
and I wondered about that. So one year I didn't. The bees LOVED the flowers and
they were pretty and I still had a great rhubarb harvest, as usual. So now I
leave the flower stalks for the pollinators until the blooms fade, then cut them
off.
CANNING HORSERADISH SAUCE -- Well, I can
safely tell you never, ever can horseradish. I pressure cooked it, big mistake.
I followed directions from a website I found that gave a simple recipe and then
said pressure cook according to pressure cooker's manufacturing direcitons,
which there were none specifically for horseradish. So I did as I would a simple
relish. It made a nasty smelling mess of goo. Had to throw it away. Lost all of
the heat it had and tasted terrible, like rotten radishes. Never again. And yes,
you can pass this on. -- Michael
Thanks for sharing your experience! I think I'll stick to the simpler method I
use. You can also store the roots in a cool spot and make "fresh" batches now
and then. The roots will store longer than the sauce.
CANNING HORSERADISH
SAUCE -- Could you tell me how to can horseradish sauce?
--Donna, and --Cindy
Although you can buy "canned" horseradish sauce in the stores, none of the
preserving books I've seen talk about canning it. Years ago, when I first grew
and grated my own, I asked a long time homesteader and horseradish lover about
canning it and he said you shouldn't because the heat would ruin the flavor. But
it turns out it lasts a long time anyway without canning so that isn't a
problem.
In the fall I dig a bucketful of roots and store them in the root cellar
(any place cool would do). Then I process a batch of sauce (which is mainly
horseradish and vinegar) which fills four or five half-pints, and I keep the
jars in the cool cellar (our equivalent of a refrigerator). That lasts us for 2
to 3 months. When we run out, I do another batch from the stored roots. I've
never had any horseradish sauce spoil so I can say it will last at last 3 months
in cool conditions. A friend stores his in the refrigerator. Neither of us have
tried keeping it any longer. I do find that it mellows as it ages however (which
I like!).
I'm just ready to make the last batch from the stored roots which are
starting to sprout but are still good. That will be the last I'll make until the
fall harvest. You can dig the roots in the summer, too, but I prefer to leave
them to grow until fall.
* * * * *
Copyright © Susan Robishaw